Todos os programas processam dados de uma forma ou de outra, e muitos precisam ser capazes de salvar e recuperar esses dados de uma invocação para a próxima. Python, SQLite e SQLAlchemy fornecem funcionalidade de banco de dados aos seus programas, permitindo que você armazene dados em um único arquivo sem a necessidade de um servidor de banco de dados.
Você pode obter resultados semelhantes usando arquivos simples em vários formatos, incluindo CSV, JSON, XML e até formatos personalizados. Arquivos simples geralmente são arquivos de texto legíveis por humanos - embora também possam ser dados binários - com uma estrutura que pode ser analisada por um programa de computador. Abaixo, você explorará o uso de bancos de dados SQL e arquivos simples para armazenamento e manipulação de dados e aprenderá a decidir qual abordagem é a certa para o seu programa.
Neste tutorial, você aprenderá a usar:
- Arquivos simples para armazenamento de dados
- SQL para melhorar o acesso a dados persistentes
- SQLite para armazenamento de dados
- SQLAlchemy para trabalhar com dados como objetos Python
Você pode obter todo o código e dados que verá neste tutorial clicando no link abaixo:
Faça o download do código de amostra: Clique aqui para obter o código que você usará para aprender sobre gerenciamento de dados com SQLite e SQLAlchemy neste tutorial.
Usando arquivos simples para armazenamento de dados
Um arquivo simples é um arquivo que contém dados sem hierarquia interna e geralmente sem referências a arquivos externos. Arquivos simples contêm caracteres legíveis por humanos e são muito úteis para criar e ler dados. Como eles não precisam usar larguras de campo fixas, os arquivos simples geralmente usam outras estruturas para possibilitar que um programa analise o texto.
Por exemplo, arquivos de valores separados por vírgula (CSV) são linhas de texto simples nas quais o caractere de vírgula separa os elementos de dados. Cada linha de texto representa uma linha de dados e cada valor separado por vírgula é um campo dentro dessa linha. O delimitador de caractere vírgula indica o limite entre os valores de dados.
Python se destaca em ler e salvar em arquivos. Ser capaz de ler arquivos de dados com o Python permite que você restaure um aplicativo para um estado útil ao executá-lo novamente mais tarde. Ser capaz de salvar dados em um arquivo permite compartilhar informações do programa entre usuários e sites onde o aplicativo é executado.
Antes que um programa possa ler um arquivo de dados, ele deve ser capaz de entender os dados. Normalmente, isso significa que o arquivo de dados precisa ter alguma estrutura que o aplicativo possa usar para ler e analisar o texto no arquivo.
Abaixo está um arquivo CSV chamado
author_book_publisher.csv , usado pelo primeiro programa de exemplo neste tutorial:first_name,last_name,title,publisher
Isaac,Asimov,Foundation,Random House
Pearl,Buck,The Good Earth,Random House
Pearl,Buck,The Good Earth,Simon & Schuster
Tom,Clancy,The Hunt For Red October,Berkley
Tom,Clancy,Patriot Games,Simon & Schuster
Stephen,King,It,Random House
Stephen,King,It,Penguin Random House
Stephen,King,Dead Zone,Random House
Stephen,King,The Shining,Penguin Random House
John,Le Carre,"Tinker, Tailor, Soldier, Spy: A George Smiley Novel",Berkley
Alex,Michaelides,The Silent Patient,Simon & Schuster
Carol,Shaben,Into The Abyss,Simon & Schuster
A primeira linha fornece uma lista de campos separados por vírgulas, que são os nomes das colunas para os dados que seguem nas linhas restantes. O restante das linhas contém os dados, com cada linha representando um único registro.
Observação: Embora os autores, livros e editores sejam todos reais, os relacionamentos entre livros e editores são fictícios e foram criados para os propósitos deste tutorial.
Em seguida, você verá algumas das vantagens e desvantagens de usar arquivos simples como o CSV acima para trabalhar com seus dados.
Vantagens dos arquivos simples
Trabalhar com dados em arquivos simples é gerenciável e simples de implementar. Ter os dados em um formato legível por humanos é útil não apenas para criar o arquivo de dados com um editor de texto, mas também para examinar os dados e procurar quaisquer inconsistências ou problemas.
Muitos aplicativos podem exportar versões de arquivo simples dos dados gerados pelo arquivo. Por exemplo, o Excel pode importar ou exportar um arquivo CSV de e para uma planilha. Arquivos simples também têm a vantagem de serem autocontidos e transferíveis se você quiser compartilhar os dados.
Quase todas as linguagens de programação possuem ferramentas e bibliotecas que facilitam o trabalho com arquivos CSV. Python tem o
csv embutido e o poderoso módulo pandas disponível, tornando o trabalho com arquivos CSV uma solução potente. Desvantagens dos arquivos simples
As vantagens de trabalhar com arquivos simples começam a diminuir à medida que os dados se tornam maiores. Arquivos grandes ainda podem ser lidos por humanos, mas editá-los para criar dados ou procurar problemas se torna uma tarefa mais difícil. Se o seu aplicativo alterar os dados no arquivo, uma solução seria ler o arquivo inteiro na memória, fazer as alterações e gravar os dados em outro arquivo.
Outro problema com o uso de arquivos simples é que você precisará criar e manter explicitamente quaisquer relacionamentos entre partes de seus dados e o programa aplicativo dentro da sintaxe do arquivo. Além disso, você precisará gerar código em seu aplicativo para usar esses relacionamentos.
Uma complicação final é que as pessoas com quem você deseja compartilhar seu arquivo de dados também precisarão conhecer e agir sobre as estruturas e relacionamentos que você criou nos dados. Para acessar as informações, esses usuários precisarão entender não apenas a estrutura dos dados, mas também as ferramentas de programação necessárias para acessá-los.
Exemplo de arquivo simples
O programa de exemplo
examples/example_1/main.py usa o author_book_publisher.csv arquivo para obter os dados e relacionamentos nele. Este arquivo CSV mantém uma lista de autores, os livros que eles publicaram e os editores de cada um dos livros. Observação: Os arquivos de dados usados nos exemplos estão disponíveis no
project/data diretório. Há também um arquivo de programa no project/build_data diretório que gera os dados. Esse aplicativo é útil se você alterar os dados e quiser voltar a um estado conhecido. Para ter acesso aos arquivos de dados utilizados nesta seção e em todo o tutorial, clique no link abaixo:
Faça o download do código de amostra: Clique aqui para obter o código que você usará para aprender sobre gerenciamento de dados com SQLite e SQLAlchemy neste tutorial.
O arquivo CSV apresentado acima é um arquivo de dados bem pequeno contendo apenas alguns autores, livros e editores. Você também deve observar algumas coisas sobre os dados:
-
Os autores Stephen King e Tom Clancy aparecem mais de uma vez porque vários livros que publicaram estão representados nos dados.
-
Os autores Stephen King e Pearl Buck têm o mesmo livro publicado por mais de uma editora.
Esses campos de dados duplicados criam relacionamentos entre outras partes dos dados. Um autor pode escrever muitos livros e uma editora pode trabalhar com vários autores. Autores e editores compartilham relacionamentos com livros individuais.
Os relacionamentos no
author_book_publisher.csv são representados por campos que aparecem várias vezes em diferentes linhas do arquivo de dados. Devido a essa redundância de dados, os dados representam mais do que uma única tabela bidimensional. Você verá mais disso quando usar o arquivo para criar um arquivo de banco de dados SQLite. O programa de exemplo
examples/example_1/main.py usa os relacionamentos incorporados no author_book_publisher.csv arquivo para gerar alguns dados. Primeiro apresenta uma lista dos autores e o número de livros que cada um escreveu. Em seguida, mostra uma lista de editoras e o número de autores para os quais cada um publicou livros. Ele também usa o
treelib módulo para exibir uma hierarquia em árvore dos autores, livros e editores. Por fim, ele adiciona um novo livro aos dados e exibe novamente a hierarquia da árvore com o novo livro no local. Aqui está o
main() função de ponto de entrada para este programa: 1def main():
2 """The main entry point of the program"""
3 # Get the resources for the program
4 with resources.path(
5 "project.data", "author_book_publisher.csv"
6 ) as filepath:
7 data = get_data(filepath)
8
9 # Get the number of books printed by each publisher
10 books_by_publisher = get_books_by_publisher(data, ascending=False)
11 for publisher, total_books in books_by_publisher.items():
12 print(f"Publisher: {publisher}, total books: {total_books}")
13 print()
14
15 # Get the number of authors each publisher publishes
16 authors_by_publisher = get_authors_by_publisher(data, ascending=False)
17 for publisher, total_authors in authors_by_publisher.items():
18 print(f"Publisher: {publisher}, total authors: {total_authors}")
19 print()
20
21 # Output hierarchical authors data
22 output_author_hierarchy(data)
23
24 # Add a new book to the data structure
25 data = add_new_book(
26 data,
27 author_name="Stephen King",
28 book_title="The Stand",
29 publisher_name="Random House",
30 )
31
32 # Output the updated hierarchical authors data
33 output_author_hierarchy(data)
O código Python acima segue os seguintes passos:
- Linhas 4 a 7 leia o
author_book_publisher.csvarquivo em um DataFrame pandas. - Linhas 10 a 13 imprimir o número de livros publicados por cada editora.
- Linhas 16 a 19 imprima o número de autores associados a cada editora.
- Linha 22 gera os dados do livro como uma hierarquia classificada por autores.
- Linhas 25 a 30 adicione um novo livro à estrutura na memória.
- Linha 33 gera os dados do livro como uma hierarquia classificada por autores, incluindo o livro recém-adicionado.
A execução deste programa gera a seguinte saída:
$ python main.py
Publisher: Simon & Schuster, total books: 4
Publisher: Random House, total books: 4
Publisher: Penguin Random House, total books: 2
Publisher: Berkley, total books: 2

Publisher: Simon & Schuster, total authors: 4
Publisher: Random House, total authors: 3
Publisher: Berkley, total authors: 2
Publisher: Penguin Random House, total authors: 1

Authors
├── Alex Michaelides
│   └── The Silent Patient
│       └── Simon & Schuster
├── Carol Shaben
│   └── Into The Abyss
│       └── Simon & Schuster
├── Isaac Asimov
│   └── Foundation
│       └── Random House
├── John Le Carre
│   └── Tinker, Tailor, Soldier, Spy: A George Smiley Novel
│       └── Berkley
├── Pearl Buck
│   └── The Good Earth
│       ├── Random House
│       └── Simon & Schuster
├── Stephen King
│   ├── Dead Zone
│   │   └── Random House
│   ├── It
│   │   ├── Penguin Random House
│   │   └── Random House
│   └── The Shining
│       └── Penguin Random House
└── Tom Clancy
    ├── Patriot Games
    │   └── Simon & Schuster
    └── The Hunt For Red October
        └── Berkley
A hierarquia do autor acima é apresentada duas vezes na saída, com a adição de The Stand de Stephen King , publicado pela Random House. A saída real acima foi editada e mostra apenas a primeira saída da hierarquia para economizar espaço.
main() chama outras funções para executar a maior parte do trabalho. A primeira função que ele chama é get_data() :def get_data(filepath):
"""Get book data from the csv file"""
return pd.read_csv(filepath)
Essa função recebe o caminho do arquivo para o arquivo CSV e usa pandas para lê-lo em um DataFrame pandas, que ele passa de volta para o chamador. O valor de retorno desta função torna-se a estrutura de dados passada para as demais funções que compõem o programa.
get_books_by_publisher() calcula o número de livros publicados por cada editora. A série de pandas resultante usa a funcionalidade de pandas GroupBy para agrupar por editor e, em seguida, classificar com base no ascending bandeira:def get_books_by_publisher(data, ascending=True):
"""Return the number of books by each publisher as a pandas series"""
return data.groupby("publisher").size().sort_values(ascending=ascending)
get_authors_by_publisher() faz essencialmente a mesma coisa que a função anterior, mas para autores:def get_authors_by_publisher(data, ascending=True):
"""Returns the number of authors by each publisher as a pandas series"""
return (
data.assign(name=data.first_name.str.cat(data.last_name, sep=" "))
.groupby("publisher")
.nunique()
.loc[:, "name"]
.sort_values(ascending=ascending)
)
add_new_book() cria um novo livro no pandas DataFrame. O código verifica se o autor, livro ou editor já existe. Caso contrário, ele cria um novo livro e o anexa ao DataFrame do pandas:def add_new_book(data, author_name, book_title, publisher_name):
"""Adds a new book to the system"""
# Does the book exist?
first_name, _, last_name = author_name.partition(" ")
if any(
(data.first_name == first_name)
& (data.last_name == last_name)
& (data.title == book_title)
& (data.publisher == publisher_name)
):
return data
# Add the new book
return data.append(
{
"first_name": first_name,
"last_name": last_name,
"title": book_title,
"publisher": publisher_name,
},
ignore_index=True,
)
output_author_hierarchy() usa for aninhado loops para iterar pelos níveis da estrutura de dados. Em seguida, ele usa o treelib módulo para gerar uma lista hierárquica dos autores, os livros que eles publicaram e os editores que publicaram esses livros:def output_author_hierarchy(data):
"""Output the data as a hierarchy list of authors"""
authors = data.assign(
name=data.first_name.str.cat(data.last_name, sep=" ")
)
authors_tree = Tree()
authors_tree.create_node("Authors", "authors")
for author, books in authors.groupby("name"):
authors_tree.create_node(author, author, parent="authors")
for book, publishers in books.groupby("title")["publisher"]:
book_id = f"{author}:{book}"
authors_tree.create_node(book, book_id, parent=author)
for publisher in publishers:
authors_tree.create_node(publisher, parent=book_id)
# Output the hierarchical authors data
authors_tree.show()
Este aplicativo funciona bem e ilustra o poder disponível para você com o módulo pandas. O módulo oferece excelente funcionalidade para ler um arquivo CSV e interagir com os dados.
Vamos avançar e criar um programa de funcionamento idêntico usando Python, uma versão de banco de dados SQLite do autor e dados de publicação e SQLAlchemy para interagir com esses dados.
Usando SQLite para persistir dados
Como você viu anteriormente, há dados redundantes no
author_book_publisher.csv Arquivo. Por exemplo, todas as informações sobre The Good Earth de Pearl Buck é listado duas vezes porque duas editoras diferentes publicaram o livro. Imagine se esse arquivo de dados contivesse mais dados relacionados, como endereço e número de telefone do autor, datas de publicação e ISBNs de livros, ou endereços, números de telefone e talvez receita anual para editoras. Esses dados seriam duplicados para cada item de dados raiz, como autor, livro ou editora.
É possível criar dados dessa maneira, mas seria excepcionalmente difícil de manejar. Pense nos problemas para manter esse arquivo de dados atualizado. E se Stephen King quisesse mudar de nome? Você teria que atualizar vários registros contendo o nome dele e garantir que não houvesse erros de digitação.
Pior do que a duplicação de dados seria a complexidade de adicionar outros relacionamentos aos dados. E se você decidisse adicionar números de telefone para os autores e eles tivessem números de telefone para casa, trabalho, celular e talvez mais? Cada novo relacionamento que você deseja adicionar para qualquer item raiz multiplicaria o número de registros pelo número de itens nesse novo relacionamento.
Esse problema é uma das razões pelas quais existem relacionamentos em sistemas de banco de dados. Um tópico importante na engenharia de banco de dados é a normalização de banco de dados , ou o processo de separação de dados para reduzir a redundância e aumentar a integridade. Quando uma estrutura de banco de dados é estendida com novos tipos de dados, normalizá-la antecipadamente reduz ao mínimo as alterações na estrutura existente.
O banco de dados SQLite está disponível em Python e, de acordo com a página inicial do SQLite, é mais usado do que todos os outros sistemas de banco de dados combinados. Ele oferece um sistema de gerenciamento de banco de dados relacional completo (RDBMS) que funciona com um único arquivo para manter toda a funcionalidade do banco de dados.
Ele também tem a vantagem de não exigir um servidor de banco de dados separado para funcionar. O formato do arquivo de banco de dados é multiplataforma e acessível a qualquer linguagem de programação que suporte SQLite.
Tudo isso é uma informação interessante, mas como isso é relevante para o uso de arquivos simples para armazenamento de dados? Você vai descobrir abaixo!
Criando uma estrutura de banco de dados
A abordagem de força bruta para obter o
author_book_publisher.csv dados em um banco de dados SQLite seria criar uma única tabela correspondente à estrutura do arquivo CSV. Fazer isso ignoraria boa parte do poder do SQLite. Bancos de dados relacionais fornecem uma maneira de armazenar dados estruturados em tabelas e estabelecer relacionamentos entre essas tabelas. Eles geralmente usam a Linguagem de Consulta Estruturada (SQL) como a principal maneira de interagir com os dados. Esta é uma simplificação do que os RDBMSs fornecem, mas é suficiente para os propósitos deste tutorial.
Um banco de dados SQLite fornece suporte para interagir com a tabela de dados usando SQL. Um arquivo de banco de dados SQLite não apenas contém os dados, mas também possui uma maneira padronizada de interagir com os dados. Esse suporte está embutido no arquivo, o que significa que qualquer linguagem de programação que pode usar um arquivo SQLite também pode usar SQL para trabalhar com ele.
Interagindo com um banco de dados com SQL
SQL é uma linguagem declarativa usado para criar, gerenciar e consultar os dados contidos em um banco de dados. Uma linguagem declarativa descreve o que deve ser realizado em vez de como deve ser realizado. Você verá exemplos de instruções SQL mais tarde quando criar tabelas de banco de dados.
Estruturando um banco de dados com SQL
Para aproveitar o poder do SQL, você precisará aplicar alguma normalização de banco de dados aos dados no
author_book_publisher.csv Arquivo. Para fazer isso, você separará os autores, livros e editores em tabelas de banco de dados separadas. Conceitualmente, os dados são armazenados no banco de dados em estruturas de tabelas bidimensionais. Cada tabela consiste em linhas de registros , e cada registro consiste em colunas ou campos , contendo dados.
Os dados contidos nos campos são de tipos predefinidos, incluindo texto, números inteiros, pontos flutuantes e muito mais. Os arquivos CSV são diferentes porque todos os campos são de texto e devem ser analisados por um programa para ter um tipo de dados atribuído a eles.
Cada registro na tabela tem uma chave primária definido para dar a um registro um identificador único. A chave primária é semelhante à chave em um dicionário Python. O próprio mecanismo de banco de dados geralmente gera a chave primária como um valor inteiro incrementado para cada registro inserido na tabela do banco de dados.
Embora a chave primária geralmente seja gerada automaticamente pelo mecanismo de banco de dados, não precisa ser. Se os dados armazenados em um campo forem exclusivos em todos os outros dados da tabela nesse campo, eles poderão ser a chave primária. Por exemplo, uma tabela contendo dados sobre livros pode usar o ISBN do livro como chave primária.
Criando tabelas com SQL
Veja como você pode criar as três tabelas que representam os autores, livros e editores no arquivo CSV usando instruções SQL:
CREATE TABLE author (
    author_id INTEGER NOT NULL PRIMARY KEY,
    first_name VARCHAR,
    last_name VARCHAR
);

CREATE TABLE book (
    book_id INTEGER NOT NULL PRIMARY KEY,
    author_id INTEGER REFERENCES author,
    title VARCHAR
);

CREATE TABLE publisher (
    publisher_id INTEGER NOT NULL PRIMARY KEY,
    name VARCHAR
);
Observe que não há operações de arquivo, nenhuma variável criada e nenhuma estrutura para mantê-los. As declarações descrevem apenas o resultado desejado:a criação de uma tabela com atributos particulares. O mecanismo de banco de dados determina como fazer isso.
Depois de criar e preencher esta tabela com dados de autor do
author_book_publisher.csv arquivo, você pode acessá-lo usando instruções SQL. A seguinte declaração (também chamada de consulta ) usa o caractere curinga (* ) para obter todos os dados no author tabela e imprima:SELECT * FROM author;
Você pode usar o
sqlite3 ferramenta de linha de comando para interagir com o author_book_publisher.db arquivo de banco de dados no project/data diretório:$ sqlite3 author_book_publisher.db
Assim que a ferramenta de linha de comando SQLite estiver em execução com o banco de dados aberto, você poderá inserir comandos SQL. Aqui está o comando SQL acima e sua saída, seguido pelo
.q comando para sair do programa:sqlite> SELECT * FROM author;
1|Isaac|Asimov
2|Pearl|Buck
3|Tom|Clancy
4|Stephen|King
5|John|Le Carre
6|Alex|Michaelides
7|Carol|Shaben
sqlite> .q
Observe que cada autor existe apenas uma vez na tabela. Diferentemente do arquivo CSV, que tinha várias entradas para alguns autores, aqui é necessário apenas um registro único por autor.
Mantendo um banco de dados com SQL
O SQL fornece maneiras de trabalhar com bancos de dados e tabelas existentes, inserindo novos dados e atualizando ou excluindo dados existentes. Aqui está um exemplo de instrução SQL para inserir um novo autor no
author tabela:INSERT INTO author
(first_name, last_name)
VALUES ('Paul', 'Mendez');
Esta instrução SQL insere os valores ‘
Paul ' e 'Mendez ‘ nas respectivas colunas first_name e last_name do author tabela. Observe que o
author_id coluna não é especificada. Como essa coluna é a chave primária, o mecanismo de banco de dados gera o valor e o insere como parte da execução da instrução. A atualização de registros em uma tabela de banco de dados é um processo descomplicado. Por exemplo, suponha que Stephen King quisesse ser conhecido por seu pseudônimo, Richard Bachman. Aqui está uma instrução SQL para atualizar o registro do banco de dados:
UPDATE author
SET first_name = 'Richard', last_name = 'Bachman'
WHERE first_name = 'Stephen' AND last_name = 'King';
A instrução SQL localiza o registro único para
'Stephen King' usando a instrução condicional WHERE first_name = 'Stephen' AND last_name = 'King' e, em seguida, atualiza o first_name e last_name campos com os novos valores. SQL usa o sinal de igual (= ) como operador de comparação e operador de atribuição. Você também pode excluir registros de um banco de dados. Aqui está um exemplo de instrução SQL para excluir um registro do
author tabela:DELETE FROM author
WHERE first_name = 'Paul'
AND last_name = 'Mendez';
Esta instrução SQL exclui uma única linha do
author tabela onde o first_name é igual a 'Paul' e o last_name é igual a 'Mendez' . Tenha cuidado ao excluir registros! As condições definidas devem ser as mais específicas possíveis. Uma condicional muito ampla pode levar à exclusão de mais registros do que você pretende. Por exemplo, se a condição for baseada apenas na linha
first_name = 'Paul' , todos os autores com o primeiro nome Paul seriam excluídos do banco de dados. Observação: Para evitar a exclusão acidental de registros, muitos aplicativos não permitem nenhuma exclusão. Em vez disso, o registro tem outra coluna para indicar se está em uso ou não. Esta coluna pode ser nomeada
active e contêm um valor que é avaliado como True ou False, indicando se o registro deve ser incluído ao consultar o banco de dados. Por exemplo, a consulta SQL abaixo obteria todas as colunas de todos os registros ativos em
some_table :SELECT
*
FROM some_table
WHERE active = 1;
SQLite não tem um tipo de dados booleano, então o
active coluna é representada por um inteiro com um valor de 0 ou 1 para indicar o estado do registro. Outros sistemas de banco de dados podem ou não ter tipos de dados booleanos nativos. É totalmente possível construir aplicativos de banco de dados em Python usando instruções SQL diretamente no código. Fazer isso retorna os dados ao aplicativo como uma lista de listas ou uma lista de dicionários.
Usar SQL bruto é uma maneira perfeitamente aceitável de trabalhar com os dados retornados por consultas ao banco de dados. No entanto, em vez de fazer isso, você passará diretamente para o uso do SQLAlchemy para trabalhar com bancos de dados.
Construindo relacionamentos
Outro recurso dos sistemas de banco de dados que você pode achar ainda mais poderoso e útil do que a persistência e a recuperação de dados são os relacionamentos . Os bancos de dados que oferecem suporte a relacionamentos permitem que você divida os dados em várias tabelas e estabeleça conexões entre elas.
Os dados no
author_book_publisher.csv arquivo representa os dados e relacionamentos duplicando dados. Um banco de dados trata disso dividindo os dados em três tabelas—author , book , e publisher — e estabelecer relações entre eles. Depois de obter todos os dados desejados em um único local no arquivo CSV, por que você deseja dividi-los em várias tabelas? Não seria mais trabalhoso criar e montar novamente? Isso é verdade até certo ponto, mas as vantagens de dividir os dados e juntá-los novamente usando SQL podem conquistá-lo!
Relacionamentos de um para muitos
Um um para muitos relacionamento é como o de um cliente que encomenda itens online. Um cliente pode ter muitos pedidos, mas cada pedido pertence a um cliente. O
author_book_publisher.db banco de dados tem um relacionamento um-para-muitos na forma de autores e livros. Cada autor pode escrever muitos livros, mas cada livro é escrito por um autor. Como você viu na criação da tabela acima, a implementação dessas entidades separadas é colocar cada uma em uma tabela de banco de dados, uma para autores e outra para livros. Mas como o relacionamento um-para-muitos entre essas duas tabelas é implementado?
Lembre-se, cada tabela em um banco de dados tem um campo designado como chave primária para aquela tabela. Cada tabela acima tem um campo de chave primária nomeado usando este padrão:
<table name>_id . O
book tabela mostrada acima contém um campo, author_id , que faz referência ao author tabela. O author_id campo estabelece uma relação um-para-muitos entre autores e livros que se parece com isso: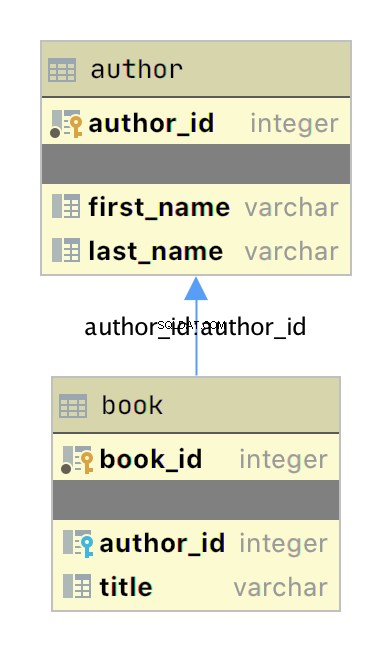
O diagrama acima é um diagrama entidade-relacionamento (ERD) simples criado com o aplicativo JetBrains DataGrip mostrando as tabelas
author e book como caixas com suas respectivas chaves primárias e campos de dados. Dois itens gráficos adicionam informações sobre o relacionamento:-
Os pequenos ícones de teclas amarelos e azuis indicam as chaves primárias e estrangeiras para a tabela, respectivamente.
-
A seta conectandobookparaauthorindica a relação entre as tabelas com base noauthor_idchave estrangeira nobooktabela.
Quando você adiciona um novo livro ao
book tabela, os dados incluem um author_id valor para um autor existente no author tabela. Dessa forma, todos os livros escritos por um autor têm uma relação de pesquisa com aquele autor único. Agora que você tem tabelas separadas para autores e livros, como você usa a relação entre eles? SQL suporta o que é chamado de
JOIN operação, que você pode usar para informar ao banco de dados como conectar duas ou mais tabelas. A consulta SQL abaixo une o
author e book table juntos usando o aplicativo de linha de comando SQLite:sqlite> SELECT
...> a.first_name || ' ' || a.last_name AS author_name,
...> b.title AS book_title
...> FROM author a
...> JOIN book b ON b.author_id = a.author_id
...> ORDER BY a.last_name ASC;
Isaac Asimov|Foundation
Pearl Buck|The Good Earth
Tom Clancy|The Hunt For Red October
Tom Clancy|Patriot Games
Stephen King|It
Stephen King|Dead Zone
Stephen King|The Shining
John Le Carre|Tinker, Tailor, Soldier, Spy: A George Smiley Novel
Alex Michaelides|The Silent Patient
Carol Shaben|Into The Abyss
A consulta SQL acima reúne informações tanto do autor quanto da tabela do livro unindo as tabelas usando o relacionamento estabelecido entre as duas. A concatenação de strings SQL atribui o nome completo do autor ao alias
author_name . Os dados coletados pela consulta são classificados em ordem crescente pelo last_name campo. Há algumas coisas a serem observadas na instrução SQL. Primeiramente, os autores são apresentados por seus nomes completos em uma única coluna e ordenados por seus sobrenomes. Além disso, os autores aparecem na saída várias vezes devido ao relacionamento um-para-muitos. O nome de um autor é duplicado para cada livro escrito no banco de dados.
Ao criar tabelas separadas para autores e livros e estabelecer a relação entre eles, você reduziu a redundância nos dados. Agora você só precisa editar os dados de um autor em um só lugar, e essa alteração aparece em qualquer consulta SQL acessando os dados.
Relações de muitos para muitos
Muitos para muitos existem relacionamentos no
author_book_publisher.db base de dados entre autores e editoras, bem como entre livros e editoras. Um autor pode trabalhar com vários editores e um editor pode trabalhar com vários autores. Da mesma forma, um livro pode ser publicado por muitas editoras e uma editora pode publicar muitos livros. Lidar com essa situação no banco de dados é mais complicado do que um relacionamento um-para-muitos porque o relacionamento ocorre nos dois sentidos. Relacionamentos muitos para muitos são criados por uma tabela de associação atuando como uma ponte entre as duas tabelas relacionadas.
The association table contains at least two foreign key fields, which are the primary keys of each of the two associated tables. This SQL statement creates the association table relating the
author and publisher tables:CREATE TABLE author_publisher (
author_id INTEGER REFERENCES author,
publisher_id INTEGER REFERENCES publisher
);
The SQL statements create a new
author_publisher table referencing the primary keys of the existing author and publisher tables. The author_publisher table is an association table establishing relationships between an author and a publisher. Because the relationship is between two primary keys, there’s no need to create a primary key for the association table itself. The combination of the two related keys creates a unique identifier for a row of data.
As before, you use the
JOIN keyword to connect two tables together. Connecting the author table to the publisher table is a two-step process:JOINtheauthortable with theauthor_publishertable.JOINtheauthor_publishertable with thepublishertable.
The
author_publisher association table provides the bridge through which the JOIN connects the two tables. Here’s an example SQL query returning a list of authors and the publishers publishing their books: 1sqlite> SELECT
2 ...> a.first_name || ' ' || a.last_name AS author_name,
3 ...> p.name AS publisher_name
4 ...> FROM author a
5 ...> JOIN author_publisher ap ON ap.author_id = a.author_id
6 ...> JOIN publisher p ON p.publisher_id = ap.publisher_id
7 ...> ORDER BY a.last_name ASC;
8Isaac Asimov|Random House
9Pearl Buck|Random House
10Pearl Buck|Simon & Schuster
11Tom Clancy|Berkley
12Tom Clancy|Simon & Schuster
13Stephen King|Random House
14Stephen King|Penguin Random House
15John Le Carre|Berkley
16Alex Michaelides|Simon & Schuster
17Carol Shaben|Simon & Schuster
The statements above perform the following actions:
-
Line 1 starts aSELECTstatement to get data from the database.
-
Line 2 selects the first and last name from theauthortable using theaalias for theauthortable and concatenates them together with a space character.
-
Line 3 selects the publisher’s name aliased topublisher_name.
-
Line 4 uses theauthortable as the first source from which to retrieve data and assigns it to the aliasa.
-
Line 5 is the first step of the process outlined above for connecting theauthortable to thepublishertable. It uses the aliasapfor theauthor_publisherassociation table and performs aJOINoperation to connect theap.author_idforeign key reference to thea.author_idprimary key in theauthortable.
-
Line 6 is the second step in the two-step process mentioned above. It uses the aliaspfor thepublishertable and performs aJOINoperation to relate theap.publisher_idforeign key reference to thep.publisher_idprimary key in thepublishertable.
-
Line 7 sorts the data by the author’s last name in ascending alphabetical order and ends the SQL query.
-
Lines 8 to 17 are the output of the SQL query.
Note that the data in the source
author and publisher tables are normalized, with no data duplication. Yet the returned results have duplicated data where necessary to answer the SQL query. The SQL query above demonstrates how to make use of a relationship using the SQL
JOIN keyword, but the resulting data is a partial re-creation of the author_book_publisher.csv CSV data. What’s the win for having done the work of creating a database to separate the data? Here’s another SQL query to show a little bit of the power of SQL and the database engine:
 1sqlite> SELECT
 2   ...> a.first_name || ' ' || a.last_name AS author_name,
 3   ...> COUNT(b.title) AS total_books
 4   ...> FROM author a
 5   ...> JOIN book b ON b.author_id = a.author_id
 6   ...> GROUP BY author_name
 7   ...> ORDER BY total_books DESC, a.last_name ASC;
 8Stephen King|3
 9Tom Clancy|2
10Isaac Asimov|1
11Pearl Buck|1
12John Le Carre|1
13Alex Michaelides|1
14Carol Shaben|1
The SQL query above returns the list of authors and the number of books they’ve written. The list is sorted first by the number of books in descending order, then by the author’s name in alphabetical order:
-
Line 1 begins the SQL query with theSELECTkeyword.
-
Line 2 selects the author’s first and last names, separated by a space character, and creates the aliasauthor_name.
-
Line 3 counts the number of books written by each author, which will be used later by theORDER BYclause to sort the list.
-
Line 4 selects theauthortable to get data from and creates theaalias.
-
Line 5 connects to the relatedbooktable through aJOINto theauthor_idand creates thebalias for thebooktable.
-
Line 6 generates the aggregated author and total number of books data by using theGROUP BYkeyword.GROUP BYis what groups eachauthor_nameand controls what books are tallied byCOUNT()for that author.
-
Line 7 sorts the output first by number of books in descending order, then by the author’s last name in ascending alphabetical order.
-
Lines 8 to 14 are the output of the SQL query.
In the above example, you take advantage of SQL to perform aggregation calculations and sort the results into a useful order. Having the database perform calculations based on its built-in data organization ability is usually faster than performing the same kinds of calculations on raw data sets in Python. SQL offers the advantages of using set theory embedded in RDBMS databases.
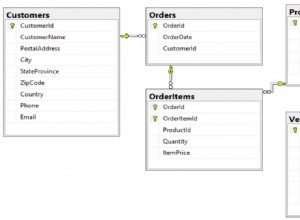
Entity Relationship Diagrams
An entity-relationship diagram (ERD) is a visual depiction of an entity-relationship model for a database or part of a database. The
author_book_publisher.db SQLite database is small enough that the entire database can be visualized by the diagram shown below: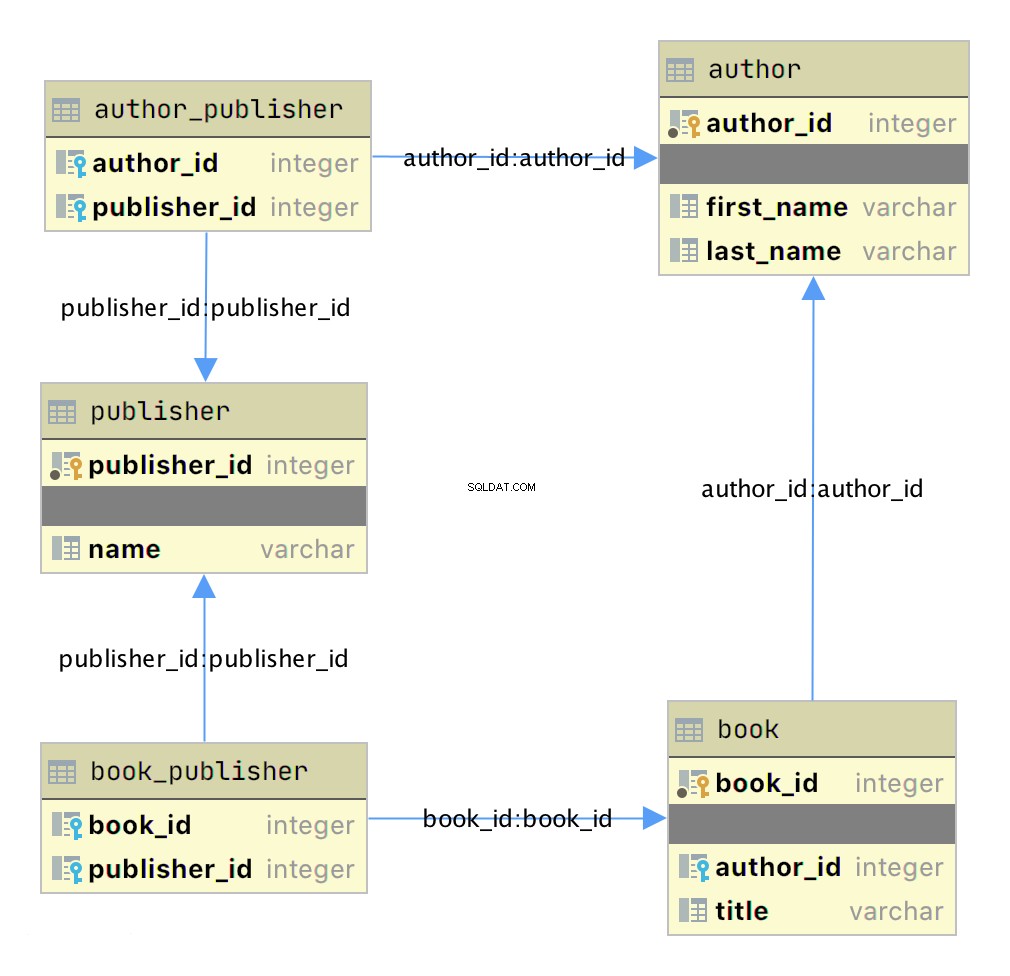
This diagram presents the table structures in the database and the relationships between them. Each box represents a table and contains the fields defined in the table, with the primary key indicated first if it exists.
The arrows show the relationships between the tables connecting a foreign key field in one table to a field, often the primary key, in another table. The table
book_publisher has two arrows, one connecting it to the book table and another connecting it to the publisher table. The arrow indicates the many-to-many relationship between the book and publisher tables. The author_publisher table provides the same relationship between author and publisher . Working With SQLAlchemy and Python Objects
SQLAlchemy is a powerful database access tool kit for Python, with its object-relational mapper (ORM) being one of its most famous components, and the one discussed and used here.
When you’re working in an object-oriented language like Python, it’s often useful to think in terms of objects. It’s possible to map the results returned by SQL queries to objects, but doing so works against the grain of how the database works. Sticking with the scalar results provided by SQL works against the grain of how Python developers work. This problem is known as object-relational impedance mismatch.
The ORM provided by SQLAlchemy sits between the SQLite database and your Python program and transforms the data flow between the database engine and Python objects. SQLAlchemy allows you to think in terms of objects and still retain the powerful features of a database engine.
The Model
One of the fundamental elements to enable connecting SQLAlchemy to a database is creating a model . The model is a Python class defining the data mapping between the Python objects returned as a result of a database query and the underlying database tables.
The entity-relationship diagram displayed earlier shows boxes connected with arrows. The boxes are the tables built with the SQL commands and are what the Python classes will model. The arrows are the relationships between the tables.
The models are Python classes inheriting from an SQLAlchemy
Base aula. The Base class provides the interface operations between instances of the model and the database table. Below is the
models.py file that creates the models to represent the author_book_publisher.db database: 1from sqlalchemy import Column, Integer, String, ForeignKey, Table
2from sqlalchemy.orm import relationship, backref
3from sqlalchemy.ext.declarative import declarative_base
4
5Base = declarative_base()
6
7author_publisher = Table(
8 "author_publisher",
9 Base.metadata,
10 Column("author_id", Integer, ForeignKey("author.author_id")),
11 Column("publisher_id", Integer, ForeignKey("publisher.publisher_id")),
12)
13
14book_publisher = Table(
15 "book_publisher",
16 Base.metadata,
17 Column("book_id", Integer, ForeignKey("book.book_id")),
18 Column("publisher_id", Integer, ForeignKey("publisher.publisher_id")),
19)
20
21class Author(Base):
22 __tablename__ = "author"
23 author_id = Column(Integer, primary_key=True)
24 first_name = Column(String)
25 last_name = Column(String)
26 books = relationship("Book", backref=backref("author"))
27 publishers = relationship(
28 "Publisher", secondary=author_publisher, back_populates="authors"
29 )
30
31class Book(Base):
32 __tablename__ = "book"
33 book_id = Column(Integer, primary_key=True)
34 author_id = Column(Integer, ForeignKey("author.author_id"))
35 title = Column(String)
36 publishers = relationship(
37 "Publisher", secondary=book_publisher, back_populates="books"
38 )
39
40class Publisher(Base):
41 __tablename__ = "publisher"
42 publisher_id = Column(Integer, primary_key=True)
43 name = Column(String)
44 authors = relationship(
45 "Author", secondary=author_publisher, back_populates="publishers"
46 )
47 books = relationship(
48 "Book", secondary=book_publisher, back_populates="publishers"
49 )
Here’s what’s going on in this module:
-
Line 1 imports theColumn,Integer,String,ForeignKey, andTableclasses from SQLAlchemy, which are used to help define the model attributes.
-
Line 2 imports therelationship()andbackrefobjects, which are used to create the relationships between objects.
-
Line 3 imports thedeclarative_baseobject, which connects the database engine to the SQLAlchemy functionality of the models.
-
Line 5 creates theBaseclass, which is what all models inherit from and how they get SQLAlchemy ORM functionality.
-
Lines 7 to 12 create theauthor_publisherassociation table model.
-
Lines 14 to 19 create thebook_publisherassociation table model.
-
Lines 21 to 29 define theAuthorclass model to theauthordatabase table.
-
Lines 31 to 38 define theBookclass model to thebookdatabase table.
-
Lines 40 to 49 define thePublisherclass model to thepublisherdatabase table.
The description above shows the mapping of the five tables in the
author_book_publisher.db database. But it glosses over some SQLAlchemy ORM features, including Table , ForeignKey , relationship() , and backref . Let’s get into those now. Table Creates Associations
author_publisher and book_publisher are both instances of the Table class that create the many-to-many association tables used between the author and publisher tables and the book and publisher tables, respectively. The SQLAlchemy
Table class creates a unique instance of an ORM mapped table within the database. The first parameter is the table name as defined in the database, and the second is Base.metadata , which provides the connection between the SQLAlchemy functionality and the database engine. The rest of the parameters are instances of the
Column class defining the table fields by name, their type, and in the example above, an instance of a ForeignKey . ForeignKey Creates a Connection
The SQLAlchemy
ForeignKey class defines a dependency between two Column fields in different tables. A ForeignKey is how you make SQLAlchemy aware of the relationships between tables. For example, this line from the author_publisher instance creation establishes a foreign key relationship:Column("author_id", Integer, ForeignKey("author.author_id"))
The statement above tells SQLAlchemy that there’s a column in the
author_publisher table named author_id . The type of that column is Integer , and author_id is a foreign key related to the primary key in the author table. Having both
author_id and publisher_id defined in the author_publisher Table instance creates the connection from the author table to the publisher table and vice versa, establishing a many-to-many relationship. relationship() Establishes a Collection
Having a
ForeignKey defines the existence of the relationship between tables but not the collection of books an author can have. Take a look at this line in the Author class definition:books = relationship("Book", backref=backref("author"))
The code above defines a parent-child collection. The
books attribute being plural (which is not a requirement, just a convention) is an indication that it’s a collection. The first parameter to
relationship() , the class name Book (which is not the table name book ), is the class to which the books attribute is related. The relationship informs SQLAlchemy that there’s a relationship between the Author and Book classes. SQLAlchemy will find the relationship in the Book class definition:author_id = Column(Integer, ForeignKey("author.author_id"))
SQLAlchemy recognizes that this is the
ForeignKey connection point between the two classes. You’ll get to the backref parameter in relationship() in a moment. The other relationship in
Author is to the Publisher aula. This is created with the following statement in the Author class definition:publishers = relationship(
"Publisher", secondary=author_publisher, back_populates="authors"
)
Like
books , the attribute publishers indicates a collection of publishers associated with an author. The first parameter, "Publisher" , informs SQLAlchemy what the related class is. The second and third parameters are secondary=author_publisher and back_populates="authors" :-
secondarytells SQLAlchemy that the relationship to thePublisherclass is through a secondary table, which is theauthor_publisherassociation table created earlier inmodels.py. Thesecondaryparameter makes SQLAlchemy find thepublisher_idForeignKeydefined in theauthor_publisherassociation table.
-
back_populatesis a convenience configuration telling SQLAlchemy that there’s a complementary collection in thePublisherclass calledauthors.
backref Mirrors Attributes
The
backref parameter of the books collection relationship() creates an author attribute for each Book instance. This attribute refers to the parent Author that the Book instance is related to. For example, if you executed the following Python code, then a
Book instance would be returned from the SQLAlchemy query. The Book instance has attributes that can be used to print out information about the book:book = session.query(Book).filter_by(Book.title == "The Stand").one_or_none()
print(f"Authors name: {book.author.first_name} {book.author.last_name}")
The existence of the
author attribute in the Book above is because of the backref definição. A backref can be very handy to have when you need to refer to the parent and all you have is a child instance. Queries Answer Questions
You can make a basic query like
SELECT * FROM author; in SQLAlchemy like this:results = session.query(Author).all()
The
session is an SQLAlchemy object used to communicate with SQLite in the Python example programs. Here, you tell the session you want to execute a query against the Author model and return all records. At this point, the advantages of using SQLAlchemy instead of plain SQL might not be obvious, especially considering the setup required to create the models representing the database. The
results returned by the query is where the magic happens. Instead of getting back a list of lists of scalar data, you’ll get back a list of instances of Author objects with attributes matching the column names you defined. The
books and publishers collections maintained by SQLAlchemy create a hierarchical list of authors and the books they’ve written as well as the publishers who’ve published them. Behind the scenes, SQLAlchemy turns the object and method calls into SQL statements to execute against the SQLite database engine. SQLAlchemy transforms the data returned by SQL queries into Python objects.
With SQLAlchemy, you can perform the more complex aggregation query shown earlier for the list of authors and the number of books they’ve written like this:
author_book_totals = (
    session.query(
        Author.first_name,
        Author.last_name,
        func.count(Book.title).label("book_total")
    )
    .join(Book)
    .group_by(Author.last_name)
    .order_by(desc("book_total"))
    .all()
)
The query above gets the author’s first and last name, along with a count of the number of books that the author has written. The aggregating
count used by the group_by clause is based on the author’s last name. Finally, the results are sorted in descending order based on the aggregated and aliased book_total . Example Program
The example program
examples/example_2/main.py has the same functionality as examples/example_1/main.py but uses SQLAlchemy exclusively to interface with the author_book_publisher.db SQLite database. The program is broken up into the main() function and the functions it calls: 1def main():
2 """Main entry point of program"""
3 # Connect to the database using SQLAlchemy
4 with resources.path(
5 "project.data", "author_book_publisher.db"
6 ) as sqlite_filepath:
7 engine = create_engine(f"sqlite:///{sqlite_filepath}")
8 Session = sessionmaker()
9 Session.configure(bind=engine)
10 session = Session()
11
12 # Get the number of books printed by each publisher
13 books_by_publisher = get_books_by_publishers(session, ascending=False)
14 for row in books_by_publisher:
15 print(f"Publisher: {row.name}, total books: {row.total_books}")
16 print()
17
18 # Get the number of authors each publisher publishes
19 authors_by_publisher = get_authors_by_publishers(session)
20 for row in authors_by_publisher:
21 print(f"Publisher: {row.name}, total authors: {row.total_authors}")
22 print()
23
24 # Output hierarchical author data
25 authors = get_authors(session)
26 output_author_hierarchy(authors)
27
28 # Add a new book
29 add_new_book(
30 session,
31 author_name="Stephen King",
32 book_title="The Stand",
33 publisher_name="Random House",
34 )
35 # Output the updated hierarchical author data
36 authors = get_authors(session)
37 output_author_hierarchy(authors)
This program is a modified version of
examples/example_1/main.py . Let’s go over the differences:-
Lines 4 to 7 first initialize thesqlite_filepathvariable to the database file path. Then they create theenginevariable to communicate with SQLite and theauthor_book_publisher.dbdatabase file, which is SQLAlchemy’s access point to the database.
-
Line 8 creates theSessionclass from the SQLAlchemy’ssessionmaker().
-
Line 9 binds theSessionto the engine created in line 8.
-
Line 10 creates thesessioninstance, which is used by the program to communicate with SQLAlchemy.
The rest of the function is similar, except for the replacement of
data with session as the first parameter to all the functions called by main() . get_books_by_publisher() has been refactored to use SQLAlchemy and the models you defined earlier to get the data requested: 1def get_books_by_publishers(session, ascending=True):
2 """Get a list of publishers and the number of books they've published"""
3 if not isinstance(ascending, bool):
4 raise ValueError(f"Sorting value invalid: {ascending}")
5
6 direction = asc if ascending else desc
7
8 return (
9 session.query(
10 Publisher.name, func.count(Book.title).label("total_books")
11 )
12 .join(Publisher.books)
13 .group_by(Publisher.name)
14 .order_by(direction("total_books"))
15 )
Here’s what the new function,
get_books_by_publishers() , is doing:-
Line 6 creates thedirectionvariable and sets it equal to the SQLAlchemydescorascfunction depending on the value of theascendingparâmetro.
-
Lines 9 to 11 query thePublishertable for data to return, which in this case arePublisher.nameand the aggregate total ofBookobjects associated with an author, aliased tototal_books.
-
Line 12 joins to thePublisher.bookscoleção.
-
Line 13 aggregates the book counts by thePublisher.nameattribute.
-
Line 14 sorts the output by the book counts according to the operator defined bydirection.
-
Line 15 closes the object, executes the query, and returns the results to the caller.
All the above code expresses what is wanted rather than how it’s to be retrieved. Now instead of using SQL to describe what’s wanted, you’re using Python objects and methods. What’s returned is a list of Python objects instead of a list of tuples of data.
get_authors_by_publisher() has also been modified to work exclusively with SQLAlchemy. Its functionality is very similar to the previous function, so a function description is omitted:def get_authors_by_publishers(session, ascending=True):
"""Get a list of publishers and the number of authors they've published"""
if not isinstance(ascending, bool):
raise ValueError(f"Sorting value invalid: {ascending}")
direction = asc if ascending else desc
return (
session.query(
Publisher.name,
func.count(Author.first_name).label("total_authors"),
)
.join(Publisher.authors)
.group_by(Publisher.name)
.order_by(direction("total_authors"))
)
get_authors() has been added to get a list of authors sorted by their last names. The result of this query is a list of Author objects containing a collection of books. The Author objects already contain hierarchical data, so the results don’t have to be reformatted:def get_authors(session):
"""Get a list of author objects sorted by last name"""
return session.query(Author).order_by(Author.last_name).all()
Like its previous version,
add_new_book() is relatively complex but straightforward to understand. It determines if a book with the same title, author, and publisher exists in the database already. If the search query finds an exact match, then the function returns. If no book matches the exact search criteria, then it searches to see if the author has written a book using the passed in title. This code exists to prevent duplicate books from being created in the database.
If no matching book exists, and the author hasn’t written one with the same title, then a new book is created. The function then retrieves or creates an author and publisher. Once instances of the
Book , Author and Publisher exist, the relationships between them are created, and the resulting information is saved to the database: 1def add_new_book(session, author_name, book_title, publisher_name):
2 """Adds a new book to the system"""
3 # Get the author's first and last names
4 first_name, _, last_name = author_name.partition(" ")
5
6 # Check if book exists
7 book = (
8 session.query(Book)
9 .join(Author)
10 .filter(Book.title == book_title)
11 .filter(
12 and_(
13 Author.first_name == first_name, Author.last_name == last_name
14 )
15 )
16 .filter(Book.publishers.any(Publisher.name == publisher_name))
17 .one_or_none()
18 )
19 # Does the book by the author and publisher already exist?
20 if book is not None:
21 return
22
23 # Get the book by the author
24 book = (
25 session.query(Book)
26 .join(Author)
27 .filter(Book.title == book_title)
28 .filter(
29 and_(
30 Author.first_name == first_name, Author.last_name == last_name
31 )
32 )
33 .one_or_none()
34 )
35 # Create the new book if needed
36 if book is None:
37 book = Book(title=book_title)
38
39 # Get the author
40 author = (
41 session.query(Author)
42 .filter(
43 and_(
44 Author.first_name == first_name, Author.last_name == last_name
45 )
46 )
47 .one_or_none()
48 )
49 # Do we need to create the author?
50 if author is None:
51 author = Author(first_name=first_name, last_name=last_name)
52 session.add(author)
53
54 # Get the publisher
55 publisher = (
56 session.query(Publisher)
57 .filter(Publisher.name == publisher_name)
58 .one_or_none()
59 )
60 # Do we need to create the publisher?
61 if publisher is None:
62 publisher = Publisher(name=publisher_name)
63 session.add(publisher)
64
65 # Initialize the book relationships
66 book.author = author
67 book.publishers.append(publisher)
68 session.add(book)
69
70 # Commit to the database
71 session.commit()
The code above is relatively long. Let’s break the functionality down to manageable sections:
-
Lines 7 to 18 set thebookvariable to an instance of aBookif a book with the same title, author, and publisher is found. Otherwise, they setbooktoNone.
-
Lines 20 and 21 determine if the book already exists and return if it does.
-
Lines 24 to 37 set thebookvariable to an instance of aBookif a book with the same title and author is found. Otherwise, they create a newBookinstance.
-
Lines 40 to 52 set theauthorvariable to an existing author, if found, or create a newAuthorinstance based on the passed-in author name.
-
Lines 55 to 63 set thepublishervariable to an existing publisher, if found, or create a newPublisherinstance based on the passed-in publisher name.
-
Line 66 sets thebook.authorinstance to theauthorinstance. This creates the relationship between the author and the book, which SQLAlchemy will create in the database when the session is committed.
-
Line 67 adds thepublisherinstance to thebook.publisherscoleção. This creates the many-to-many relationship between thebookandpublishertables. SQLAlchemy will create references in the tables as well as in thebook_publisherassociation table that connects the two.
-
Line 68 adds theBookinstance to the session, making it part of the session’s unit of work.
-
Line 71 commits all the creations and updates to the database.
There are a few things to take note of here. First, there’s is no mention of the
author_publisher or book_publisher association tables in either the queries or the creations and updates. Because of the work you did in models.py setting up the relationships, SQLAlchemy can handle connecting objects together and keeping those tables in sync during creations and updates. Second, all the creations and updates happen within the context of the
session objeto. None of that activity is touching the database. Only when the session.commit() statement executes does the session then go through its unit of work and commit that work to the database. For example, if a new
Book instance is created (as in line 37 above), then the book has its attributes initialized except for the book_id primary key and author_id foreign key. Because no database activity has happened yet, the book_id is unknown, and nothing was done in the instantiation of book to give it an author_id . When
session.commit() is executed, one of the things it will do is insert book into the database, at which point the database will create the book_id primary key. The session will then initialize the book.book_id value with the primary key value created by the database engine. session.commit() is also aware of the insertion of the Book instance in the author.books coleção. The author object’s author_id primary key will be added to the Book instance appended to the author.books collection as the author_id foreign key. Providing Access to Multiple Users
To this point, you’ve seen how to use pandas, SQLite, and SQLAlchemy to access the same data in different ways. For the relatively straightforward use case of the author, book, and publisher data, it could still be a toss-up whether you should use a database.
One deciding factor when choosing between using a flat file or a database is data and relationship complexity. If the data for each entity is complicated and contains many relationships between the entities, then creating and maintaining it in a flat file might become more difficult.
Another factor to consider is whether you want to share the data between multiple users. The solution to this problem might be as simple as using a sneakernet to physically move data between users. Moving data files around this way has the advantage of ease of use, but the data can quickly get out of sync when changes are made.
The problem of keeping the data consistent for all users becomes even more difficult if the users are remote and want to access the data across networks. Even when you’re limited to a single language like Python and using pandas to access the data, network file locking isn’t sufficient to ensure the data doesn’t get corrupted.
Providing the data through a server application and a user interface alleviates this problem. The server is the only application that needs file-level access to the database. By using a database, the server can take advantage of SQL to access the data using a consistent interface no matter what programming language the server uses.
The last example program demonstrates this by providing a web application and user interface to the Chinook sample SQLite database. Peter Stark generously maintains the Chinook database as part of the SQLite Tutorial site. If you’d like to learn more about SQLite and SQL in general, then the site is a great resource.
The Chinook database provides artist, music, and playlist information along the lines of a simplified Spotify. The database is part of the example code project in the
project/data folder. Using Flask With Python, SQLite, and SQLAlchemy
The
examples/example_3/chinook_server.py program creates a Flask application that you can interact with using a browser. The application makes use of the following technologies:-
Flask Blueprint is part of Flask and provides a good way to follow the separation of concerns design principle and create distinct modules to contain functionality.
-
Flask SQLAlchemy is an extension for Flask that adds support for SQLAlchemy in your web applications.
-
Flask_Bootstrap4 packages the Bootstrap front-end tool kit, integrating it with your Flask web applications.
-
Flask_WTF extends Flask with WTForms, giving your web applications a useful way to generate and validate web forms.
-
python_dotenv is a Python module that an application uses to read environment variables from a file and keep sensitive information out of program code.
Though not necessary for this example, a
.env file holds the environment variables for the application. The .env file exists to contain sensitive information like passwords, which you should keep out of your code files. However, the content of the project .env file is shown below since it doesn’t contain any sensitive data:SECRET_KEY = "you-will-never-guess"
SQLALCHEMY_TRACK_MODIFICATIONS = False
SQLAlCHEMY_ECHO = False
DEBUG = True
The example application is fairly large, and only some of it is relevant to this tutorial. For this reason, examining and learning from the code is left as an exercise for the reader. That said, you can take a look at an animated screen capture of the application below, followed by the HTML that renders the home page and the Python Flask route that provides the dynamic data.
Here’s the application in action, navigating through various menus and features:
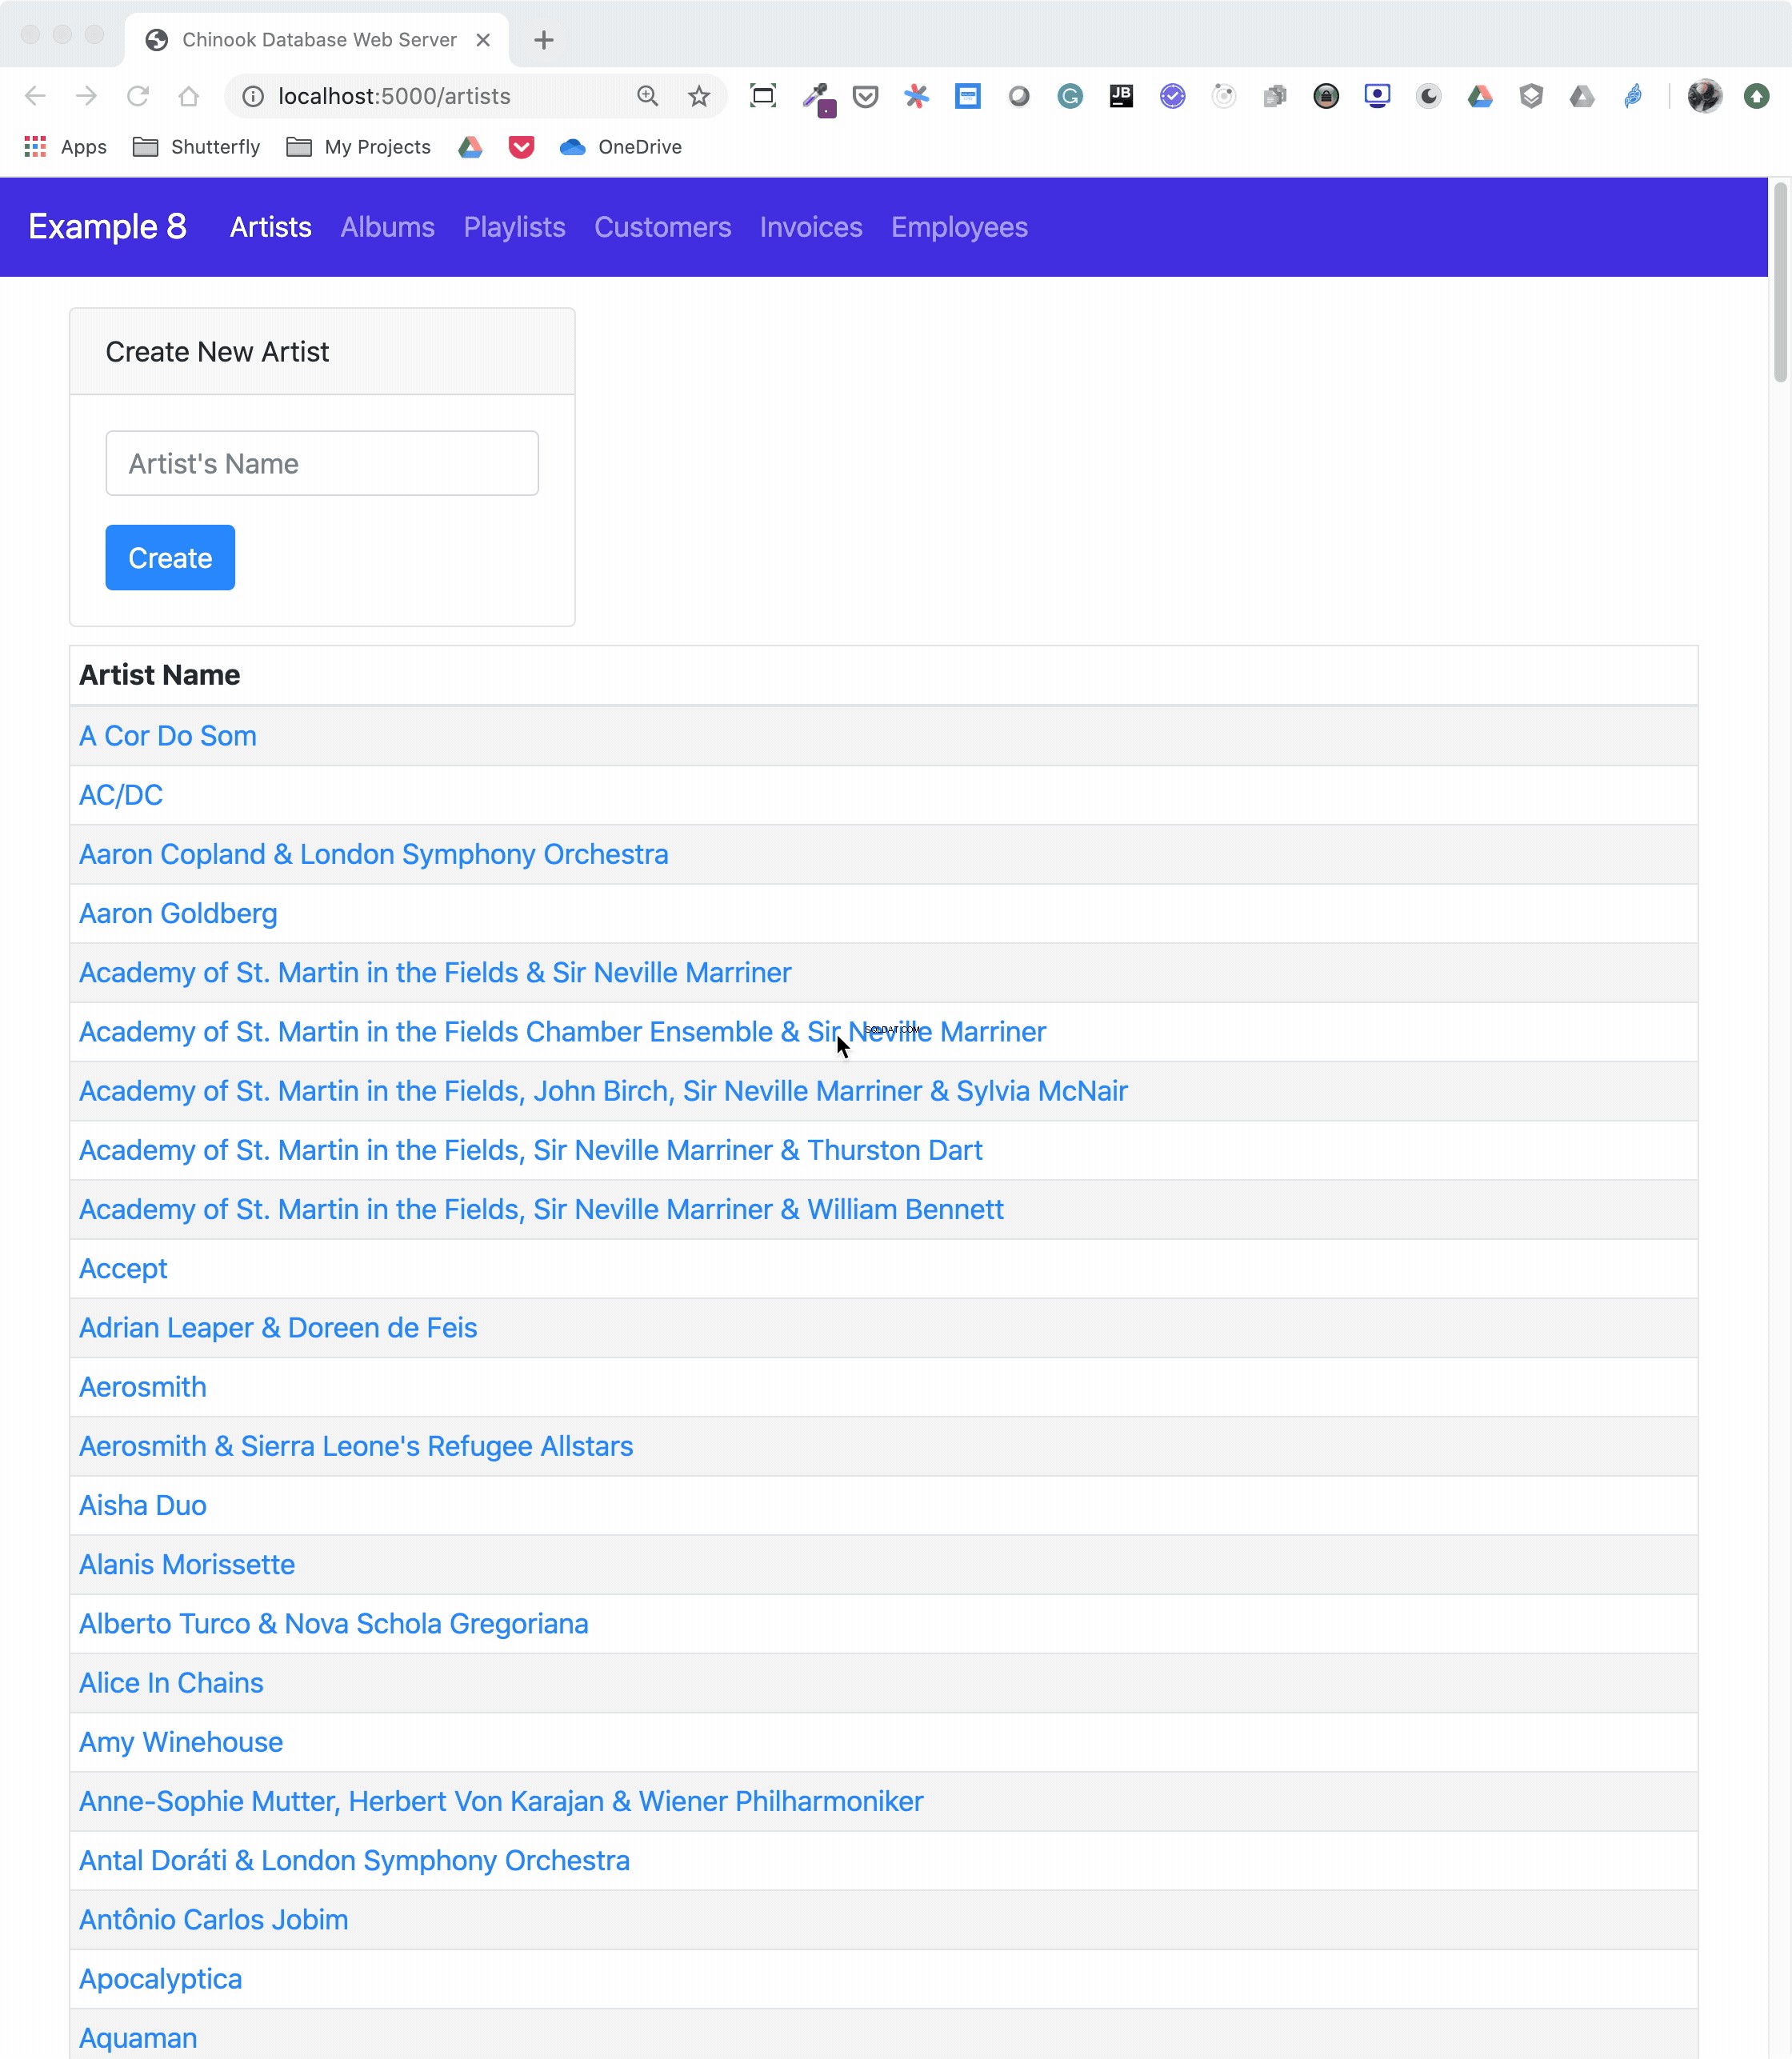
The animated screen capture starts on the application home page, styled using Bootstrap 4. The page displays the artists in the database, sorted in ascending order. The remainder of the screen capture presents the results of clicking on the displayed links or navigating around the application from the top-level menu.
Here’s the Jinja2 HTML template that generates the home page of the application:
 1{% extends "base.html" %}
 2
 3{% block content %}
 4<div class="container-fluid">
 5  <div class="m-4">
 6    <div class="card" style="width: 18rem;">
 7      <div class="card-header">Create New Artist</div>
 8      <div class="card-body">
 9        <form method="POST" action="{{url_for('artists_bp.artists')}}">
10          {{ form.csrf_token }}
11          {{ render_field(form.name, placeholder=form.name.label.text) }}
12          <button type="submit" class="btn btn-primary">Create</button>
13        </form>
14      </div>
15    </div>
16    <table class="table table-striped table-bordered table-hover table-sm">
17      <caption>List of Artists</caption>
18      <thead>
19        <tr>
20          <th>Artist Name</th>
21        </tr>
22      </thead>
23      <tbody>
24        {% for artist in artists %}
25        <tr>
26          <td>
27            <a href="{{url_for('albums_bp.albums', artist_id=artist.artist_id)}}">
28              {{ artist.name }}
29            </a>
30          </td>
31        </tr>
32        {% endfor %}
33      </tbody>
34    </table>
35  </div>
36</div>
37{% endblock %}
Here’s what’s going on in this Jinja2 template code:
-
Line 1 uses Jinja2 template inheritance to build this template from thebase.htmltemplate. Thebase.htmltemplate contains all the HTML5 boilerplate code as well as the Bootstrap navigation bar consistent across all pages of the site.
-
Lines 3 to 37 contain the block content of the page, which is incorporated into the Jinja2 macro of the same name in thebase.htmlbase template.
-
Lines 9 to 13 render the form to create a new artist. This uses the features of Flask-WTF to generate the form.
-
Lines 24 to 32 create aforloop that renders the table of artist names.
-
Lines 27 to 29 render the artist name as a link to the artist’s album page showing the songs associated with a particular artist.
Here’s the Python route that renders the page:
 1from flask import Blueprint, render_template, redirect, url_for
 2from flask_wtf import FlaskForm
 3from wtforms import StringField
 4from wtforms.validators import InputRequired, ValidationError
 5from app import db
 6from app.models import Artist
 7
 8# Set up the blueprint
 9artists_bp = Blueprint(
10    "artists_bp", __name__, template_folder="templates", static_folder="static"
11)
12
13def does_artist_exist(form, field):
14    artist = (
15        db.session.query(Artist)
16        .filter(Artist.name == field.data)
17        .one_or_none()
18    )
19    if artist is not None:
20        raise ValidationError("Artist already exists", field.data)
21
22class CreateArtistForm(FlaskForm):
23    name = StringField(
24        label="Artist's Name", validators=[InputRequired(), does_artist_exist]
25    )
26
27@artists_bp.route("/")
28@artists_bp.route("/artists", methods=["GET", "POST"])
29def artists():
30    form = CreateArtistForm()
31
32    # Is the form valid?
33    if form.validate_on_submit():
34        # Create new artist
35        artist = Artist(name=form.name.data)
36        db.session.add(artist)
37        db.session.commit()
38        return redirect(url_for("artists_bp.artists"))
39
40    artists = db.session.query(Artist).order_by(Artist.name).all()
41    return render_template("artists.html", artists=artists, form=form,)
Let’s go over what the above code is doing:
-
Lines 1 to 6 import all the modules necessary to render the page and initialize forms with data from the database.
-
Lines 9 to 11 create the blueprint for the artists page.
-
Lines 13 to 20 create a custom validator function for the Flask-WTF forms to make sure a request to create a new artist doesn’t conflict with an already existing artist.
-
Lines 22 to 25 create the form class to handle the artist form rendered in the browser and provide validation of the form field inputs.
-
Lines 27 to 28 connect two routes to theartists()function they decorate.
-
Line 30 creates an instance of theCreateArtistForm()aula.
-
Line 33 determines if the page was requested through the HTTP methods GET or POST (submit). If it was a POST, then it also validates the fields of the form and informs the user if the fields are invalid.
-
Lines 35 to 37 create a new artist object, add it to the SQLAlchemy session, and commit the artist object to the database, persisting it.
-
Line 38 redirects back to the artists page, which will be rerendered with the newly created artist.
-
Line 40 runs an SQLAlchemy query to get all the artists in the database and sort them byArtist.name.
-
Line 41 renders the artists page if the HTTP request method was a GET.
You can see that a great deal of functionality is created by a reasonably small amount of code.
Creating a REST API Server
You can also create a web server providing a REST API. This kind of server offers URL endpoints responding with data, often in JSON format. A server providing REST API endpoints can be used by JavaScript single-page web applications through the use of AJAX HTTP requests.
Flask is an excellent tool for creating REST applications. For a multi-part series of tutorials about using Flask, Connexion, and SQLAlchemy to create REST applications, check out Python REST APIs With Flask, Connexion, and SQLAlchemy.
If you’re a fan of Django and are interested in creating REST APIs, then check out Django Rest Framework – An Introduction and Create a Super Basic REST API with Django Tastypie.
Note: It’s reasonable to ask if SQLite is the right choice as the database backend to a web application. The SQLite website states that SQLite is a good choice for sites that serve around 100,000 hits per day. If your site gets more daily hits, the first thing to say is congratulations!
Beyond that, if you’ve implemented your website with SQLAlchemy, then it’s possible to move the data from SQLite to another database such as MySQL or PostgreSQL. For a comparison of SQLite, MySQL, and PostgreSQL that will help you make decisions about which one will serve your application best, check out Introduction to Python SQL Libraries.
It’s well worth considering SQLite for your Python application, no matter what it is. Using a database gives your application versatility, and it might create surprising opportunities to add additional features.
Conclusão
You’ve covered a lot of ground in this tutorial about databases, SQLite, SQL, and SQLAlchemy! You’ve used these tools to move data contained in flat files to an SQLite database, access the data with SQL and SQLAlchemy, and provide that data through a web server.
In this tutorial, you’ve learned:
- Why an SQLite database can be a compelling alternative to flat-file data storage
- How to normalize data to reduce data redundancy and increase data integrity
- How to use SQLAlchemy to work with databases in an object-oriented manner
- How to build a web application to serve a database to multiple users
Working with databases is a powerful abstraction for working with data that adds significant functionality to your Python programs and allows you to ask interesting questions of your data.
You can get all of the code and data you saw in this tutorial at the link below:
Download the sample code: Click here to get the code you’ll use to learn about data management with SQLite and SQLAlchemy in this tutorial.
Further Reading
This tutorial is an introduction to using databases, SQL, and SQLAlchemy, but there’s much more to learn about these subjects. These are powerful, sophisticated tools that no single tutorial can cover adequately. Here are some resources for additional information to expand your skills:
-
If your application will expose the database to users, then avoiding SQL injection attacks is an important skill. For more information, check out Preventing SQL Injection Attacks With Python.
-
Providing web access to a database is common in web-based single-page applications. To learn how, check out Python REST APIs With Flask, Connexion, and SQLAlchemy – Part 2.
-
Preparing for data engineering job interviews gives you a leg up in your career. To get started, check out Data Engineer Interview Questions With Python.
-
Migrating data and being able to roll back using Flask with Postgres and SQLAlchemy is an integral part of the Software Development Life Cycle (SDLC). You can learn more about it by checking out Flask by Example – Setting up Postgres, SQLAlchemy, and Alembic.