Este tutorial fornece todas as etapas necessárias para instalar o MySQL 8 no Ubuntu 18.04 LTS. Os mesmos passos podem ser seguidos para outras versões do Ubuntu.
Observações :Para seguir este post, você deve remover completamente a instalação anterior do servidor MySQL instalada usando o instalador se ele já estiver instalado no sistema. Você pode seguir Como remover completamente o MySQL do Ubuntu para remover completamente a instalação anterior feita usando o instalador.
Você também pode estar interessado em outros tutoriais específicos do MySQL, incluindo Como instalar o MySQL 8 em
Etapa 1 - Baixe o repositório MySQL APT
Desde o MySQL 8 não está incluído nos repositórios oficiais do Ubuntu 18.04 , temos que fazer o download seu pacote Debian . A versão atual oficialmente disponível do MySQL no Ubuntu 18.04 é 5.7.26 . Use o comando abaixo mencionado para baixar o repositório APT mais recente.
# Download MySQL APT Repository
wget –c https://dev.mysql.com/get/mysql-apt-config_0.8.13-1_all.deb
Ele irá baixar o pacote oficial do Debian para instalar o MySQL 8.
Etapa 2 - Instalar o repositório MySQL
Use o comando abaixo mencionado para iniciar a instalação do repositório MySQL usando o repositório baixado por nós na etapa anterior.
sudo dpkg -i mysql-apt-config_0.8.13-1_all.deb
Ele pedirá para escolher entre as opções disponíveis, conforme mostrado na Fig 1. Mantenha a opção padrão selecionada e pressione a tecla Enter para iniciar a instalação.

Figura 1
Na próxima tela, o instalador pedirá para escolher a versão do MySQL a ser instalada conforme mostrado na Fig 2. Mantenha mysql-8 selecionado e pressione a tecla Enter.
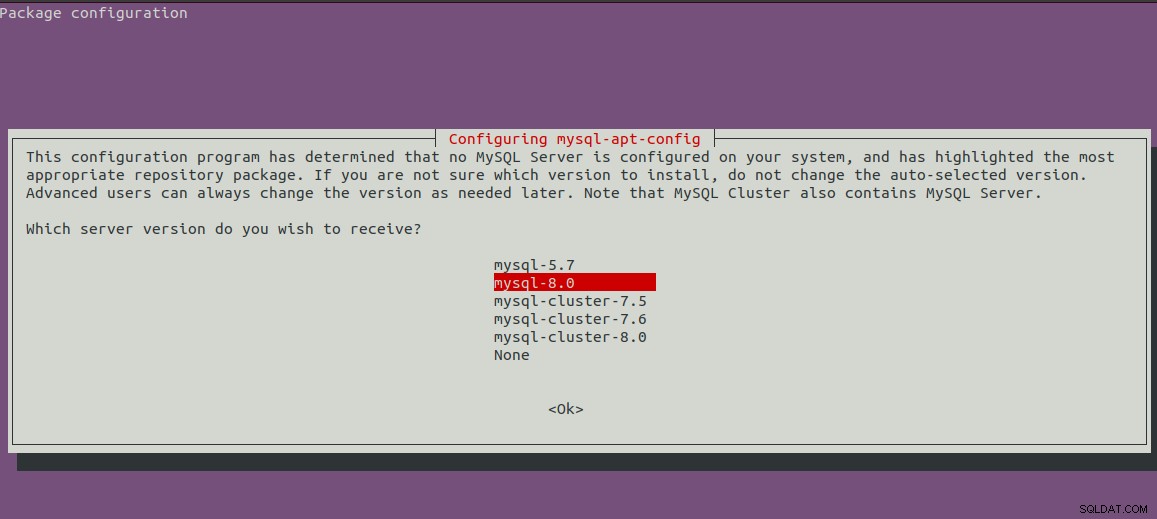
Figura 2
Ele mostrará a primeira tela com a versão selecionada do MySQL. Agora pressione a tecla de seta para baixo e a tecla de seta seguinte para mover para as opções OK, conforme mostrado na Fig 3.
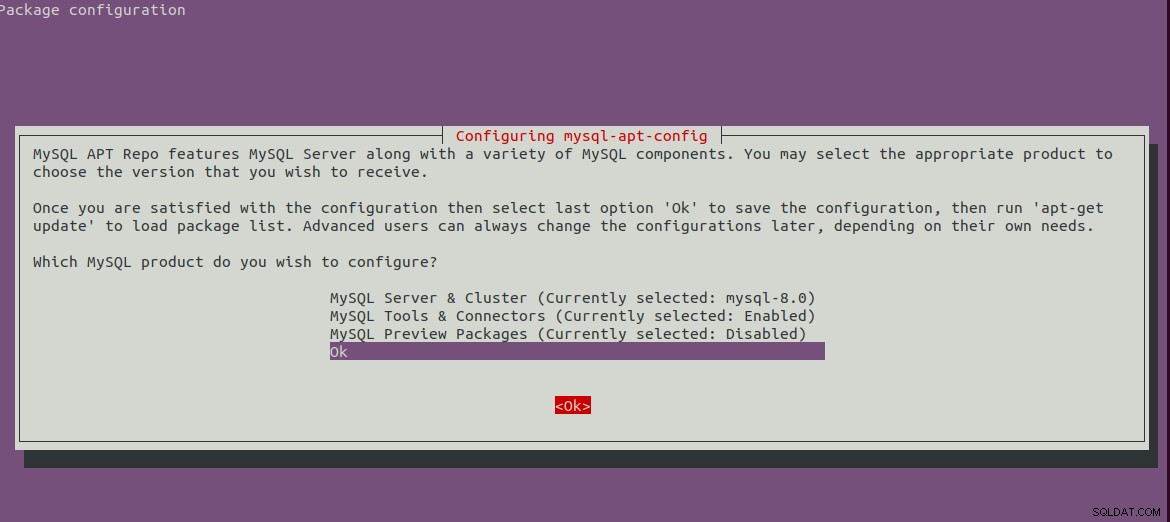
Figura 3
Pressione a tecla Enter para iniciar a instalação. Ele mostrará as mensagens abaixo mencionadas após concluir a instalação.
bravo@pc1:/setups/database$ sudo dpkg -i mysql-apt-config_0.8.13-1_all.deb
Selecting previously unselected package mysql-apt-config.
(Reading database ... 200223 files and directories currently installed.)
Preparing to unpack mysql-apt-config_0.8.13-1_all.deb ...
Unpacking mysql-apt-config (0.8.13-1) ...
Setting up mysql-apt-config (0.8.13-1) ...
Warning: apt-key should not be used in scripts (called from postinst maintainerscript of the package mysql-apt-config)
Etapa 3 - Atualizar os repositórios do sistema
Agora atualize os repositórios do sistema usando o comando conforme mencionado abaixo.
sudo apt-get update

# It must show MySQL 8 repos
bravo@pc1:/setups/database$ sudo apt-get update
Hit:1 http://repo.mysql.com/apt/ubuntu bionic InRelease
Hit:2 http://in.archive.ubuntu.com/ubuntu bionic InRelease
Hit:3 http://in.archive.ubuntu.com/ubuntu bionic-updates InRelease
Hit:4 http://in.archive.ubuntu.com/ubuntu bionic-backports InRelease
Hit:5 http://security.ubuntu.com/ubuntu bionic-security InRelease
Get:6 http://repo.mysql.com/apt/ubuntu bionic/mysql-8.0 Sources [962 B]
Get:7 http://repo.mysql.com/apt/ubuntu bionic/mysql-8.0 i386 Packages [7,472 B]
Get:8 http://repo.mysql.com/apt/ubuntu bionic/mysql-8.0 amd64 Packages [7,463 B]
Fetched 15.9 kB in 3s (5,556 B/s)
Reading package lists... Done
Ele atualizará o cache do sistema para obter atualizações sobre as versões mais recentes dos pacotes disponíveis.
Etapa 4 - Instalar o servidor MySQL
Após atualizar o cache do sistema, podemos iniciar a instalação do servidor e cliente MySQL usando o comando conforme mencionado abaixo.
# Install MySQL Server 8
sudo apt-get install mysql-server mysql-client
Pressione Y para confirmar e continuar com a instalação. Com isso, o MySQL é instalado como fazemos com o pacote padrão disponível nos repositórios do Ubuntu. A instalação também pedirá para escolher
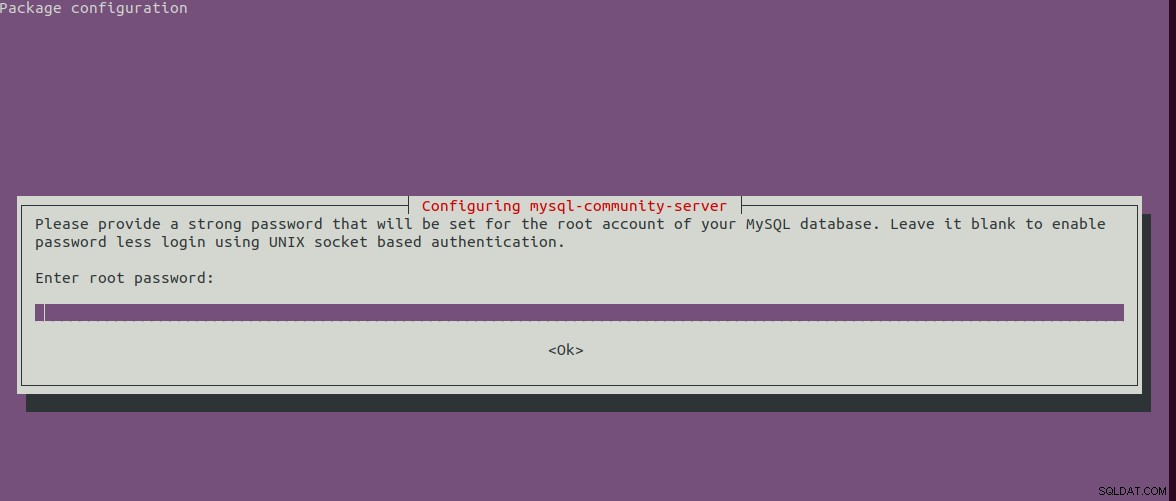
Figura 4
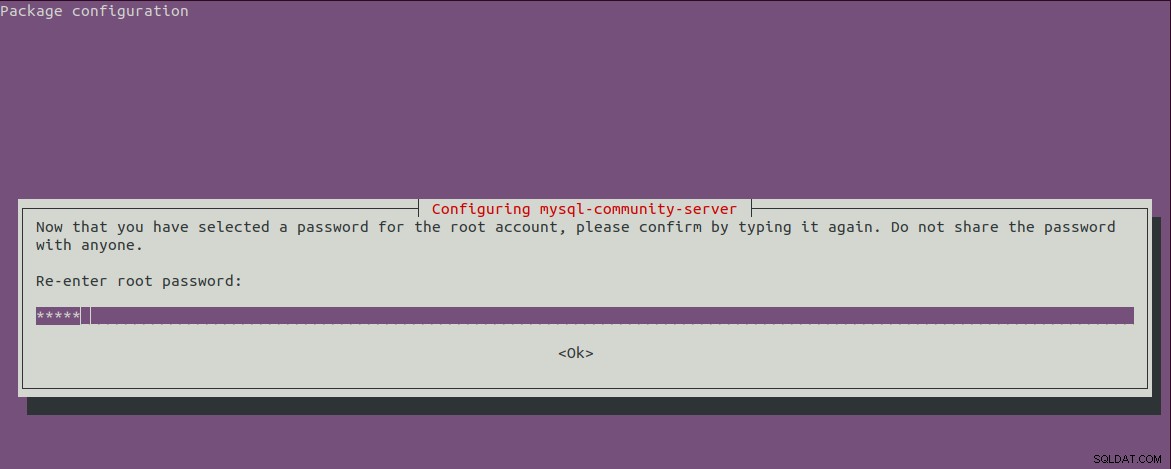
Figura 5
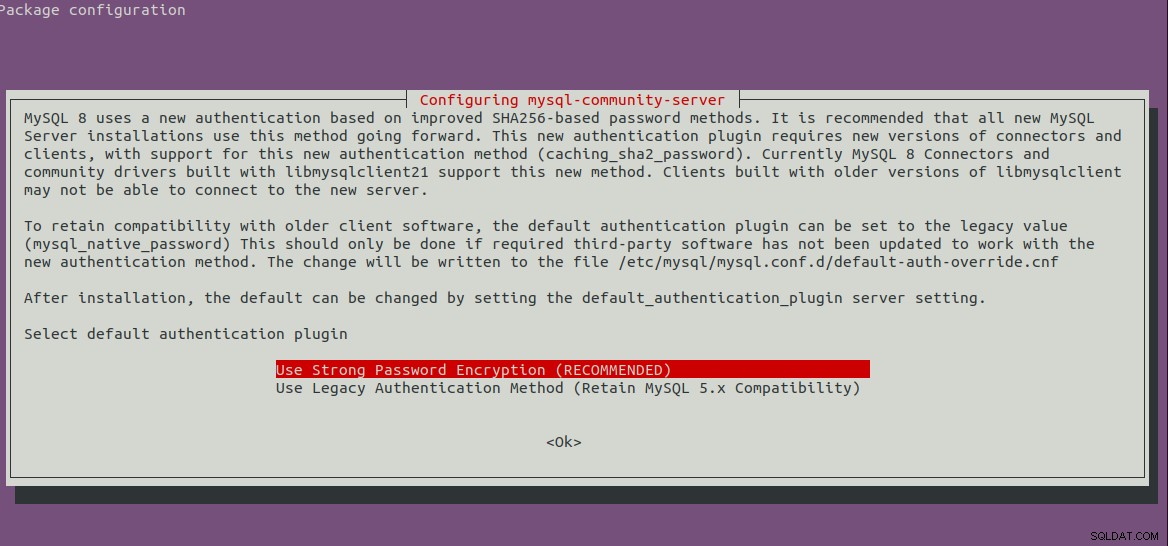
Figura 6
Etapa 5 - Instalação segura do MySQL
Também devemos proteger a instalação usando o comando conforme mencionado abaixo.
sudo mysql_secure_installation
Ele pedirá para definir a senha de root e algumas perguntas de segurança. As etapas completas seguidas por mim são as mostradas abaixo.
bravo@pc1:/setups/database$ sudo mysql_secure_installation

Securing the MySQL server deployment.

Enter password for user root:

VALIDATE PASSWORD COMPONENT can be used to test passwords
and improve security. It checks the strength of password
and allows the users to set only those passwords which are
secure enough. Would you like to setup VALIDATE PASSWORD component?

Press y|Y for Yes, any other key for No: y

There are three levels of password validation policy:

LOW    Length >= 8
MEDIUM Length >= 8, numeric, mixed case, and special characters
STRONG Length >= 8, numeric, mixed case, special characters and dictionary                  file

Please enter 0 = LOW, 1 = MEDIUM and 2 = STRONG: 1
Using existing password for root.

Estimated strength of the password: 25
Change the password for root ? ((Press y|Y for Yes, any other key for No) : n

 ... skipping.
By default, a MySQL installation has an anonymous user,
allowing anyone to log into MySQL without having to have
a user account created for them. This is intended only for
testing, and to make the installation go a bit smoother.
You should remove them before moving into a production
environment.

Remove anonymous users? (Press y|Y for Yes, any other key for No) : y
Success.


Normally, root should only be allowed to connect from
'localhost'. This ensures that someone cannot guess at
the root password from the network.

Disallow root login remotely? (Press y|Y for Yes, any other key for No) : y
Success.

By default, MySQL comes with a database named 'test' that
anyone can access. This is also intended only for testing,
and should be removed before moving into a production
environment.


Remove test database and access to it? (Press y|Y for Yes, any other key for No) : y
 - Dropping test database...
Success.

 - Removing privileges on test database...
Success.

Reloading the privilege tables will ensure that all changes
made so far will take effect immediately.

Reload privilege tables now? (Press y|Y for Yes, any other key for No) : y
Success.

All done!
bravo@pc1:/setups/database$
As etapas acima removem o banco de dados de teste e os usuários anônimos. Ele também não permite o login remoto para garantir que o servidor seja acessível localmente usando 127.0.0.1 ou localhost .
Use o comando abaixo mencionado para verificar se o servidor MySQL está em execução.
bravo@pc1:/setups/database$ systemctl status mysql
● mysql.service - MySQL Community Server
   Loaded: loaded (/lib/systemd/system/mysql.service; enabled; vendor preset: enabled)
   Active: active (running) since Thu 2019-08-15 10:40:47 IST; 4min 45s ago
     Docs: man:mysqld(8)
           http://dev.mysql.com/doc/refman/en/using-systemd.html
  Process: 28669 ExecStartPre=/usr/share/mysql-8.0/mysql-systemd-start pre (code=exited, status=0/SUCCESS)
 Main PID: 28708 (mysqld)
   Status: "Server is operational"
    Tasks: 38 (limit: 4915)
   CGroup: /system.slice/mysql.service
           └─28708 /usr/sbin/mysqld

Aug 15 10:40:45 bravo systemd[1]: Starting MySQL Community Server...
Aug 15 10:40:47 bravo systemd[1]: Started MySQL Community Server.
Etapa 6 - Verifique a versão e o acesso
Verifique a versão do servidor instalado por nós e também certifique-se de que o servidor esteja acessível usando a senha de root configurada por nós.
# Check version
sudo mysql --version
mysql  Ver 8.0.17 for Linux on x86_64 (MySQL Community Server - GPL)

# Login
sudo mysql -u root -p
Etapa 7 - Comandos importantes
Esta seção mostra alguns dos comandos importantes para iniciar, parar e reiniciar o servidor.
# Check server status
sudo service mysql status

# Stop server
sudo service mysql stop

# Start server
sudo service mysql start

# Restart server
sudo service mysql restart
Etapa 8 - Usando plug-ins de senha
Caso você tenha optado por usar a opção de plugin de senha para campatibilidade de backword com a versão 5.7, pode ser necessário conectar-se ao MySQL Server usando a conta com
# Login to MySQL

# Check password plugin of root user
SELECT user,authentication_string,plugin,host FROM mysql.user;

# Note the password plugin of root user
+------------------+-------------------------------------------+-----------------------+-----------+
| user             | authentication_string                     | plugin                | host      |
+------------------+-------------------------------------------+-----------------------+-----------+
| root             |                                           | auth_socket           | localhost |
+------------------+-------------------------------------------+-----------------------+-----------+

# Change password plugin of root user to native
ALTER USER 'root'@'localhost' IDENTIFIED WITH mysql_native_password BY '<pw>';

# Apply changes
flush privileges;

# Check password scheme of user
SELECT user,authentication_string,plugin,host FROM mysql.user;

# Note the password plugin of root user
+------------------+-------------------------------------------+-----------------------+-----------+
| user             | authentication_string                     | plugin                | host      |
+------------------+-------------------------------------------+-----------------------+-----------+
| root             | *E5C4F73D963132CEF9BB4PA79LA818C08BAQC300 | mysql_native_password | localhost |
+------------------+-------------------------------------------+-----------------------+-----------+

# Change to new and recommended password plugin
ALTER USER 'root'@'localhost' IDENTIFIED WITH caching_sha2_password BY '<pw>';

# Apply changes
flush privileges;

# Check password scheme of user
SELECT user,authentication_string,plugin,host FROM mysql.user;

+------------------+------------------------------------------------------------------------+-----------------------+-----------+
| user             | authentication_string                                                  | plugin                | host      |
+------------------+------------------------------------------------------------------------+-----------------------+-----------+
| root             | $A$005$THISISACOMBINATIONOFINVALIDSALTANDPASSWORDTHATMUSTNEVERBRBEUSED | caching_sha2_password | localhost |
+------------------+------------------------------------------------------------------------+-----------------------+-----------+
É assim que podemos instalar a versão mais recente do servidor MySQL, ou seja, MySQL 8 no Ubuntu 18.04 LTS.


