1. Introdução ao Oracle SQL/SQL*Plus
O Oracle Relational Database Management System (RDBMS) é um sistema de banco de dados líder do setor projetado para armazenamento e recuperação de dados de missão crítica. O RDBMS é responsável por armazenar dados com precisão e recuperar esses dados com eficiência em resposta às consultas do usuário.
A Oracle Corporation também fornece ferramentas de interface para acessar dados armazenados em um banco de dados Oracle. Duas dessas ferramentas são conhecidas como SQL*Plus, uma interface de linha de comando e Desenvolvedor , uma coleção de formulários, relatórios e interfaces gráficas. Este tutorial apresenta os recursos da ferramenta SQL*Plus e fornece demonstrações de seus principais recursos.
Este tutorial destina-se a estudantes e profissionais de banco de dados que precisam de uma introdução ao SQL, uma introdução ao trabalho com a ferramenta Oracle SQL*Plus ou ambos.
Este documento está organizado da seguinte forma. Uma breve visão geral do conjunto de produtos Oracle é apresentada pela primeira vez na Seção 2. Na Seção 3, discutimos os fundamentos do trabalho com a ferramenta SQL*Plus. A linguagem de consulta estruturada (SQL), incluindo a linguagem de definição de dados (DDL) e a linguagem de manipulação de dados (DML) é discutida na seção 4. Os comandos avançados do SQL*Plus são discutidos na seção 5 e uma breve introdução aos procedimentos armazenados e gatilhos é fornecida na seção 6.
Índice
- 1. Introdução
- 2. Produtos Oracle:Uma Visão Geral
- 2.1 Ferramentas de desenvolvimento de aplicativos
- 2.2 Utilitários de banco de dados
- 2.3 Produtos de conectividade
- 2.4 Mecanismo de banco de dados principal
- 2.5 Ambientes de desenvolvimento
- 3. Princípios Básicos do Oracle SQL*Plus
- 3.1 Executando Oracle SQL*Plus e/ou SQL Developer
- 3.2 Comandos SQL*Plus
- 3.3 Recursos de ajuda do SQL*Plus
- 4. A linguagem SQL
- 4.1 Instruções SQL
- 4.2 Linguagem de definição de dados SQL
- 4.2.1 Criar, alterar e descartar tabelas, visualizações, índices e sequências
- 4.2.2 Declarações GRANT e REVOKE
- 4.2.3 Sinônimos
- 4.3 Linguagem de manipulação de dados SQL
- 4.3.1 Selecionar, inserir, atualizar, excluir, confirmar e reverter dados
- 4.3.2 Exibindo metadados de tabela
- 4.3.3 Pseudo-colunas Oracle
- 4.3.4 Funções Oracle SQL
- 4.3.5 Exemplos de instruções SQL DML
- Declarações básicas de seleção
- Seleção de 2 ou mais tabelas
- Consultas recursivas e aliases de tabela
- Consultas em árvore
- Expressões da cláusula WHERE
- Exemplos de funções SQL
- Instruções SQL DELETE
- Instruções SQL UPDATE
- 5. Comandos SQL*Plus avançados
- 5.1 Editando o buffer SQL
- 5.2 Formatando a saída do SQL*Plus
- 5.3 Salvando a saída do SQL*Plus usando o comando SPOOL
- 5.4 Solicitando e aceitando a entrada do usuário
- 5.5 Gerando saída HTML do SQL*Plus
- 5.6 Coleta de estatísticas e criação de perfil de instruções SQL
- 5.7 Uso da instrução ALTER SESSION para formatos de data
- 6. Stored Procedures e Triggers no Oracle
- 6.1 Sintaxe do Acionador Oracle
- 6.2 Exemplo de gatilho Oracle
- 6.3 Exemplo de procedimento armazenado Oracle
2. Produtos Oracle:uma visão geral
O pacote de produtos Oracle inclui as seguintes ferramentas e utilitários:
2.1 Ferramentas de desenvolvimento de aplicativos
- SQL*Plus – Uma ferramenta de linha de comando usada para manipular tabelas e outros objetos de banco de dados em um banco de dados Oracle.
- Desenvolvedor SQL – Uma poderosa ferramenta GUI usada para manipular tabelas e outros objetos de banco de dados em um banco de dados Oracle.
- Formulários Oracle – Uma ferramenta baseada em GUI usada para desenvolver formulários de entrada de dados e menus que acessam tabelas em um banco de dados Oracle.
- Relatórios Oracle – Uma ferramenta baseada em GUI usada para desenvolver relatórios que acessam tabelas em um banco de dados Oracle.
- Oracle JDeveloper – Um ambiente de desenvolvimento integrado Java de propósito geral que foi pré-carregado com classes e métodos usados para conectar e manipular esquemas em bancos de dados Oracle. Uma coleção de assistentes de desenvolvimento de código permite que o desenvolvedor crie rapidamente formulários de entrada de dados como aplicativos ou applets Java, bem como relatórios usando Java Server Pages (JSP).
- Designer Oracle – Uma ferramenta gráfica usada para criar e exibir modelos contidos no CASE*Dictionary. O CASE*Dictionary é um repositório de regras de negócios, modelos funcionais e modelos de dados usados para organizar e documentar um esforço de desenvolvimento de aplicativos. CASE*Generator é uma ferramenta de geração de código que usa informações armazenadas no CASE*Dictionary para desenvolver formulários de entrada de dados, relatórios e gráficos.
- Programador – Incluindo os pré-compiladores Pro* – Bibliotecas de rotinas e utilitários que podem ser vinculados com “C”, C++, FORTRAN, Java, ADA, COBOL ou outras linguagens de host para permitir o acesso a bancos de dados Oracle.
O conjunto de ferramentas Developer foi inicialmente destinado ao desenvolvimento de aplicativos cliente/servidor tradicionais de duas camadas, onde o lado do cliente mantém as interfaces de usuário de formulários e relatórios, bem como a maior parte da lógica de negócios. A lógica de negócios é implementada usando a linguagem PL/SQL da Oracle. Essas ferramentas foram constantemente revisadas para se adequarem a uma arquitetura de três camadas, na qual o cliente processa apenas os elementos da interface do usuário, enquanto uma “camada intermediária” cuida do processamento da lógica de negócios. A versão atual (no outono de 2014) é o Oracle Developer Suite 11g.
2.2 Utilitários de banco de dados
- Gerente Empresarial – Uma coleção de utilitários baseada em GUI para gerenciar bancos de dados Oracle.
- SQL*DBA e SVRMGR – Um utilitário que permite que o administrador de banco de dados (DBA) monitore a atividade do banco de dados e ajuste o banco de dados para um desempenho ideal.
- Exportar/Importar – Utilitários de linha de comando que permitem que um usuário ou o DBA exporte dados de um banco de dados Oracle para um arquivo legível por máquina ou importe dados de um arquivo legível por máquina para um banco de dados Oracle.
- SQL*Loader – Um utilitário de linha de comando para carregar arquivos de dados ASCII ou binários em um banco de dados Oracle.
- Oracle*Terminal – Um programa utilitário usado para customizar a interface do usuário e os mapeamentos de teclado para todas as ferramentas Oracle. Esse utilitário permite que todas as ferramentas Oracle tenham uma “aparência e comportamento” semelhante em muitas plataformas diferentes de hardware e sistema operacional.
2.3 Conectividade e produtos de middleware
- SQL*Net e Net8 – Um driver de comunicação que permite que uma ferramenta Oracle executada em uma máquina cliente acesse dados Oracle em uma máquina servidora separada.
- SQL*Connect e Gateways Oracle – Um driver de comunicação que permite que uma ferramenta Oracle executada em uma máquina cliente acesse dados não Oracle em uma máquina servidora, como dados que residem em um banco de dados DB2 ou banco de dados MS SQL Server.
- Servidor ORACLE – Normalmente uma parte do Oracle RDBMS em execução em um servidor de banco de dados, esse componente recebe solicitações de máquinas clientes e as envia ao Oracle RDBMS. Os resultados são então passados de volta para as máquinas clientes.
- Drivers ODBC da Oracle – Drivers Open DataBase Connectivity para conectar software a bancos de dados Oracle usando o padrão ODBC.
2.4 Mecanismo de banco de dados Oracle Core
- RDBMS ORACLE – O Oracle Relational Database Engine com várias opções além de gerenciar dados relacionais. Essas opções incluem:
- Servidor de aplicativos da Web da Oracle – Um servidor WWW (servidor HTTP) vinculado ao Oracle RDBMS. Permite que aplicativos baseados na web usando formulários HTML e Java acessem e manipulem dados.
- Dados espaciais – Permite o armazenamento de dados temporais e espaciais no Oracle RDBMS. Útil para Sistemas de Informações Geográficas (GIS).
- Vídeo – Fornece armazenamento e serviço em tempo real de streaming de vídeo.
- Contexto – Fornece armazenamento e recuperação de documentos de texto.
- Mensagens – Uma arquitetura de groupware construída sobre o RDBMS.
- OLAP – Ferramentas e suporte a banco de dados para Processamento Analítico On-Line.
- Mineração de dados – Ferramentas e suporte a banco de dados para mineração de dados.
- Dicionário de dados integrado – Armazena e gerencia o acesso a todas as tabelas pertencentes a todos os usuários em um sistema.
- SQL – A linguagem usada para acessar e manipular dados do banco de dados.
- PL/SQL – Uma extensão procedural para a linguagem SQL exclusiva da linha de produtos Oracle.
2.5 Ambientes de desenvolvimento Oracle típicos
O desenvolvimento de aplicativos usando um banco de dados Oracle requer acesso a uma cópia do Oracle RDBMS (ou um servidor Oracle RDBMS central) e uma ou mais ferramentas de desenvolvimento. Ferramentas de desenvolvimento de terceiros, como PowerBuilder, Visual Basic ou Java, também podem ser usadas para desenvolvimento de aplicativos.
O desenvolvimento autônomo em um ambiente de usuário único pode ser realizado usando o Personal Oracle ou Personal Oracle Lite RDBMS em conjunto com o Oracle Developer ou uma ferramenta de desenvolvimento de terceiros.
O desenvolvimento multiusuário em um ambiente compartilhado pode ser realizado usando um servidor Oracle RDBMS executado em uma máquina servidora. Os PCs clientes distribuídos podem desenvolver os aplicativos usando qualquer uma das ferramentas mencionadas acima.
Independentemente do ambiente de desenvolvimento usado, o utilitário Oracle SQL*Plus é uma ferramenta conveniente e capaz de manipular dados em um banco de dados Oracle. Na seção a seguir, a ferramenta SQL*Plus é apresentada.
3. Noções básicas do SQL*Plus
O SQL*Plus da Oracle é uma ferramenta de linha de comando que permite que um usuário digite instruções SQL para serem executadas diretamente em um banco de dados Oracle. O SQL*Plus tem a capacidade de formatar a saída do banco de dados, salvar comandos usados com frequência e pode ser invocado de outras ferramentas Oracle ou do prompt do sistema operacional.
Nas seções a seguir, a funcionalidade básica do SQL*Plus será demonstrada juntamente com entradas e saídas de amostra para demonstrar alguns dos muitos recursos deste produto.
3.1 Executando o SQL*Plus
Nesta seção, damos algumas orientações gerais sobre como entrar no programa SQL*Plus e conectar-se a um banco de dados Oracle. As instruções específicas para sua instalação podem variar dependendo da versão do SQL*Plus que está sendo usada, se o SQL*Net ou o Net8 estão em uso ou não, etc.
Algumas dicas sobre como obter e instalar o software Oracle podem ser encontradas neste link.
Se você tiver o Oracle Express Edition instalado, acesse este link. descreverá como executar comandos SQL no Oracle Application Express.
Antes de usar a ferramenta SQL*Plus ou qualquer outra ferramenta ou utilitário de desenvolvimento, o usuário deve obter uma conta Oracle para o DBMS. Essa conta incluirá um nome de usuário, uma senha e, opcionalmente, uma string de host indicando o banco de dados ao qual se conectar. Essas informações geralmente podem ser obtidas com o administrador do banco de dados.
As instruções a seguir se aplicam a duas instalações comumente encontradas:cliente Windows XP ou Windows 7 (daqui em diante, referido simplesmente como cliente Windows) com um servidor Oracle e uma instalação UNIX/LINUX.
3.1.1 Executando o SQL*Plus no Windows
Para executar o programa de linha de comando SQL*Plus no Windows , Clique no botão
 , Programas, Oracle – OraHomeXX, Desenvolvimento de Aplicativos e depois SQL*Plus. A tela de login do SQL*Plus aparecerá após aproximadamente 15 segundos.
 (Observe que o XX é substituído pela versão do banco de dados que você está usando, como 81 para Oracle8i, 90 para Oracle9i etc.).

No Nome de usuário: campo, digite seu nome de usuário Oracle.
Pressione a tecla TAB para ir para o próximo campo.
Na Senha: campo, digite sua senha Oracle.
Pressione a tecla TAB para ir para o próximo campo.
Na String de host: campo, digite o Nome do serviço do host Oracle ao qual se conectar.
Se o DBMS for Personal Oracle lite, essa string poderá ser ODBC:POLITE. Se o DBMS for um banco de dados pessoal Oracle8, 8i ou 9i local, a string do host poderá ser beq-local ou, em alguns casos, você poderá deixar este campo em branco para conectar-se à instância do banco de dados local. Certifique-se de que sua instância local foi iniciada. Para instalações Cliente/Servidor com SQL*Net ou Net8, esta string será o nome do serviço configurado pelo software assistente SQL*Net ou Net8.
Por fim, clique no botão OK para concluir o processo de login do Oracle. O SQL*Plus estabelecerá uma sessão com o Oracle DBMS e o prompt do SQL*Plus (SQL> ) aparecerá. A figura a seguir mostra os resultados do login no Oracle usando SQL*Plus:

Linha de comando SQL*Plus no Oracle 11g
Se você estiver executando o Oracle Database 11g Express Edition então os seguintes itens aparecem no menu Iniciar -> Programas:

A Executar linha de comando SQL O atalho executa o SQL*Plus com a opção /NOLOG para que não solicite automaticamente o nome de usuário e a senha. Em vez disso, ele fornecerá o prompt SQL>. Neste caso para se conectar ao banco de dados, digite o comando CONNECT e preencha as respostas aos propmts.

Erros ao conectar a um banco de dados
Existem várias situações em que pode ocorrer um erro:
- Você pode digitar incorretamente seu nome de usuário, senha e/ou Host String
- O SQL*Plus e o SQL*Net podem não estar configurados corretamente em seu cliente Windows.
- A rede entre o cliente Windows e o servidor Oracle pode ter um problema
- O servidor Oracle pode estar temporariamente desligado ou indisponível
Em qualquer um dos casos acima, uma mensagem de erro será retornada. Se o servidor Oracle não estiver disponível ou se você fornecer o nome de usuário ou a senha incorretos, um erro será retornado imediatamente. Se houver um problema de rede, o SQL*Plus pode levar vários minutos antes de retornar um erro.
Aqui estão algumas mensagens de erro comuns e algumas sugestões sobre como resolvê-las:
- ERRO:ORA-12154:TNS:não foi possível resolver o nome do serviço
- A string do Host foi digitada incorretamente ou SQL*Net ou Net8 não está configurado corretamente. Saia do SQL*Plus e tente fazer login novamente. Se o erro persistir, tente outro PC.
- ERRO:ORA-01017:nome de usuário/senha inválidos; logon negado
- O nome de usuário ou a senha foram digitados incorretamente. Saia do SQL*Plus e tente novamente.
Infelizmente, a maioria das versões do SQL*Plus não exibirá novamente a tela de login se sua tentativa de conexão não for bem-sucedida. Você deve sair do SQL*Plus completamente puxando para baixo o menu Arquivo e escolhendo o item de menu Sair. Em seguida, execute o SQL*Plus novamente desde o início.
Para usuários de uma nova instalação do Peronsal Oracle8, 8i ou 9i, um nome de usuário/senha padrão que já está configurado é SCOTT/TIGER. A conta DBA padrão para todos os bancos de dados Oracle é SYSTEM/MANAGER. No entanto, você é fortemente desencorajado a praticar ou fazer o trabalho de desenvolvimento no esquema SYSTEM, pois pode resultar em danos irreparáveis ao seu banco de dados.
Para usuários do Personal Oracle Lite, há um esquema de banco de dados padrão criado na instalação do software. Para efetuar login no Personal Oracle Lite usando o SQL*Plus, forneça os seguintes valores na tela de login do SQL*Plus:
No Nome de usuário: campo, digite OOT_SCH
Na Senha: campo, digite OOT_SCH
Na String de host: campo, digite ODBC:POLITE.
3.1.2 Executando SQL*Plus em UNIX/LINUX
Verifique com o administrador do sistema se há algum comando especial necessário para executar o SQL*Plus em seu ambiente Linux ou Unix. Especificamente, o Oracle requer que algumas variáveis de ambiente do shell sejam configuradas. As instruções abaixo assumem que tudo isso foi configurado.
Para executar o SQL*Plus em Unix ou Linux , faça login em sua conta Unix/Linux e no prompt de comando do shell (mostrado como unix% abaixo), digite o comando sqlplus seguido por um retorno de carro. Quando um nome de usuário for solicitado, forneça seu nome de usuário Oracle (pode ser igual ou diferente do nome da sua conta Unix/Linux). Quando uma senha for solicitada, forneça a senha da sua conta Oracle (não deve ser a mesma senha da sua conta Unix/Linux).
|
Para sair do programa SQL*Plus (em qualquer sistema operacional), digite EXIT e pressione Enter ou retorno de carro:
SQL> SAIR
<1 name="sqldeveloper">
Desenvolvedor SQL
O Oracle SQL Developer é uma ferramenta de interface gráfica do usuário com uma ampla variedade de recursos úteis para o desenvolvimento de aplicativos de banco de dados. Além de fornecer conexões com bancos de dados Oracle, você pode usar o SQL Developer para enviar instruções SQL em um banco de dados ou esquema (como no SQL*Plus), fazer engenharia reversa de um esquema em um modelo de dados, gerenciar cubos OLAP, iniciar trabalhos de mineração de dados e muitos outros mais.
O Oracle SQL Developer está disponível para download gratuito na Oracle Technology Network. Requer que um Java Development Kit (JDK) seja instalado no mesmo computador. Normalmente, o SQL Developer é simplesmente descompactado (descompactado) em uma pasta como c:\sqldeveloper ou c:\oracle\sqldeveloper ou algo semelhante.
Para executar o SQL Developer, navegue até a pasta onde o SQL Developer foi descompactado e execute o sqldeveloper.exe programa. Você pode ser solicitado a fornecer o caminho para a pasta Java Development Kit (JDK).
Quando o SQL Developer estiver em execução, crie uma nova conexão de banco de dados clicando no sinal de mais verde na janela Conexões. Preencha as informações de nome de usuário, senha e string de conexão apropriadas. Clique no botão Testar para verificar se a conexão está funcionando. Em seguida, salve a conexão e, por fim, clique no botão Conectar para conectar-se ao banco de dados. Uma nova planilha SQL deve aparecer e nesse ponto você pode começar a digitar a Instrução SQL e enviá-la ao banco de dados.
Websites com emuladores Oracle
Mesmo se você não tiver o Oracle instalado, ainda poderá praticar SQL usando um emulador Oracle SQL baseado na web. Dois exemplos disso são Tutoriais Point Oracle Terminal On-Line e SQL Fiddle.
Talvez a melhor ferramenta disponível (em janeiro de 2017) seja o próprio LiveSQL da Oracle. Siga este tutorial para obter instruções e exemplos.
Uma vez que uma sessão foi estabelecida usando a ferramenta SQL*Plus, quaisquer instruções SQL ou Comandos SQL*Plus podem ser emitidos. Por padrão, todos os comandos são direcionados para o esquema do usuário (que tem o mesmo nome do nome de usuário do Oracle). Na seção a seguir, os comandos básicos do SQL*Plus são apresentados.
3.2 Comandos SQL*Plus
Os comandos SQL*Plus permitem que um usuário manipule e envie instruções SQL. Especificamente, eles permitem que um usuário:
- Inserir, editar, armazenar, recuperar e executar instruções SQL
- Liste as definições de coluna para qualquer tabela
- Formatar, realizar cálculos, armazenar e imprimir resultados de consulta na forma de relatórios
- Acessar e copiar dados entre bancos de dados SQL
A seguir está uma lista de comandos SQL*Plus e suas funções. Os comandos mais usados são enfatizados em itálico:
- / – Executa a instrução SQL atual no buffer – igual a RUN
- ACEITAR – Aceitar um valor do usuário e colocá-lo em uma variável
- APPEND – Adiciona texto ao final da linha atual da instrução SQL no buffer
- AUTOTRACE – Rastreie o plano de execução da instrução SQL e colete estatísticas
- BREAK – Defina o comportamento de formatação para a saída de instruções SQL
- BTITLE – Coloque um título na parte inferior de cada página na impressão de uma instrução SQL
- CHANGE – Substitui o texto na linha atual da instrução SQL por um novo texto
- CLEAR – Limpa o buffer
- COLUMN – Alterar a aparência de uma coluna de saída de uma consulta
- COMPUTE – Faz cálculos em linhas retornadas de uma instrução SQL
- CONNECT – Conecte-se a outro banco de dados Oracle ou ao mesmo banco de dados Oracle com um nome de usuário diferente
- COPIAR – Copia dados de uma tabela para outra no mesmo banco de dados ou em bancos de dados diferentes
- DEL – Excluir a linha atual no buffer
- DESCRIBE – Lista as colunas com tipos de dados de uma tabela (pode ser abreviado como DESC)
- EDIT – Edite a instrução SQL atual no buffer usando um editor externo como vi ou emacs
- EXIT – Sair do programa SQL*Plus
- GET – Carrega uma instrução SQL no buffer, mas não a executa
- AJUDA – Obter ajuda para um comando SQL*Plus (em algumas instalações)
- HOST – Desça para o shell do sistema operacional
- INPUT – Adicione uma ou mais linhas à instrução SQL no buffer
- LIST – Lista a instrução SQL atual no buffer
- QUIT – Sair do programa SQL*Plus
- REMARK – Coloque um comentário após a palavra-chave REMARK
- EXECUTAR – Execute a instrução SQL atual no buffer
- SALVAR – Salve a instrução SQL atual em um arquivo de script
- SET – Defina uma variável de ambiente para um novo valor
- MOSTRAR – Mostra o valor atual de uma variável de ambiente
- CARRETEL – Envie a saída de uma instrução SQL para um arquivo
- INICIAR – Carregue uma instrução SQL localizada em um arquivo de script e execute essa instrução SQL
- TIMING – Usado para cronometrar a execução de instruções SQL para análise de desempenho
- TÍTULO – Coloque um título no topo de cada página na impressão de uma instrução SQL
- UNDEFINE – Excluir uma variável definida pelo usuário
Exemplos desses comandos SQL*Plus são fornecidos nas seções a seguir.
Observe a distinção feita entre Comandos SQL*Plus e Instruções SQL . Os comandos SQL*Plus são proprietários da ferramenta Oracle SQL*Plus. SQL é uma linguagem padrão que pode ser usada em qualquer sistema de gerenciamento de banco de dados relacional (RDBMS).
3.3 Recursos de ajuda do SQL*Plus
Algumas versões do SQL*Plus armazenam a documentação de ajuda no banco de dados e a disponibilizam por meio da linha de comando do SQL*Plus. Instalações mais recentes mudaram isso e agora armazenam a documentação em formato HTML que pode ser lido usando um navegador da World Wide Web, como MS Internet Explorer ou Firefox.
As duas seções a seguir descrevem como chamar a ajuda no SQL*Plus no Windows e no UNIX. O método usado para acessar a ajuda pode variar de acordo com a forma como o software foi instalado.
3.3.1 Obtendo ajuda no Windows
Para obter AJUDA em qualquer uma das ferramentas oracle, use a Documentação Oracle8 ou Oracle8i que pode ser acessada por meio de um navegador da web. Para acessar a Documentação do Oracle8, clique no botão Windows
, depois Programs, Oracle – OraHomeXX e finalmente Oracle8 Documentation: . Isso iniciará seu navegador da Web local (Netscape Navigator/Communicator ou Microsoft Internet Explorer) e o arquivo Welcome to the Oracle8 Documentation Library! tela será exibida. A partir daqui, clique no link “VERSÃO DE TEXTO” para acessar a Biblioteca de Documentação do Produto Oracle.
Uma vez na tela principal da Documentação do Oracle8, clique em Oracle8 Enterprise Edition e, em seguida, SQL*Plus Getting Started for Windows . Outra documentação que você pode achar útil é:
| Arquivo/Link de Ajuda | Conteúdo |
|---|---|
| Referência SQL | Sintaxe abrangente para todas as instruções SQL |
| Introdução ao SQL*Plus para Windows | Comandos e opções específicos do SQL*Plus para usuários do Windows NT/2000/XP. |
| Referência Rápida do SQL*Plus | Guia de referência rápida para comandos SQL*Plus. |
| Guia e referência do usuário do SQL*Plus | Guia abrangente para usar o SQL*Plus. |
Cada um deles pode ser encontrado na mesma página do Oracle8 Enterprise Edition.
Observe que a disposição da tela de ajuda e da documentação on-line em outras versões do Oracle8 e Oracle8i pode ser ligeiramente diferente.
3.3.2 Obtendo ajuda no UNIX
SQL> HELP SELECT SELECT command
PURPOSE: To retrieve data from one or more tables, views, or snapshots. SYNTAX: SELECT [DISTINCT | ALL] { * | { [schema.]{table | view | snapshot}.*
| expr } [ [AS] c_alias ]
[, { [schema.]{table | view | snapshot}.*
| expr } [ [AS] c_alias ] ] ... }
FROM [schema.]{table | view | subquery | snapshot} [t_alias] [, [schema.]... ] ...
[WHERE condition ]
[ [START WITH condition] CONNECT BY condition]
[GROUP BY expr [, expr] ... [HAVING condition] ]
[{UNION | UNION ALL | INTERSECT | MINUS} SELECT command ]
[ORDER BY {expr|position} [ASC | DESC]
[, {expr|position} [ASC | DESC]] ...]
[FOR UPDATE [OF [[schema.]{table | view}.]column
[, [[schema.]{table | view}.]column] ...] ] etc.
Como nota final, a Oracle disponibiliza grande parte de sua documentação em seu site no Oracle Documentation Center em https://www.oracle.com/technetwork/documentation/
4. A linguagem SQL
Structured Query Language (SQL) é a linguagem usada para manipular bancos de dados relacionais. O SQL está intimamente ligado ao modelo relacional.
No modelo relacional, os dados são armazenados em estruturas chamadas relações ou tabelas . Cada tabela tem um ou mais atributos ou colunas que descrevem a tabela. Em bancos de dados relacionais, a tabela é o bloco de construção fundamental de um aplicativo de banco de dados. As tabelas são usadas para armazenar dados sobre Funcionários, Equipamentos, Materiais, Armazéns, Pedidos de Compra, Pedidos de Clientes, etc. As colunas na tabela Funcionários, por exemplo, podem ser Sobrenome, Nome, Salário, Data de contratação, CPF etc. .
As instruções SQL são emitidas com a finalidade de:
- Definição de dados – Definindo tabelas e estruturas no banco de dados (DB).
- Manipulação de dados – Inserindo novos dados, Atualizando dados existentes, Excluindo dados existentes e Consultando o banco de dados (Recuperando dados existentes do banco de dados).
Outra maneira de dizer isso é que a linguagem SQL é, na verdade, composta de 1) a linguagem de definição de dados (DDL) usada para criar, alterar e descartar objetos scema, como tabelas e índices, e 2) a linguagem de manipulação de dados (DML) usada para manipular os dados dentro desses objetos de esquema.
A linguagem SQL foi padronizada pelo Comitê de Padrões de Banco de Dados ANSI X3H2. Dois dos padrões mais recentes são SQL-92 e SQL-99. Ao longo dos anos, cada fornecedor de bancos de dados relacionais introduziu novos comandos para estender sua implementação particular de SQL. A implementação da linguagem SQL do Oracle8i está em conformidade com os padrões SQL-99 “Entry Level” e é parcialmente compatível com os níveis Transitional, Intermediate e Full do SQL-99. Para obter mais detalhes sobre os recursos exatos compatíveis e não compatíveis, consulte o manual Oracle8i ou Oracle9i SQL Reference.
4.1 Instruções SQL
A seguir está uma lista alfabética de instruções SQL que podem ser emitidas em um esquema de banco de dados Oracle. Esses comandos estão disponíveis para qualquer usuário do banco de dados Oracle. Os itens enfatizados são mais comumente usados.
- ALTER – Alterar uma tabela, visualização ou definição de índice (DDL) existente
- AUDITORIA – Acompanhe as alterações feitas em uma tabela (DDL)
- COMMENT – Adicione um comentário a uma tabela ou coluna em uma tabela (DDL)
- COMMIT – Torna permanentes todas as alterações recentes (DML – transacional)
- CRIAR – Criar novos objetos de banco de dados, como tabelas ou visualizações (DDL)
- EXCLUIR – Excluir linhas de uma tabela de banco de dados (DML)
- DEIXAR – Solte um objeto de banco de dados, como uma tabela, exibição ou índice (DDL)
- GRANT – Permitir que outro usuário acesse objetos de banco de dados, como tabelas ou visualizações (DDL)
- INSERIR – Inserir novos dados em uma tabela de banco de dados (DML)
- Sem AUDITORIA – Desative a função de auditoria (DDL)
- REVOKE – Não permite o acesso de um usuário a objetos de banco de dados, como tabelas e exibições (DDL)
- ROLLBACK – Desfaz quaisquer alterações recentes no banco de dados (DML – Transacional)
- SELECIONAR – Recuperar dados de uma tabela de banco de dados (DML)
- TRUNCATE – Excluir todas as linhas de uma tabela de banco de dados (não pode ser revertida) (DML)
- ATUALIZAÇÃO – Alterar os valores de alguns itens de dados em uma tabela de banco de dados (DML)
Seguem alguns breves exemplos de instruções SQL. Para todos os exemplos neste tutorial, as palavras-chave usadas pelo SQL e Oracle são fornecidas em letras maiúsculas, enquanto as informações específicas do usuário, como nomes de tabelas e colunas, são fornecidas em letras minúsculas.
Para criar uma nova tabela para armazenar dados de funcionários, usamos a instrução CREATE TABLE:
CREATE TABLE employee
(employeeid      VARCHAR2(9) NOT NULL,
 fname           VARCHAR2(8),
 minit           VARCHAR2(2),
 lname           VARCHAR2(8),
 bdate           DATE,
 address         VARCHAR2(27),
 sex             VARCHAR2(1),
 salary          NUMBER(7) NOT NULL,
 superempid      VARCHAR2(9),
 dno             NUMBER(1) NOT NULL) ;
Para inserir novos dados na tabela de funcionários, usamos a instrução INSERT:
INSERT INTO employee
VALUES ('132451122', 'BUD', 'T', 'WILLIAMS',
        '24-JAN-1974', '987 Western Way, Plano, TX',
        'M', 42000, NULL, 5);

INSERT INTO employee
VALUES ('004321234', 'JANE', 'V', 'SMITH',
        '04-JUL-1983', '44 Forth St., Easytown, WA',
        'F', 56000, '132451122', 4);
Para recuperar uma lista de todos os funcionários com salário maior que 30.000 da tabela de funcionários, a seguinte instrução SQL pode ser emitida (Observe que todas as instruções SQL terminam com um ponto e vírgula):
SELECT fname, lname, salary
FROM   employee
WHERE  salary > 30000;
Para dar a cada funcionário do departamento 5 um aumento de 4%, a seguinte instrução SQL pode ser emitida:
          UPDATE employee
          SET    salary = salary * 1.04
          WHERE  dno = 5;
To delete an employee record from the database, the following SQL statement might be issued:
          DELETE FROM employee
          WHERE  employeeid  = '004321234' ;
The above statements are just a brief example of some of the many SQL statements and variations that are used with relational database management systems. The full syntax of these commands and additional examples are given on the next pages.
4.2 SQL Data Definition Language
In this section, the basic SQL Data Definition Language (DDL) statements are introduced and their syntax is given with examples.
An Oracle database can contain one or more schemas . A schema is a collection of database objects that can include:tables, views, indexes and sequences. By default, each user has their own the schema which has the same name as the Oracle username. For example, a single Oracle database can have separate schemas for HOLOWCZAK, JONES, JSHIH, SMITH and GREEN.
Any object in the database must be created in only one schema. The object name is prefixed by the schema name as in:
schema.object_name By default, all objects are created in the user’s own schema. For example, when JONES creates a database object such as a table, it is created in her own schema. If JONES creates an EMPLOYEE table, the full name of the table becomes:
JONES.EMPLOYEE . Thus database objects with the same name can be created in more than one schema. This feature allows each user to have their own EMPLOYEE table, for example. Database objects can be shared among several users by specifying the schema name. In order to work with a database object from another schema, a user must be granted authorization. See the section below on GRANT and REVOKE for more details.
Please note that many of these database objects and options are not available under Personal Oracle Lite. For example, foreign key constraints are not supported. Please see the on-line documentation for Personal Oracle Lite for more details.
4.2.1 Create, Alter and Drop Tables, Views and Sequences
SQL*Plus accepts SQL statements that allow a user to create, alter and drop table, view and sequence definitions. These statements are all standard ANSI SQL statements with the exception of CREATE SEQUENCE.
ALTER TABLE – Change an existing table definition. The table indicated in the ALTER statement must already exist. This statement can be used to add a new column or remove an existing column in a table, modify the data type for an existing column, or add or remove a constraint.
ALTER TABLE has the following syntax for renaming a table:
ALTER TABLE <table name>
RENAME TO <new table name> ;
ALTER TABLE has the following syntax for adding a new column to an existing table:
ALTER TABLE <table name>
ADD ( <column name>  <data type> <[not]null> ) ;
Another ALTER TABLE option can change a data type of column. The syntax is:
ALTER TABLE <table name>
MODIFY ( <column name>  <new data type> <[not]null> );
Another helpful ALTER statement can be used to drop a column in a table:
ALTER TABLE <table name>
DROP ( <column name> ) ;
Note:In earlier versions of Oracle (before Oracle8), there is no single command to drop a column of a table. In order to drop a column from a table, you must create a temporary table containing all of the columns and records that will be retained. Then drop the original table and rename the temporary table to the original name. This is demonstrated below in the section on Creating, Altering and Dropping Tables.
Finally, ALTER TABLE can also be used to add a constraint to a table such as for a PRIMARY KEY, FOREIGN KEY or CHECK CONSTRAINT. The syntax to add a PRIMARY KEY is:
ALTER TABLE <table name>
ADD CONSTRAINT <constraint-name>
PRIMARY KEY (<column-name>);
The syntax to add a FOREIGN KEY constraint is:
ALTER TABLE <table-name>
ADD CONSTRAINT <constraint-name>
FOREIGN KEY (<column-name>)
REFERENCES <parent-table-name> (column-name);
In Oracle, you must use an ALTER TABLE statement to define a composite PRIMARY KEY (a key made up of two or more columns). To do this, use the names of the columns that constitute the composite key separated by commas as in:
ALTER TABLE <table name>
ADD CONSTRAINT <constraint-name>
PRIMARY KEY (<column-name1>, <column-name2>);
CREATE TABLE – Create a new table in the database. The table name must not already exist. CREATE TABLE has the following syntax:
CREATE TABLE <table_name>
             ( <column1_name>  <data type> <[not]null>,
               <column2_name>  <data type> <[not]null>,   . . .  ) ;
An alternate syntax can be used to create a table with a subset of rows or columns from an existing table.
CREATE TABLE <table_name>
AS           <sql select statement> ;
DROP TABLE – Drop a table from the database. The table name must already exist in the database. The syntax for the DROP TABLE statement is:
DROP TABLE <table name> ;
CREATE INDEX – Create a new Index that facilitates rapid lookup of data. An index is typically created on the primary and/or secondary keys of the table. The basic syntax for the CREATE INDEX statement is:
CREATE INDEX <index name>
ON           <table name>
             ( <column name>, <column name> ) ;
DROP INDEX – Drop an index from the database. The syntax for the DROP INDEX statement is:
DROP INDEX <index name> ;
CREATE SEQUENCE – Create a new Oracle Sequence of values. Sequences can be used to automatically supply unique identifiers (keys) and other unique sequence of values when inserting data into a table. The new sequence name must not exist. CREATE SEQUENCE has the following syntax:
CREATE SEQUENCE <sequence name>
INCREMENT BY    <increment number>
START WITH      <start number>
MAXVALUE        <maximum value>
CYCLE ;
The CYCLE clause indicates if the sequence count should cycle back to the START WITH value once the MAXVALUE is reached. Without the CYCLE clause, the sequence will return an error once MAXVALUE is reached.
DROP SEQUENCE – Drop an Oracle Sequence. The sequence must exist in the schema. DROP SEQUENCE has the following syntax:
DROP SEQUENCE <sequence name> ;
CREATE VIEW – Create a new view based on a query of existing tables in the database. The table names must already exist. The new view name must not exist. CREATE VIEW has the following syntax:
CREATE VIEW <view name>
AS       <sql select statement> ;
where sql select statement is in the form:
SELECT <column names>
FROM   <table name>
WHERE  <where clause>
Additional information on the SELECT statement and SQL queries can be found in the next section.
Note that an ORDER BY clause may not be added to the sql select statement then defining a view.
In general, views are read-only. That is, one may query a view but it is normally the case that views can not be operated on with INSERT, UPDATE or DELETE. This is especially true in cases where views joining two or more tables together or when a view contains an aggregate function.
DROP VIEW – Drop a view from the database. The view name must already exist in the database. The syntax for the DROP VIEW command is:
DROP VIEW <view name> ;
In the following page, more examples of each of the SQL DDL commands will be provided.
4.2 SQL Data Definition Language – Continued
Creating, Altering and Dropping Tables
A table is made up of one or more columns (also called attributes in relational theory). Each column is given a name and a data type that reflects the kind of data it will store. Oracle supports four basic data types called CHAR, NUMBER, DATE and RAW. There are also a few additional variations on the RAW and CHAR data types. The basic datatypes, uses and syntax, are as follows:
- VARCHAR2 – Character data type. Can contain letters, numbers and punctuation. The syntax for this data type is:VARCHAR2(size) where size is the maximum number of alphanumeric characters the column can hold. For example VARCHAR2(25) can hold up to 25 alphanumeric characters. In Oracle8, the maximum size of a VARCHAR2 column is 4,000 bytes.The VARCHAR data type is a synonym for VARCHAR2. It is recommended to use VARCHAR2 instead of VARCHAR.
- NUMBER – Numeric data type. Can contain integer or floating point numbers only. The syntax for this data type is:NUMBER(precision, scale) where precision is the total size of the number including decimal point and scale is the number of places to the right of the decimal. For example, NUMBER(6,2) can hold a number between -999.99 and 999.99.
- DATE – Date and Time data type. Can contain a date and time portion in the format:DD-MON-YY HH:MI:SS. No additional information is needed when specifying the DATE data type. If no time component is supplied when the date is inserted, the time of 00:00:00 is used as a default. The output format of the date and time can be modified to conform to local standards. In general, to manipulate the time portion of the DATE datatype, one must make use of the TO_DATE and TO_CHAR SQL functions.
- RAW – Free form binary data. Can contain binary data up to 255 characters. Data type LONG RAW can contain up to 2 gigabytes of binary data. RAW and LONG RAW data cannot be indexed and can not be displayed or queried in SQL*Plus. Only one RAW column is allowed per table.
- LOB – Large Object data types. These include BLOB (Binary Large OBject) and CLOB (Character Large OBject). More than one LOB column can appear in a table. These data types are the prefferred method for storing large objects such as text documents (CLOB), images, or video (BLOB).
A column may be specified with a NULL or NOT NULL constraint meaning the column may or may not be left blank, respectively. This check is made just before a new row is inserted into the table. By default, a column is created as NULL if no option is given.
In addition to specifying NOT NULL constraints, tables can also be created with constraints that enforce referential integrity (relationships among data between tables). Constraints can be added to one or more columns, or to the entire table.
Each table may have one PRIMARY KEY that consists of a single column containing no NULL values and no repeated values. A PRIMARY KEY with multiple columns can be designated using the ALTER TABLE command. We create primary keys with NOT NULL constraints to uphold entity integrity.
Up to 255 columns may be specified per table. Column names and table names must start with a letter and may not contain spaces or other punctuation except for the underscore character. Column names and table names are case insensitive. This means that you can specify the names of columns and tables in any way you like. For example, the following three SELECT statements are all identical:
SELECT lname, fname, address FROM employee;

SELECT LNAME, FNAME, ADDRESS FROM EMPLOYEE;

SELECT Lname, Fname, Address FROM Employee;
In the following example, a new table called “employee” is created with ten columns of a variety of types. The columns indicated by NOT NULL will be mandatory while the other columns, by default, will be optional.
SQL> CREATE TABLE employee
2  (employeeid VARCHAR2(9) NOT NULL,
3  fname VARCHAR2(8),
4  minit VARCHAR2(2),
5  lname VARCHAR2(8),
6  bdate DATE,
7  address VARCHAR2(27),
8  sex VARCHAR2(1),
9  salary NUMBER(7) NOT NULL,
10 superempid VARCHAR2(9),
11 dno NUMBER(1) NOT NULL) ;

Table created.
SQL>
The numbers 2 through 11 at the start of each line indicate the line number supplied by the SQL*Plus program as this statement was typed in. We will omit these numbers in the rest of the examples to facilitate copying and pasting this material directly into a live SQL*Plus session.
DESCRIBE is a SQL*Plus command that displays the columns of a table and their data types. The syntax for the DESCRIBE command is:
DESCRIBE <table name> ;
For example, we can use DESCRIBE on the employee table just created:
SQL> DESCRIBE employee
Name                                      Null?    Type
----------------------------------------- -------- -------------------------
EMPLOYEEID                                NOT NULL VARCHAR2(9)
FNAME                                              VARCHAR2(8)
MINIT                                              VARCHAR2(2)
LNAME                                              VARCHAR2(8)
BDATE                                              DATE
ADDRESS                                            VARCHAR2(27)
SEX                                                VARCHAR2(1)
SALARY                                    NOT NULL NUMBER(7)
SUPEREMPID                                         VARCHAR2(9)
DNO                                       NOT NULL NUMBER(1)
A new table can also be created with a subset of the columns in an existing table. In the following example, a new table called emp_department_1 is created with only the fname, minit, lname and bdate columns from the employee table. This new table is also populated with data from the employee table where the employees are from department number 1.
SQL> CREATE TABLE emp_department_1
AS SELECT fname, minit, lname, bdate
FROM employee WHERE dno = 1 ;
Table created.

SQL> DESCRIBE emp_department_1
Name                            Null?    Type
------------------------------- -------- ------------
FNAME                                    VARCHAR2(8)
MINIT                                    VARCHAR2(2)
LNAME                                    VARCHAR2(8)
BDATE                                    DATE

SQL>
One can also create a new table with all of the columns from the original table, but with only a subset of the rows form the original table:
SQL> CREATE TABLE high_pay_emp
AS SELECT *
   FROM employee
   WHERE salary > 50000 ;

Table created.
The copying of data can be suppressed by giving a WHERE clause that always evaluates to FALSE for each record in the source table. The following example makes a duplicate of the employee table but does not copy any data into it.
SQL> CREATE TABLE copy_of_employee
AS SELECT *
   FROM employee
   WHERE 3=5 ;

Table created.
SQL> DESCRIBE copy_of_employee
 Name                                      Null?    Type
 ----------------------------------------- -------- -------------------------
 EMPLOYEEID                                NOT NULL VARCHAR2(9)
 FNAME                                              VARCHAR2(8)
 MINIT                                              VARCHAR2(2)
 LNAME                                              VARCHAR2(8)
 BDATE                                              DATE
 ADDRESS                                            VARCHAR2(27)
 SEX                                                VARCHAR2(1)
 SALARY                                    NOT NULL NUMBER(7)
 SUPEREMPID                                         VARCHAR2(9)
 DNO                                       NOT NULL NUMBER(1)
Constraints can be added to the table at the time it is created, or at a later time using the ALTER TABLE statement. Constraints can include:
- Primary key and Unique key constraints.
- Foreign key constraints (for referential integrity).
- Check constraints – to ensure only certain values are supplied for a column.
Here is an example of creating a primary key constraint on the employeeid column (Note we first drop the existing employee table and then re-create it):
SQL> DROP TABLE employee;
Table dropped.
SQL> CREATE TABLE employee
 (employeeid VARCHAR2(9) NOT NULL,
  fname      VARCHAR2(8),
  minit      VARCHAR2(2),
  lname      VARCHAR2(8),
  bdate      DATE,
  address    VARCHAR2(27),
  sex        VARCHAR2(1),
  salary     NUMBER(7) NOT NULL,
  superempid VARCHAR2(9),
  dno        NUMBER(1) NOT NULL,
  CONSTRAINT pk_employee PRIMARY KEY (employeeid) );

Table created.
Note the name given to the constraint is pk_employee .
Referential integrity constraints can also be added. Referential integrity refers to the behavior of child records when the parent record is modified or deleted. In the following example, the dno column in the employee table references the dnumber column in the department table. If a department is deleted, all employees that reference the department are also deleted. This is given by the ON DELETE CASCADE option. (be sure to DROP TABLE employee before you try the next example).
DROP TABLE department;
CREATE TABLE department
(dnumber NUMBER(1),
dname VARCHAR2(15),
mgrempid VARCHAR2(9),
mgrstartdate DATE,
CONSTRAINT pk_department PRIMARY KEY (dnumber) );

DROP TABLE employee;
CREATE TABLE employee
 (employeeid VARCHAR2(9) NOT NULL,
 fname VARCHAR2(8),
 minit VARCHAR2(2),
 lname VARCHAR2(8),
 bdate DATE,
 address VARCHAR2(27),
 sex VARCHAR2(1),
 salary NUMBER(7) NOT NULL,
 superempid VARCHAR2(9),
 dno NUMBER(1) NOT NULL,
 CONSTRAINT pk_employee PRIMARY KEY (employeeid),
 CONSTRAINT fk_department FOREIGN KEY (dno)
 REFERENCES department (dnumber) ON DELETE CASCADE);
In order to specify a foreign key constraint, the column in the parent (or master) table (e.g., the dnumber column in the department table in the above example) must be either the primary key or a unique key for the table. Thus, the parent (or master) table must be created first before the child (or detail) table is created using the above constraints.
Additional CREATE TABLE constraint statements allow the specification of what should happen when a row is deleted or updated in a parent table. In the above example, deleting a department causes all employees in that department to also be deleted. Other options include ON DELETE SET DEFAULT and ON DELETE SET NULL. In addition, the behavior of child tables when a parent table is updated can also be specified using an ON UPDATE clause.
CHECK constraints can be added to check the values for a given column. This can be used to allow only a specific set of valid values for a column. In the following example, CHECK constraints are added to limit the valid values for the sex column and to check if the salary is greater than 10,000 (be sure to DROP TABLE employee before you try the next example).
CREATE TABLE employee
(employeeid VARCHAR2(9) NOT NULL,
fname       VARCHAR2(8),
minit       VARCHAR2(2),
lname       VARCHAR2(8),
bdate       DATE,
address     VARCHAR2(27),
sex         VARCHAR2(1) CONSTRAINT ck_sex CHECK (sex IN ('M', 'F')),
salary      NUMBER(7) NOT NULL CONSTRAINT ck_salary CHECK (salary > 10000),
superempid  VARCHAR2(9),
dno         NUMBER(1) NOT NULL,
CONSTRAINT pk_employee PRIMARY KEY (employeeid),
CONSTRAINT fk_dno FOREIGN KEY (dno)
REFERENCES department (dnumber)
ON DELETE CASCADE);
The CHECK constraints are activated when inserting a new row or when updating existing data. In the following example, the value given for sex is ‘m’:
SQL> insert into employee  values
 ('123456789', 'Joe', 'M', 'Smith', '01-JUN-45',
 '123 Smith St.', 'm', 45000, '123456789', 1) ;
insert into employee values
* ERROR at line 1:
ORA-02290: check constraint (HOLOWCZAK.CK_SEX) violated
In the previous examples, constraints were given names with the following prefixes:
- Primary key constraints:pk_
- Foreign key constraints:fk_
- Check constraints:ck_
Naming constraints in this fashion is simply a convenience. Any name may be given to a constraint so long as it starts with a letter an contains no other punctuation other than the underscore character.
The ALTER TABLE command can be used to add a new column to an existing table or to change the data type of an existing column. The following examples add a new column manager to an existing table named emp_department_1 and then modify the data type of the fname coluna.
SQL> DESCRIBE emp_department_1
Name                            Null?    Type
------------------------------- -------- -----------
FNAME                                    VARCHAR2(8)
MINIT                                    VARCHAR2(2)
LNAME                                    VARCHAR2(8)
BDATE                                    DATE

SQL> ALTER TABLE emp_department_1
 ADD (manager VARCHAR2(8)) ;
 Table altered.

SQL> ALTER TABLE emp_department_1
 MODIFY (fname VARCHAR2(15));
 Table altered.

SQL> DESCRIBE emp_department_1
 Name                            Null?    Type
 ------------------------------- -------- ----------
 FNAME                                    VARCHAR2(15)
 MINIT                                    VARCHAR2(2)
 LNAME                                    VARCHAR2(8)
 BDATE                                    DATE
 MANAGER                                  VARCHAR2(8)
The ALTER TABLE command can also be used to change the datatype of column provided there is no data in the table . To get around this if there is data in the table, create a temporary table using all of the data from the existing table, delete the existing records from the original table, alter the datatype, and then insert the records from the temporary table back into the original table. For example, assume the emp_department_1 table has some records in it and we want to change the datatype for the MANAGER column:
CREATE TABLE temp AS SELECT * FROM emp_department_1;
DELETE FROM emp_department_1;
ALTER TABLE emp_department_1
MODIFY (manager VARCHAR2(15));
INSERT INTO emp_department_1
SELECT * FROM temp;
DROP TABLE temp;
This trick can also be used to drop a column from a table. Assume the Employee table has the following columns:employeeid, fname, minit, lname, bdate, address, sex, salary, superssn and dno, and we want to drop the salary column from the table (notice the salary column is not in the SELECT statement):
CREATE TABLE temp AS
SELECT employeeid, fname, minit, lname, bdate, address,
sex, superssn, dno FROM employee;

DROP TABLE employee;

CREATE TABLE employee AS
 SELECT * FROM temp;
The DROP TABLE command can be used to drop a table definition and all of its data from the database. In the following example, the table emp_department_1 created previously, is dropped from the database.
SQL> DROP TABLE emp_department_1 ;
Table dropped.
To see which tables are defined in a schema, submit a query to the USER_TABLES view of the database system catalog:
SQL> SELECT table_name FROM USER_TABLES ;
TABLE_NAME
---------------
DEPARTMENT
EMPLOYEE
STUDENTS
To see which constraints are defined in a schema, submit a query to the USER_CONSTRAINTS view of the database system catalog:
SQL> SELECT constraint_name, constraint_type, table_name
FROM user_constraints ;

CONSTRAINT_NAME                C TABLE_NAME
------------------------------ - ---------------
SYS_C004797                    C DEPARTMENT
PK_DEPARTMENT                  P DEPARTMENT
SYS_C004794                    C EMPLOYEE
SYS_C004795                    C EMPLOYEE
SYS_C004796                    C EMPLOYEE
PK_EMPLOYEE                    P EMPLOYEE
FK_DEPARTMENT                  R EMPLOYEE
Note that the middle column “constraint_type” has values such as “C” for Check constraint (could be NOT NULL for example), “P” for Primary Key constraint and “R” for Referential Integrity (Foreign Key) constraint.
Exercise 2:Creating and Altering Tables
For this exercise, create an index on the STUDENTS table for the StudentName column. Be sure to give this index an appropriate name.
Create an index on the COURSES table for the semester and year columns (together).
Creating and Dropping Views
In the SQL language, a view is a representation of one or more tables. A view can be used to hide the complexity of relationships between tables or to provide security for sensitive data in tables. In the following example, a limited view of the
employee table is created. When a view is defined, a SQL statement is associated with the view name. Whenever the view is accessed, the SQL statement will be executed. In the following example, the view
emp_dno_1 is created as a limitednumber of columns (fname, lname, dno ) and limited set of data (
WHERE dno=1 ) from the employee tabela.
     CREATE VIEW vw_emp_dno_1
     AS SELECT fname, lname, dno
     FROM employee
     WHERE dno = 1;

View created.
Once the view is created, it can be queried with a SELECT statement as if it were a table.
SELECT * FROM vw_emp_dno_1 ;

FNAME    LNAME          DNO
-------- -------- ---------
JAMES    BORG             1
Views can be dropped in a similar fashion to tables. The DROP VIEW command provides this facility. In the following example, the view just created is dropped.
DROP VIEW vw_emp_dno_1 ;

View dropped.
Views can also be created to join several tables together. The following is an example of creating a view that joins two tables:
SQL> CREATE VIEW vw_dept_managers AS
     SELECT dnumber, dname, mgrempid, lname, fname
     FROM   employee, department
     WHERE  employee.ssn = department.mgrssn ;

View created.

SQL> SELECT * FROM vw_dept_managers ;

DNUMBER DNAME             MGREMPID LNAME    FNAME
------- --------------- ---------- -------- --------
      5 RESEARCH         333445555 WONG     FRANKLIN
      4 ADMINISTRATION   987654321 WALLACE  JENNIFER
      1 HEADQUARTERS     888665555 BORG     JAMES
This view can then be used as part of other queries or as the basis for developing applications.
As a final example, a view can be created that contains an aggregate function. In the following example, a view is created that returns the average salary of all employees per department.
SQL> CREATE VIEW vw_dept_average_salary AS
     SELECT dnumber, dname, AVG(salary) AS average_salary
     FROM   department, employee
     WHERE  employee.dno = department.dnumber
     GROUP BY dnumber, dname ;

 View created.

SQL> SELECT * FROM vw_dept_average_salary ;

   DNUMBER DNAME           AVERAGE_SALARY
---------- --------------- --------------
         1 HEADQUARTERS             55000
         4 ADMINISTRATION           31000
         5 RESEARCH                 33250
Note the use of the column alias AS average_salary and the mandatory GROUP BY clause. More details on column aliases and various features of SELECT statements in given in Section 4.3 on SQL DML.
In general, views are read-only as the above cases demonstrate.
To see which views are defined in a schema, submit a query to the USER_VIEWS view of the database system catalog:
SQL> SELECT view_name FROM user_views ;

VIEW_NAME
--------------------------
VW_DEPT_AVERAGE_SALARY
VW_DEPT_MANAGERS
VW_EMP_DNO_1
Exercise 3:Creating Views
For this exercise, create a view called VW_CIS_MAJORS basd upon the following SQL SELECT statement:
SELECT * FROM students WHERE major = 'CIS';
Query the view and show the output.
Create another view called VW_COURSES_TAKEN based upon the following SQL SELECT statement:
SELECT name, major, coursenumber, coursename,
       semester, year, grade
FROM   students, courses
WHERE  students.studentid = courses.studentid;
Before querying this view, format the output column by submitting the following SQL*Plus COLUMN FORMAT commands:
COLUMN name       FORMAT A8
COLUMN coursename FORMAT A15
COLUMN major      FORMAT A10
COLUMN year       FORMAT 9999
As discussed in Section 5.2, the format command changes the way data is displayed in SQL*Plus. It does not change how the data is stored in the tables.
Query the VW_COURSES_TAKEN view and show the output.
Creating, Altering and Dropping Sequences
The Oracle database provides a database object known as a Sequence. Sequences are used to automatically generate a series of unique numbers such as those used for Employee Id or Part Number columns. Sequences are not part of the ANSI SQL-92 standard. In the following example, an Oracle Sequence for Employee Id is created. The numbers to be generated will be between 1001 and 9999. As a rule of thumb, sequences can be named with the prefix seq to differentiate them from other database objects.
      CREATE SEQUENCE seq_department_number
      START WITH  1
      MAXVALUE    9999
      NOCYCLE ;

Sequence created.
In this example, the sequence will begin its numbering at 1 and count up (in increments of 1 which is the default) until it reaches 9999. Once the MAXVALUE is reached, accessing the sequence will return an error.
Sequences are accessed using a SELECT statement with a special table called
DUAL . The DUAL table is a placeholder that exists in all schemas by default. In the following example, the next value in the seq_department_number sequence is retrieved:
SELECT seq_department_number.nextval FROM dual ;

  NEXTVAL
---------
     6
Sequences can also be used in INSERT statements to automatically provide the next value for a key. For example, to insert a new department row with the next department id in the sequence, the following statement would be issued:
     INSERT INTO department VALUES
       (seq_department_number.nextval, 'Finance',
        '123456789', '01'-JAN-1990');

    1 Row Created.
As with most database objects, Oracle Sequences can be dropped using a DROP SEQUENCE command. Dropping a sequence and then re-creating it has the effect of resetting the sequence to its START WITH number. In the following example, the department number sequence created previously is dropped.
DROP SEQUENCE seq_department_number ;

Sequence dropped.
Sequences can also be altered to change the INCREMENT BY, MAXVALUE or START WITH values. The ALTER SEQUENCE statement achieves these changes.
To see which sequences are defined in a schema, submit a query to the USER_SEQUENCES view of the database system catalog:
SQL> SELECT sequence_name, min_value, max_value, last_number
     FROM USER_SEQUENCES ;

SEQUENCE_NAME                   MIN_VALUE  MAX_VALUE LAST_NUMBER
------------------------------ ---------- ---------- -----------
SEQ_DEPARTMENT_NUMBER                   1        600           6
Exercise 4:Working with Sequences
For this exercise, start by creating an Oracle Sequence called seq_student_id . Have the sequence start numbering at 120 and go up to 999.
Then, write an SQL INSERT statement to insert a new record for the following person:
Name:     Joe
Major:    CIS
GPA:      3.85
TutorID:  103
Use the seq_student_id.nextval as the StudentID. Finally, use a SELECT statement to query the VW_CIS_MAJOR and see if the record was inserted properly.
4.2.2 Grant and Revoke Statements
The GRANT and REVOKE statements allow a user to control access to objects (Tables, Views, Sequences, Procedures, etc.) in their schema. The Grant command grants authorization for a subject (another user or group) to perform some action (SELECT, INSERT, UPDATE, DELETE, ALTER, INDEX) on an object (Table, View, stored procedure, sequence or synonym).
The actions are defined as follows:
- SELECT – allows a subject to select rows from the object.
- INSERT – allows a subject to insert rows into the object.
- UPDATE – allows a subject to update rows in the object.
- DELETE – allows a subject to delete rows from the object.
- ALTER – allows a subject to alter the object. For example, add a column or change a constraint.
- INDEX – allows a subject to create an index on the object.
- EXECUTE – allows a subject to execute a stored procedure or trigger.
In addition to objects such as tables, the SELECT and UPDATE actions may also be granted on individual columns in a table or view.
The general syntax for the GRANT statement is:
GRANT <action1>, <action2>, ...
ON    tablename
TO    subject;
For example, assume user ALICE wishes to allow another user BOB to view the rows in the employee table. ALICE would execute the following GRANT statement:
GRANT SELECT
ON    employee
TO    BOB ;
At this point, user BOB may now issue SQL SELECT statements on the table ALICE.employee . For example, user BOB may execute:
SELECT fname, minit, lname, employeeid FROM ALICE.employee ;

FNAME    MI LNAME    EMPLOYEEID
-------- -- -------- ----------
JOHN     B  SMITH    123456789
FRANKLIN T  WONG     333445555
ALICIA   J  ZELAYA   999887777
JENNIFER S  WALLACE  987654321
RAMESH   K  NARAYAN  666884444
JOYCE    A  ENGLISH  453453453
AHMAD    V  JABBAR   987987987
JAMES    E  BORG     888665555
etc.
The REVOKE statement reverses the authorization by removing privileges from a subject (user). The syntax for REVOKE is:
REVOKE <action>
ON     <object>
FROM   <subject>
For example, to revoke Bob’s privileges to read the employee table, Alice might execute this revoke statement:
REVOKE SELECT
ON     employee
FROM   BOB ;
One can also REVOKE only a portion of the privileges from a user. For example, suppose ALICE granted the following:
GRANT SELECT, INSERT, UPDATE, DELETE
ON    department
TO    BOB ;
However, later on she decides that BOB should only be able to select from the department table. The following REVOKE statement would address the situation:
REVOKE INSERT, UPDATE, DELETE
ON     department
FROM   BOB ;
This would leave BOB with only the select privilege on the department table.
A shortcut to revoking all of the privileges on an object can be given by using the keyword ALL in the REVOKE statement. For example, if ALICE wishes to revoke all privileges on department from BOB, she could submit:
REVOKE ALL
ON     department
FROM   BOB;
A special group of users called PUBLIC represents all of the users in a database instance. GRANT can be used with the PUBLIC group to allow all users to work with a table. For example the following GRANT statement allows any user to select records from the employee table:
GRANT SELECT
ON    employee
TO    PUBLIC;
The current authorizations in effect can be viewed by selecting from the USER_TAB_PRIVS view. In the following example, the columns are first formatted (more examples of this are given in a later section), and then the privileges for the user (table owner) ALICE are displayed.
 COLUMN grantee    FORMAT A10
 COLUMN grantor    FORMAT A10
 COLUMN owner      FORMAT A10
 COLUMN table_name FORMAT A10
 COLUMN privilege  FORMAT A10
 SELECT * FROM USER_TAB_PRIVS ;

GRANTEE    OWNER      TABLE_NAME GRANTOR    PRIVILEGE  GRA
---------- ---------- ---------- ---------- ---------- ---
BOB        ALICE       EMPLOYEE  ALICE      SELECT     NO
A quick way to generate a list of GRANT statements for every table in your schema is to run a query on the catalog that forms the GRANT statements:
SELECT 'GRANT SELECT, INSERT, UPDATE, DELETE ON '
        || table_name ||  ' TO username;'
        FROM   cat
        WHERE  table_type = 'TABLE';
In the above example, username is the name of the user you would like to grant access to.
The result of this query is something like the following:
GRANT SELECT, INSERT, UPDATE, DELETE ON DEPARTMENT TO username;
GRANT SELECT, INSERT, UPDATE, DELETE ON DEPENDENT TO username;
GRANT SELECT, INSERT, UPDATE, DELETE ON DEPT_LOCATIONS TO username;
GRANT SELECT, INSERT, UPDATE, DELETE ON EMPLOYEE TO username;
GRANT SELECT, INSERT, UPDATE, DELETE ON PROJECT TO username;
GRANT SELECT, INSERT, UPDATE, DELETE ON WORKS_ON TO username;
This output can then be copied and pasted back in to put the grant statements into effect.
To see which privileges you have granted to others, submit a query to the USER_TAB_PRIVS_MADE view of the database system catalog:
SQL>  SELECT grantee, table_name, grantor, privilege FROM USER_TAB_PRIVS_MADE;

GRANTEE    TABLE_NAME      GRANTOR        PRIVILEGE
---------- --------------- -------------- ----------
SMITH      DEPARTMENT      HOLOWCZAK      INSERT
SMITH      DEPARTMENT      HOLOWCZAK      SELECT
SMITH      DEPARTMENT      HOLOWCZAK      UPDATE
SMITH      EMPLOYEE        HOLOWCZAK      SELECT
To see which privileges have been grated to you, submit a query to the USER_TAB_PRIVS_RECD view of the database system catalog:
SQL> SELECT owner, table_name, grantor, privilege FROM USER_TAB_PRIVS_RECD;

OWNER        TABLE_NAME      GRANTOR        PRIVILEGE
------------ --------------- -------------- ----------
SMITH        STUDENT         SMITH          SELECT
SMITH        STUDENT         SMITH          INSERT
SMITH        STUDENT         SMITH          UPDATE
SMITH        STUDENT         SMITH          DELETE
In the above example, user SMITH has granted SELECT, INSERT, UPDATE and DELETE to the user who issued the query on USER_TAB_PRIVS_RECD (HOLOWCZAK in this case).
One additional caveat:When one user inserts, deletes or updates data in a table, that user should issue an explicit COMMIT; so that these changes become visible to others who may have permissions to view the table.
Exercise 5:GRANT and REVOKE
GRANT SELECT privileges to another member of your group. Have them query your STUDENTS table.
Then REVOKE the SELECT privilege from the STUDENTS table. Have your group member try to query the table after you have revoked access and see what happens.
Query the USER_TAB_PRIVS_RECD and USER_TAB_PRIVS_MADE views to see which privileges have been granted to you and which ones you have granted to others.
4.2.3 Synonyms in Oracle
In many cases, a schema is created under a single username but other users must have access to the tables, sequences and stored procedures. One possibility is to code all queries and applications to specifically access these database objects by providing a schema name. Por exemplo;
SELECT * FROM alice.employee;
This query selects all of the columns and rows from the employee table in user alice’s schema.
One problem with this method is that if the tables move to another user’s schema, all of the references will need to change.
An alternative is to use Synonyms to provide a pointer to the schema and database objects. A Synonym is like a pointer in that is has a name that is recognized in the local schema that, when addressed, will resolve to the schema.object name in another user’s schema.
Synonyms are created with the CREATE SYNONYM command:
CREATE SYNONYM <synonym_name> FOR <schema>.<object> ;
One can create synonyms for tables, views, sequences and stored procedures.
For example, if Bob wishes to have access to Alice’s employee table, first, Alice would need to GRANT access to her table using the GRANT command, and then Bob would create a synonym using:
CREATE SYNONYM employee FOR alice.employee;
Now Bob can execute the following query:
SELECT * FROM employee ;
The above query will return all columns and rows from the employee table in Alice’s schema.
If the tables are moved to another schema such as Abe’s schema, then only the synonyms need to be dropped and recreated. All applications will run the same.
To generate a list of CREATE SYNONYM statements, use the following type of query:
SELECT 'CREATE SYNONYM ' || table_name ||
       ' FOR schema.' || table_name || ' ;'
FROM   cat
WHERE  table_type = 'TABLE' ;
Where schema is the username containing the tables. This results in the following output that can be pasted back into SQL*Plus by each user to create the set of synonyms:
CREATE SYNONYM DEPARTMENT FOR schema.DEPARTMENT ;
CREATE SYNONYM DEPENDENT FOR schema.DEPENDENT ;
CREATE SYNONYM DEPT_LOCATIONS FOR schema.DEPT_LOCATIONS ;
CREATE SYNONYM EMPLOYEE FOR schema.EMPLOYEE ;
CREATE SYNONYM PROJECT FOR schema.PROJECT ;
CREATE SYNONYM STUDENTS FOR schema.STUDENTS ;
CREATE SYNONYM WORKS_ON FOR schema.WORKS_ON ;
To see which synonyms have been created in your schema, query to the USER_SYNONYMS view of the database system catalog:
SQL> SELECT synonym_name, table_owner, table_name FROM USER_SYNONYMS ;

SYNONYM_NAME TABLE_OWNER  TABLE_NAME
------------ ------------ ------------
EMPLOYEE     SMITH        EMPLOYEE
DEPARTMENT   SMITH        DEPARTMENT
In this section, the SQL commands for creating, altering and deleting tables, views and sequences, and granting and revoking access to database objects have been introduced. A typical database may have a dozen or more related tables with several columns each. To facilitate the creation and deletion of a large number of tables, the CREATE statements can be placed into a file and executed using the SQL*Plus START comando.
4.3 SQL Data Manipulation Language (DML)
In this section, we discuss SQL statements that can be used to manipulate data in tables and views.
4.3.1 Select, Insert, Update, Delete, Commit and Rollback Data
SQL*Plus allows the user to enter SQL statements to select, insert, update and delete rows in database tables. These are all standard SQL statements.
- COMMIT – Make all recent changes to the database permanent. Changes that have occurred since the last commit are made permanent. A commit can be done explicitly using the following syntax:
COMMIT ;
A commit is also done implicitly when the next SQL DDL statement is executed or the user exits SQL*Plus.
- DELETE – Delete one or more rows from a table. The syntax for this SQL statement is:
        DELETE FROM <table name>
        WHERE <where clause>
If the WHERE clause is omitted, all rows in the table will be deleted.
- INSERT – Insert a row of data into a table. The syntax for this SQL statement is:
        INSERT INTO <table name>
        (column1, column2 . . .)
        VALUES (value1, value2, . . .)
If a value for each column in the table is supplied, then the columns do not need to be listed in the first set of parenthesis. Values can be of 3 types:Character, Number or Date. Each one requires a slightly different format when inserting:
- Character – Must be enclosed within single quotes
For example:‘Bill Smith’ - Number – No quotes are required
For example:123, 44000.12 - Date – Enclosed in single quotes in the format ‘DD-MON-YYYY’
For example:’26-JUN-1996′
Note that different versions of Oracle accept only 2 digit years
for an INSERT statement. All newer versions (from Oracle8 on)
appear to default to using 4 digit years.
To insert TIME into a DATE column, use the TO_DATE function. For example,
the following function will insert the 26th of June 1996 at 5:00pm:
TO_DATE(’26-JUN-1996 17:00′, ‘DD-MON-YYYY HH24:MI’)
All values, regardless of data type, must be separated by commas.
Another option for the INSERT statement is to pull some data from another table. The syntax is:
        INSERT INTO <table name>
        SELECT <columns>
        FROM   <table>
        WHERE  <where-clause>
For example, assume table1 and table2 have the same number of columns and the corresponding columns have the same data types. To insert all data currently in
table1 into table2:
       INSERT INTO table2
       SELECT * FROM table1;
- Character – Must be enclosed within single quotes
- ROLLBACK – Undo all recent changes to the database. A rollback can only undo changes made since the last commit. The syntax for the ROLLBACK command is:
ROLLBACK ;
- SELECT – Retrieve existing rows from a table. If the table is empty, a message indicating that no rows were found will be displayed. A simplified syntax for the SELECT statement is:
         SELECT <column1, column2, . . .>
         FROM   <table1, table2, . . .>
         WHERE  <where clause>
         GROUP BY <column1, column2, . . .>
         HAVING   <having clause>
         ORDER BY <column1, column2, . . .>
The WHERE clause, GROUP BY, HAVING and ORDER BY statements are optional. If a WHERE
clause if omitted, all rows in the table will be retrieved. If the ORDER BY statement is omitted, there is no specific order in which the rows will be displayed. GROUP BY and HAVING are used in conjunction with aggregate functions (functions that operate
on more than one record). If all columns in the table are to be retrieved, an asterisk (*) may be substituted for the entire list of columns after the SELECT key word.
More than one table can be specified in the FROM clause. The WHERE clause typically contains logic expressions (such asWHERE salary > 40000) that are
evaluated for each row in the table.
A more complete syntax for the SELECT statement is:
SELECT     <column1, column2, . . .>
FROM       <schema.table1, schema.table2, . . .> | <view>
WHERE      <where clause>
CONNECT BY <connect by expression>
GROUP BY   <group by expression>
HAVING     <having clause>
ORDER BY   <column1, column2, ....> ASC | DESC
- UPDATE – Change the values of existing rows in a table in the database. One or more rows must exist in the table in order to successfully update data. The syntax for this SQL statement is:
        UPDATE <table name>
        SET    <column name> = <expression>
        WHERE  <where clause>
The expression can be either a single value or an arithmetic expression including another column in the table. More than one column can be updated at a time by adding additional column name =expression pairs separated by commas. If the WHERE clause is omitted, the update is applied to all rows in the table.
For example, to give all employees in the marketing department a 3% raise:
      UPDATE employee
      SET    salary = salary * 1.03
      WHERE  dno =
      (SELECT dno
       FROM   department
       WHERE  dname = 'MARKETING');
In the following example, a new row is inserted into the
employee tabela. Since a value is supplied for each column, the columns do not need to be explicitly listed.
 DESCRIBE employee ;
 Name                            Null?    Type
 ------------------------------- -------- ----
 EMPLOYEEID                      NOT NULL VARCHAR2(9)
 FNAME                                    VARCHAR2(8)
 MINIT                                    VARCHAR2(2)
 LNAME                                    VARCHAR2(8)
 BDATE                                    DATE
 ADDRESS                                  VARCHAR2(27)
 SEX                                      VARCHAR2(1)
 SALARY                          NOT NULL NUMBER(7)
 SUPEREMPID                               VARCHAR2(9)
 DNO                             NOT NULL NUMBER(1)

    INSERT INTO employee
     VALUES ('123456789', 'JOHN', 'B', 'SMITH', '09-JAN-1975',
             '731 FONDREN, HOUSTON, TX', 'M', 30000, '333445555', 5) ;

  1 row created.
To check the contents of the
employee table, a SELECT statement is done on the table.
 SELECT fname, minit, lname, employeeid, bdate,
        address, sex, superempid, dno
 FROM   employee;

FNAME    MI LNAME    EMPLOYEEID BDATE       ADDRESS                   S SALARY SUPEREMPID DNO
-------- -- -------- ---------- ----------- ------------------------- - ------ ---------- ---
JOHN     B  SMITH     123456789 09-JAN-1975 731 FONDREN, HOUSTON, TX  M  30000  333445555   5
FRANKLIN T  WONG      333445555 08-DEC-1965 638 VOSS,HOUSTON TX       M  40000  888665555   5
ALICIA   J  ZELAYA    999887777 19-JUL-1978 3321 CASTLE, SPRING, TX   F  25000  987654321   4
JENNIFER S  WALLACE   987654321 20-JUN-1951 291 BERRY, BELLAIRE, TX   F  43000  888665555   4
RAMESH   K  NARAYAN   666884444 15-SEP-1972 975 FIRE OAK, HUMBLE, TX  M  38000  333445555   5
JOYCE    A  ENGLISH   453453453 31-JUL-1982 5631 RICE, HOUSTON, TX    F  25000  333445555   5
AHMAD    V  JABBAR    987987987 29-MAR-1979 980 DALLAS, HOUSTON, TX   M  25000  987654321   4
JAMES    E  BORG      888665555 10-NOV-1947 450 STONE, HOUSTON, TX    M  55000              1

8 rows selected.
In the next example, a row in the
employee table is updated.
      UPDATE employee
      SET    salary = salary * 1.04
      WHERE  dno = 4;

3 rows updated.
SELECT fname, minit, lname, employeeid, bdate,
       address, sex, superempid, dno
FROM   employee ;

FNAME    MI LNAME    EMPLOYEEID BDATE       ADDRESS                   S SALARY SUPEREMPID DNO
-------- -- -------- ---------- ----------- ------------------------- - ------ ---------- ---
JOHN     B  SMITH     123456789 09-JAN-1975 731 FONDREN, HOUSTON, TX  M  30000  333445555   5
FRANKLIN T  WONG      333445555 08-DEC-1965 638 VOSS,HOUSTON TX       M  40000  888665555   5
ALICIA   J  ZELAYA    999887777 19-JUL-1978 3321 CASTLE, SPRING, TX   F  26000  987654321   4
JENNIFER S  WALLACE   987654321 20-JUN-1951 291 BERRY, BELLAIRE, TX   F  44720  888665555   4
RAMESH   K  NARAYAN   666884444 15-SEP-1972 975 FIRE OAK, HUMBLE, TX  M  38000  333445555   5
JOYCE    A  ENGLISH   453453453 31-JUL-1982 5631 RICE, HOUSTON, TX    F  25000  333445555   5
AHMAD    V  JABBAR    987987987 29-MAR-1979 980 DALLAS, HOUSTON, TX   M  26000  987654321   4
JAMES    E  BORG      888665555 10-NOV-1947 450 STONE, HOUSTON, TX    M  55000              1

8 rows selected.
In the final example, a row is deleted from the
employee tabela.
SQL>  DELETE FROM employee
      WHERE dno = 5;

4 rows deleted.

SQL> COMMIT ;
Commit complete.
In the final example, if the ROLLBACK command was given instead of the COMMIT command, the rows would have been undeleted.
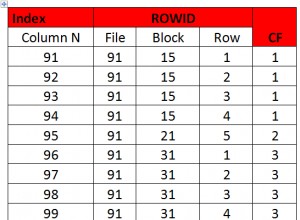
4.3.2 Displaying Oracle Table Metadata (Data about the data)
Once database objects have been created, it is often useful to query the data dictionary to see the various characteristics of the objects. In this section, we describe several ways to query the data dictionary to retrieve this information.
Note that many of these statements and commands will not work properly under Personal Oracle Lite.
The Oracle Data Dictionary maintains a collection of USER_ views that are accessible from each user’s schema. The following table summarizes these views:
| USER View | Contents | Typical Query |
|---|---|---|
| USER_TABLES | Table names and storage details about tables a user owns | SELECT table_name FROM USER_TABLES; |
| CAT or TAB | Brief list of tables and views for a user | SELECT * FROM CAT; or SELECT * FROM TAB; |
| COL | Column names and NOT NULL constraints. |
SELECT   colno, cname, coltype,
         width, scale, precision, nulls
FROM     col
WHERE    tname = 'EMPLOYEE'
ORDER BY col.colno; |
| USER_INDEXES | Indexes defined on tables the user owns | COLUMN table_owner FORMAT A12 SELECT index_name, table_owner, table_name FROM USER_INDEXES; |
| USER_VIEWS | View names and view definitions (queries) a user owns | SELECT view_name, text FROM USER_VIEWS; |
| USER_SEQUENCES | Sequence definitions and current values for sequences a user owns | SELECT * FROM USER_SEQUENCES; |
| USER_TRIGGERS | Trigger names and definitions for triggers a user owns | SELECT trigger_name, trigger_body FROM USER_TRIGGERS; |
| USER_ERRORS | Contains information about the last error that occurred in a user’s schema due to a trigger or procedure compilation error. | SELECT * FROM USER_ERRORS; |
| USER_CONSTRAINTS | Constraints on tables a user owns. Includes column constraints such as NOT NULL, CHECK and foreign key constraints. | SELECT constraint_name, table_name,
search_condition
FROM USER_CONSTRAINTS
WHERE table_name = 'EMPLOYEE';
|
| USER_OBJECTS | All database objects a user owns. Includes tables, views, sequences, indexes, procedures, triggers, etc. | COLUMN object_name FORMAT A35 SELECT object_name, object_type FROM USER_OBJECTS; |
| USER_SOURCE | Source code for stored procedures owned by the user. | To see which procedures exist:SELECT DISTINCT NAME from USER_SOURCE; To see the actual code: SELECT text FROM USER_SOURCE WHERE name = 'procedure_name' ORDER BY LINE; Note:You may have to reduce the ARRAYSIZE variable to avoid overflowing the bufer. e.g., SET ARRAYSIZE 2 |
| USER_TS_QUOTAS | Quotas on tablespaces accessible to a user. | SELECT * FROM USER_TS_QUOTAS; |
A comprehensive list of user catalog views can be found in the Oracle Server Reference guide.
Many of the view contain columns of type LONG. In order to display their content, set the SQL*Plus variable LONG to a large number such as 4096 as follows:
SQL> SET LONG 4096
You may have to reduce the ARRAYSIZE variable to avoid overflowing the bufer. e.g.,
SET ARRAYSIZE 2
To find out the names of tables you have created, use the system view called
CAT in a SELECT statement:SELECT * FROM cat;
.
The following is an example:
SELECT * FROM cat ;

TABLE_NAME                     TABLE_TYPE
------------------------------ ----------
EMPLOYEE                       TABLE
DEPARTMENT                     TABLE
PROJECT                        TABLE
DEPENDENTS                     TABLE
The
TAB view was supported in older versions of Oracle and may not be available in future releases of Oracle. In that case, try using the CAT view instead of TAB . The column definitions for a table can be displayed using the
DESCRIBE command in SQL*Plus:DESCRIBE employee ; Name Null? Type ------------------------------- -------- ---- EMPLOYEEID NOT NULL VARCHAR2(9) FNAME VARCHAR2(8) MINIT VARCHAR2(2) LNAME VARCHAR2(8) BDATE DATE ADDRESS VARCHAR2(27) SEX VARCHAR2(1) SALARY NOT NULL NUMBER(7) SUPEREMPID VARCHAR2(9) DNO NOT NULL NUMBER(1)
More detailed metadata can be retrieved from the tables
COL and user_constraints . To get information on columns of a table, use the following (substitute ‘EMPLOYEE’ with the name of the table in question):
SQL> COLUMN coltype FORMAT A10
SQL> COLUMN cname FORMAT A15
SQL> SELECT   colno, cname, coltype, width, scale, precision, nulls
     FROM     col
     WHERE    tname = 'EMPLOYEE'
     ORDER BY col.colno;

COLNO CNAME           COLTYPE    WIDTH SCALE PRECISION NULLS
----- --------------- ---------- ----- ----- --------- ---------
    1 EMPLOYEEID      VARCHAR2       9                 NOT NULL
    2 FNAME           VARCHAR2       8                 NULL
    3 MINIT           VARCHAR2       2                 NULL
    4 LNAME           VARCHAR2       8                 NULL
    5 BDATE           DATE           7                 NULL
    6 ADDRESS         VARCHAR2      27                 NULL
    7 SEX             VARCHAR2       1                 NULL
    8 SALARY          NUMBER        22     0         7 NOT NULL
    9 SUPEREMPID      VARCHAR2       9     0         9 NULL
   10 DNO             NUMBER        22     0         1 NOT NULL

10 rows selected.
To see any constraints that are presently in effect on a table, use the following (substitute ‘EMPLOYEE’ with the name of the table in question):
SQL> COLUMN search_condition FORMAT A21
SQL> SELECT constraint_name, constraint_type,
            search_condition, delete_rule
     FROM   user_constraints
     WHERE  table_name = 'EMPLOYEE';

CONSTRAINT_N CONSTRAINT_T SEARCH_CONDITION      DELETE_RULE
------------ ------------ --------------------- -----------
FK_DNO       R                                  CASCADE
SYS_C00886   C            EMPID IS NOT NULL
SYS_C00887   C            EMPLOYEEID IS NOT NULL
SYS_C00888   C            SALARY IS NOT NULL
SYS_C00889   C            DNO IS NOT NULL
CK_SEX       C            sex IN ('M', 'F')
CK_SALARY    C            salary > 10000
PK_EMPLOYEE  P
A list of Indexes defined on tables in the user’s schema can be displayed by querying the USER_INDEXES tabela:
SQL> COLUMN table_owner FORMAT A12
SQL> SELECT index_name, table_owner, table_name FROM USER_INDEXES ;

INDEX_NAME                     TABLE_OWNER  TABLE_NAME
------------------------------ ------------ ------------------------------
ACCOUNTS_PK                    HOLOWCZA     ACCOUNTS
AT_PK                          HOLOWCZA     ACCOUNT_TYPES
COURSES_PK                     HOLOWCZA     COURSES
CUSTOMER_PK                    HOLOWCZA     CUSTOMERS
PK_DEPARTMENT                  HOLOWCZA     DEPARTMENT
PK_EMPLOYEE                    HOLOWCZA     EMPLOYEE
UNQ_RNAME                      HOLOWCZA     LOGREPORT
Finally, a list of Views the user owns can be displayed by querying the USER_VIEWS tabela:
SQL> SET LONG 4096
SQL> SELECT view_name, text FROM USER_VIEWS;

VIEW_NAME
-------------------
TEXT
--------------------------------------------------------------
VACCOUNTS
SELECT c.fname, c.lname, ac.account_number, at.account_typeid,
       at.interest_rate, at.minimum_balance,
       ac.date_opened, ac.current_balance
FROM   customers c, accounts ac, account_types at
WHERE  c.customerid = ac.customerid
  AND  ac.account_typeid = at.account_typeid

V_COURSES_TAKEN
SELECT name, major, coursenumber, coursename,
       semester, year, grade
FROM   students, courses
WHERE  students.studentid = courses.studentid
4.3.3 Oracle Pseudo-Columns
The Oracle implementation of SQL adds several pseudo columns to each table. These columns do not exist in a physical table, yet they can be used in any SQL statement for a variety of purposes.
The following table lists the major pseudo columns:
- CURRVAL – Returns the current value of an Oracle sequence.
- NEXTVAL – Returns the current value of an Oracle sequence
and then increments the sequence. - LEVEL – The current level in a hierarchy
for a query using STARTWITH and CONNECT BY. - ROWID – An identifier (data file, block and row) for
the physical storage of a row in a table. - ROWNUM – The integer indicating the order in which
a row is returned from a query.
Exercise 6:Displaying Metadata
For this exercise, query the USER_ tables and display the following metadata:
- List the tables in the presently in the schema
- List the Indexes
- List the Views
- For the STUDENT and COURSES tables, display the columns in each table, their data types and whether or not they allow NULL values
- For the STUDENT and COURSES tables, display constraints on each table
4.3.4 Oracle SQL Functions
The Oracle implementation of SQL provides a number of functions that can be used in SELECT statements. Functions are typically grouped into the following:
- Single row functions – Operate on column values for each row returned by a query.
- Group functions – Operate on a collection (group) of rows.
The following is an overview and brief description of single row functions. x is some number, s is a string of characters and c is a single character.
- Math functions include:
ABS (x ) Absolute Value of x CEIL (x ) Smallest integer greater than or equal to x . COS (x ) Cosine of x FLOOR (x ) Largest integer less than or equal to x . LOG (x ) Log of x LN (x ) Natural Log of x ROUND (x , n ) Round x to n decimal places to the right of the decimal point. SIN (x ) Sine of x TAN (x ) Tangent of x TRUNC (x , n ) Truncate x to n decimal places to the right of the decimal point. - Character functions include:
CHR (x ) Character for ASCII value x . INITCAP (s ) String s with the first letter of each word capitalized. LOWER (s ) Converts string s to all lower case letters. LPAD (s , x ) Pads string s with x spaces to the left. LTRIM (s ) Removes leading spaces from s . REPLACE (s1 , s2 , s3 ) Replace occurrences of s2 with s3 in string s1 . RPAD (s , x ) Pads string s with x spaces to the right. RTRIM (s ) Removes trailing spaces from s . SUBSTR (s , x1 , x2 ) Return a portion of string s starting at position x1 and ending with position x2 . If x2 is omitted, it’s value defaults to the end of s . UPPER (s ) Converts string s to all upper case letters. s1 || s2 (two vertical bars or “pipe” symbols) Concatenates s1 with s2 - Character functions that return numbers include:
ASCII (c ) Returns the ASCII value of c INSTR (s1 , s2 , x ) Returns the position of s2 in s1 where the search starts at position x . LENGTH (s ) Length of s - Conversion functions include:
TO_CHAR (date , format ) Converts a date column to a string of characters. format is a set of Date formatting codes where:
YYYYis a 4 digit year.
MMis a month number.
MONTHis the full name of the month.
MONis the abbreviated month.
DDDis the day of the year.
DDis the day of the month.
Dis the day of the week.
DAYis the name of the day.
HHis the hour of the day (12 hour clock)
HH24is the hour of the day (24 hour clock)
AMis the morning or afternoon indicator (AM or PM).
MIis the minutes.
SSis the seconds.TO_CHAR (number , format ) Converts a numeric column to a string of characters. format is a set of number formatting codes where:
9indicates a digit position. Blank if position value is 0.
0indicates a digit position. Shows a 0 if the position value is 0.
$displays a leading currency indicator.
TO_DATE (s , format ) Converts a character column (string s to a date. format is a set of Date formatting codes as above.
TO_NUMBER (s , format ) Converts a character column (string s to a Number. format is a set of Number formatting codes as above. - Date functions include:
SYSDATE Returns the current date (and time if the TO_CHAR function is used) from the system clock. For example:
SELECT TO_CHAR(SYSDATE, ‘DD-MON-YYYY HH:MM:SS’) FROM DUAL; - Some additional function are:
DECODE (s , search1 , result1 , search2 , result2 ) Compares s with search1 , search2 , etc. and returns the corresponding result when there is a match.
NVL (s , expression ) If s is NULL, return expression . If s is not null, then return s .
USER Returns the username of the current user.
For example:SELECT USER FROM DUAL;
The following is an overview and brief description of multiple row (group) functions. col is the name of a table column (or expression) of type NUMBER.
| AVG (col ) | Returns the average of a group of rows for col |
| MAX (col ) | Returns the maximum of a group of rows for col |
| MIN (col ) | Returns the minimum of a group of rows for col |
| STDEV (col ) | Returns the standard deviation of a group of rows for col |
| SUM (col ) | Returns the sum (total) of a group of rows for col |
| VARIANCE (col ) | Returns the variance of a group of rows for col |
In addition the COUNT group function counts instances of values. These values can be any type (CHAR, DATE or NUMBER):
| COUNT (columns ) | Returns the number of instances of a group of rows for (columns ) |
To use an aggregate function and a regular non-aggregated column in the same query, a GROUP BY clause must be added to the SELECT statement.
Examples of functions are given in the following section.
Exercise 7:Functions
For this exercise, use the various functions to display the following:
- Display the average, minimum, and maximum grade point average for all of the students
- For each student, write a sentence like the following:
Congratulations Bill, your grade point average is 3.45
You’ll need to use the TO_CHAR function to convert the
GPA column (which is a NUMBER data type) to a set of characters. - For each student, count the number of courses he or she has taken.
- Modify the above query to only count CIS courses.
Hint:You’ll need to use the SUBSTR function on
the COURSENUMBER column to extract the first three
letters. Then compare this to ‘CIS’.
4.3.5 Examples of SQL DML Statements
In this section, several examples of SQL DML statements are given including SQL SELECT queries, INSERT, UPDATE and DELETE statements. Variations on WHERE clause, FROM clause and using SQL functions are all demonstrated.
You may wish to first create the example tables in your Oracle database schema so that the queries you try match up to the results shown here. Click here for the SQL DDL used to create the example tables .
Basic Select Statements
The most basic SQL command most folks learn about is the SQL SELECT Statement used to retrieve data from one or more tables. Assume we have a table named STUDENTS as shown below:
Example Table STUDENTS:
CREATE TABLE students (
      studentid NUMBER(5,0),
      name VARCHAR2(25),
      major VARCHAR2(15),
      gpa NUMBER(6,3),
      tutorid NUMBER(5,0)
      );

INSERT INTO students VALUES (101, 'Bill', 'CIS', 3.45,  102);
INSERT INTO students VALUES (102, 'Mary', 'CIS', 3.10,  NULL);
INSERT INTO students VALUES (103, 'Sue',  'Marketing', 2.95, 102);
INSERT INTO students VALUES (104, 'Tom',  'Finance', 3.5, 106);
INSERT INTO students VALUES (105, 'Alex', 'CIS', 2.75, 106);
INSERT INTO students VALUES (106, 'Sam',  'Marketing', 3.25, 103);
INSERT INTO students VALUES (107, 'Jane', 'Finance', 2.90, 102);
Example table COURSES:CREATE TABLE courses( studentid NUMBER(5,0) NOT NULL, coursenumber VARCHAR2(15) NOT NULL, coursename VARCHAR2(25), semester VARCHAR2(10), year NUMBER(4,0), grade VARCHAR2(2) ); INSERT INTO courses VALUES (101, 'CIS3400', 'DBMS I', 'FALL', 1997, 'B+'); INSERT INTO courses VALUES (101, 'CIS3100', 'OOP I', 'SPRING', 1999, 'A-'); INSERT INTO courses VALUES (101, 'MKT3000', 'Marketing', 'FALL', 1997, 'A'); INSERT INTO courses VALUES (102, 'CIS3400', 'DBMS I', 'SPRING', 1997, 'A-'); INSERT INTO courses VALUES (102, 'CIS3500', 'Network I', 'SUMMER', 1997, 'B'); INSERT INTO courses VALUES (102, 'CIS4500', 'Network II', 'FALL', 1997, 'B+'); INSERT INTO courses VALUES (103, 'MKT3100', 'Advertizing', 'SPRING', 1998, 'A'); INSERT INTO courses VALUES (103, 'MKT3000', 'Marketing', 'FALL', 1997, 'A'); INSERT INTO courses VALUES (103, 'MKT4100', 'Marketing II', 'SUMMER', 1998, 'A-');
- Example query:Show all of the columns and all student records in the STUDENTS table:
SELECT * FROM students;
StudentID Name Major GPA TutorId 101 Bill CIS 3.45 102 102 Mary CIS 3.1 103 Sue Marketing 2.95 102 104 Tom Finance 3.5 106 105 Alex CIS 2.75 106 106 Sam Marketing 3.25 103 107 Jane Finance 2.9 102 - Show the Average GPA of all students:
 SELECT AVG(gpa)
  FROM   students;

AVG(GPA)
----------
3.12857143
- Average GPA of Finance and CIS students:
SELECT AVG(gpa) FROM students WHERE major = 'CIS' OR major = 'Finance'; AVG(GPA) ---------- 3.14 - Give the name of the student with the highest GPA:
This is an example of a subquery . The SELECT MAX(gpa) FORM students part runs first and returns a single number that is then matched up to the WHERE clause.
SELECT name, gpa
FROM   students
WHERE  gpa =
  (  SELECT MAX(gpa) FROM students  );

NAME            GPA
-------- ----------
Tom             3.5
Another option is to enclose some text in quotes and
concatenate that text with the output of the SQL statement:
SELECT 'The student with the highest GPA is ' || name
FROM   students
WHERE  gpa =
  (  SELECT MAX(gpa) FROM students   );


NAME
------------------------------------------
The student with the highest grade is Tom
- Show the students with the highest GPA in each major. Format the GPA with trailing 0 if necessary:
SELECT    name, major, TO_CHAR(gpa, '9.00') AS GPA
FROM      students s1
WHERE     gpa =
   (
     SELECT max(gpa)
     FROM   students s2
     WHERE  s1.major = s2.major
   );

NAME               MAJOR           GPA
------------------ --------------- -----
Bill               CIS              3.45
Tom                Finance          3.50
Sam                Marketing        3.25
Note the two aliases given to the students table:s1 and s2 . These allow us to refer to different views of the same table.
You may wish to sort the output based on the GPA. In this case, the output is ordered by GPA in decending order (highest GPA will come first, etc.):
SELECT    name, major, gpa
FROM      students s1
WHERE     gpa =
   (
     SELECT max(gpa)
     FROM   students s2
     WHERE  s1.major = s2.major
   )
ORDER BY gpa DESC;

NAME     MAJOR             GPA
-------- ---------- ----------
Tom      Finance           3.5
Bill     CIS              3.45
Sam      Marketing        3.25
Selecting from 2 or More Tables
- In the FROM portion, list all tables separated by commas. Called a Join .
- The WHERE part becomes the Join Condition
Example table EMPLOYEE:
FNAME    MI LNAME   EMPLOYEEID BDATE     ADDRESS                   S SALARY SUPEREMPID DNO
-------- -- ------- ---------- --------- ------------------------- - ------ ---------- ---
JOHN     B  SMITH    123456789 09-JAN-75 731 FONDREN, HOUSTON, TX  M  30000  333445555 5
FRANKLIN T  WONG     333445555 08-DEC-65 638 VOSS,HOUSTON TX       M  40000  888665555 5
ALICIA   J  ZELAYA   999887777 19-JUL-78 3321 CASTLE, SPRING, TX   F  25000  987654321 4
JENNIFER S  WALLACE  987654321 20-JUN-51 291 BERRY, BELLAIRE, TX   F  43000  888665555 4
RAMESH   K  NARAYAN  666884444 15-SEP-72 975 FIRE OAK, HUMBLE, TX  M  38000  333445555 5
JOYCE    A  ENGLISH  453453453 31-JUL-82 5631 RICE, HOUSTON, TX    F  25000  333445555 5
AHMAD    V  JABBAR   987987987 29-MAR-79 980 DALLAS, HOUSTON, TX   M  25000  987654321 4
JAMES    E  BORG     888665555 10-NOV-47 450 STONE, HOUSTON, TX    M  55000            1

Example table DEPARTMENT:
DNAME             DNUMBER  MGREMPID MGRSTARTD
--------------- --------- --------- ---------
RESEARCH                5 333445555 22-MAY-98
ADMINISTRATION          4 987654321 01-JAN-05
HEADQUARTERS            1 888665555 19-JUN-91

Example Table DEPT_LOCATIONS:
DNUMBER DLOCATION
------- ---------------
      1 HOUSTON
      4 STAFFORD
      5 BELLAIRE
      5 SUGARLAND
      5 HOUSTON

Example table DEPENDENT:
EMPLOYEEID DEPENDENT_NAME  SEX BDATE     RELATIONSHIP
---------- --------------- --- --------- ------------
 333445555 ALICE           F   05-APR-96 DAUGHTER
 333445555 THEODORE        M   25-OCT-93 SON
 333445555 JOY             F   03-MAY-68 SPOUSE
 123456789 MICHAEL         M   01-JAN-98 SON
 123456789 ALICE           F   31-DEC-98 DAUGHTER
 123456789 ELIZABETH       F   05-MAY-77 SPOUSE
 987654321 ABNER           M   26-FEB-52 SPOUSE
- List all of the employees working in Houston:
SELECT  employee.fname, employee.lname
FROM    employee, dept_locations
WHERE   employee.dno = dept_locations.dnumber
AND     dept_locations.dlocation = 'HOUSTON' ;

FNAME    LNAME
-------- --------
JOHN     SMITH
FRANKLIN WONG
RAMESH   NARAYAN
JOYCE    ENGLISH
JAMES    BORG
- List each employee name and the location they work in. List them in order of location and name:
SELECT    dept_locations.dlocation, department.dname,
          employee.fname, employee.lname
FROM      employee, department, dept_locations
WHERE     employee.dno = department.dnumber
   AND    department.dnumber = dept_locations.dnumber
   AND    employee.dno = dept_locations.dnumber
ORDER BY  dept_locations.dlocation, employee.lname;

Results:
DLOCATION       DNAME           FNAME    LNAME
--------------- --------------- -------- --------
BELLAIRE        RESEARCH        JOYCE    ENGLISH
BELLAIRE        RESEARCH        RAMESH   NARAYAN
BELLAIRE        RESEARCH        JOHN     SMITH
BELLAIRE        RESEARCH        FRANKLIN WONG
HOUSTON         HEADQUARTERS    JAMES    BORG
HOUSTON         RESEARCH        JOYCE    ENGLISH
HOUSTON         RESEARCH        RAMESH   NARAYAN
HOUSTON         RESEARCH        JOHN     SMITH
HOUSTON         RESEARCH        FRANKLIN WONG
STAFFORD        ADMINISTRATION  AHMAD    JABBAR
STAFFORD        ADMINISTRATION  JENNIFER WALLACE
STAFFORD        ADMINISTRATION  ALICIA   ZELAYA
SUGARLAND       RESEARCH        JOYCE    ENGLISH
SUGARLAND       RESEARCH        RAMESH   NARAYAN
SUGARLAND       RESEARCH        JOHN     SMITH
SUGARLAND       RESEARCH        FRANKLIN WONG

16 rows selected.
- What is the highest paid salary in Houston ?
SELECT MAX(employee.salary)
FROM   employee, dept_locations
WHERE  employee.dno = dept_locations.dnumber
 AND   dept_locations.dlocation = 'HOUSTON';

MAX(EMPLOYEE.SALARY)
--------------------
               55000
- To obtain the Cartesian Product of two tables, use a SELECT statement with no WHERE clause:
SELECT *
FROM department, dept_locations ;

DNAME           DNUMBER    MGRSSN MGRSTARTD DNUMBER DLOCATION
--------------- ------- --------- --------- ------- ----------
RESEARCH              5 333445555 22-MAY-78       1 HOUSTON
ADMINISTRATION        4 987654321 01-JAN-85       1 HOUSTON
HEADQUARTERS          1 888665555 19-JUN-71       1 HOUSTON
RESEARCH              5 333445555 22-MAY-78       4 STAFFORD
ADMINISTRATION        4 987654321 01-JAN-85       4 STAFFORD
HEADQUARTERS          1 888665555 19-JUN-71       4 STAFFORD
RESEARCH              5 333445555 22-MAY-78       5 BELLAIRE
ADMINISTRATION        4 987654321 01-JAN-85       5 BELLAIRE
HEADQUARTERS          1 888665555 19-JUN-71       5 BELLAIRE
RESEARCH              5 333445555 22-MAY-78       5 SUGARLAND
ADMINISTRATION        4 987654321 01-JAN-85       5 SUGARLAND
HEADQUARTERS          1 888665555 19-JUN-71       5 SUGARLAND
RESEARCH              5 333445555 22-MAY-78       5 HOUSTON
ADMINISTRATION        4 987654321 01-JAN-85       5 HOUSTON
HEADQUARTERS          1 888665555 19-JUN-71       5 HOUSTON
                 15 rows selected.
- In which states do our employees work ?
SELECT    DISTINCT dlocation
FROM      dept_locations;

DLOCATION
---------------
BELLAIRE
HOUSTON
STAFFORD
SUGARLAND
- List the Department name and the total salaries for each department:
SELECT   department.dname, SUM( employee.salary )
FROM     employee, department
WHERE    employee.dno = department.dnumber
GROUP BY department.dname

Results:

DNAME           SUM(EMPLOYEE.SALARY)
--------------- --------------------
ADMINISTRATION                 93000
HEADQUARTERS                   55000
RESEARCH                      133000
- We can also use a Column Alias to change the title of the columns
SELECT   department.dname, SUM( employee.salary ) AS TotalSalaries
FROM     employee, department
WHERE    employee.dno = department.dnumber
GROUP BY department.dname

Results:

DNAME           TOTALSALARIES
--------------- -------------
ADMINISTRATION          93000
HEADQUARTERS            55000
RESEARCH               133000
- Here is a combination of a function and
a column alias:
SELECT   fname, lname,
         salary  AS CurrentSalary,
         (salary * 1.03)  AS ProposedRaise
FROM     employee;

FNAME    LNAME    CURRENTSALARY PROPOSEDRAISE
-------- -------- ------------- -------------
JOHN     SMITH            30000         30900
FRANKLIN WONG             40000         41200
ALICIA   ZELAYA           25000         25750
JENNIFER WALLACE          43000         44290
RAMESH   NARAYAN          38000         39140
JOYCE    ENGLISH          25000         25750
AHMAD    JABBAR           25000         25750
JAMES    BORG             55000         56650

8 rows selected.
4.3.5 Examples of SQL DML Statements – Continued
Click here for the SQL DDL used to create the example tables .
Recursive Queries and Table Aliases
- Recall some of the E-R diagrams and relations we dealt with had a recursive relationship.
- For example:A student can tutor one or more other students. A student has only one tutor.
STUDENTS (studentid, name, major, grade, student_tutorid)
- Provide a listing of each student and the name
of their tutor:
SELECT   s1.name AS Student,  tutors.name AS Tutor
FROM     students s1,  students tutors
WHERE    s1.tutorid = tutors.studentid;

STUDENT                   TUTOR
------------------------- -----------
Bill                      Mary
Sue                       Mary
Jane                      Mary
Sam                       Sue
Tom                       Sam
Alex                      Sam
- The above is called a “recursive” query because it access the same table two times.
- We give the table two aliases called s1 and tutors so that we can compare different aspects of the same table.
- However, as is, the table is missing something:We don’t see who is tutoring Mary. Use a left outer join to see the rest of the information. In MS Access, we use the LEFT JOIN comando. In Oracle, we place a
(+)after the join condition to indicate an outer join:
In MS Access:
SELECT   s1.name AS Student,  tutors.name AS Tutor
FROM     students s1   LEFT JOIN   students tutors
ON       s1.tutorid = tutors.studentid;
In Oracle:
SELECT   s1.name AS Student,  tutors.name AS Tutor
FROM     students s1, students tutors
WHERE    s1.tutorid = tutors.studentid (+) ;

STUDENT                   TUTOR
------------------------- -------------
Bill                      Mary
Sue                       Mary
Jane                      Mary
Sam                       Sue
Tom                       Sam
Alex                      Sam
Mary
- Suppose instead of printing a blank for Mary’s tutor, we would like to write something meaningful in the output. Use the NVL function:
SELECT   s1.name AS Student,  NVL(tutors.name, 'No Tutor') AS Tutor
FROM     students s1, students tutors
WHERE    s1.tutorid = tutors.studentid (+) ;

STUDENT                   TUTOR
------------------------- -------------------------
Bill                      Mary
Sue                       Mary
Jane                      Mary
Sam                       Sue
Tom                       Sam
Alex                      Sam
Mary                      No Tutor
- Here is one more twist:Suppose we were interested in those students who do not tutor anyone? Use a right outer join (RIGHT JOIN in MS Access).
- How many students does each tutor work with ?
SELECT   s1.name AS TutorName,
         COUNT(tutors.tutorid) AS NumberTutored
FROM     students s1, students tutors
WHERE    s1.studentid = tutors.tutorid
GROUP BY s1.name;

TUTORNAME                 NUMBERTUTORED
------------------------- -------------
Mary                                  3
Sam                                   2
Sue                                   1
Tree Queries
Another form of recursive query is the tree query. A tree query decomposes the table such that each row is a node the tree and nodes are related in levels. Consider the Students table defined above.
- Bill tutors Alex, Mary and Sue.
- Mary tutors Liz and Ed
- Sue tutors Petra
Using the SQL SELECT statements CONNECT BY and START WITH clauses, we can form a set
of relationships between the rows of the table that form a tree structure.
- START WITH – indicates which row the tree should start with.
- CONNECT BY – indicates how successive related rows are to be identified and included in the result.
- LEVEL – a pseudo-column that indicates which level of the tree the current row is assigned to.
The following example prints a tree structure modeled after the tutoring relationships
in the Students table. We will start with Mary’s student id (102) since no one tutors her.
SELECT            LPAD(' ',3*(LEVEL-1)) || students.name
                  As TutorTree
FROM              students
START WITH        studentid = '102'
CONNECT BY PRIOR  studentid = tutorid;

TUTORTREE
-----------------------------------
Mary
  Bill
  Sue
    Sam
      Tom
      Alex
  Jane

7 rows selected.
From the tree we can see that Mary tutors Bill, Sue and Jane. In turn, Sue tutors Sam. Finally, Sam tutors both Tom and Alex.
Tree Query Exercise
For this exercise, go back and look at the EMPLOYEE table we used previously. Note that the superempid represents the id of the person who supervises the employee. For example, James Borg with employeeid 888665555 supervises Jennifer Wallace and Franklin Wong (look for 888665555 in the supervisorid column).
Write a tree query, starting with 888665555 that will draw the “Supervisors tree” like so:
SUPERVISORTREE
---------------
BORG
   WONG
      SMITH
      ENGLISH
      NARAYAN
   WALLACE
      JABBAR
      ZELAYA
4.3.5 Examples of SQL DML Statements – Continued
WHERE Clause Expressions
- There are a number of expressions one can use in a WHERE clause.
- Subqueries using =(equals) :
These are used when we want to compare values from the outer query to the result of a sub query.
SELECT name, grade
FROM   students
WHERE  grade =
  (  SELECT MAX(grade) FROM students   );
This assumes the subquery returns only one tuple as a result. This is typically used when aggregate functions are in the subquery. For example, we know ahead of time that selecting MAX(grade will only ever return one number. So then we can compare this one number to the WHERE grade = cláusula.
- Subqueries using the IN operator . The IN operator is used whenever the value of a column should be found in a set of values. The set of values can be explicitly listed (as in the first example below) or they can be created on the fly using a subquery.
SELECT    employee.fname, department.dname
FROM      employee, department
WHERE     employee.dno = department.dnumber
  AND     department.dname IN ('HEADQUARTERS', 'RESEARCH');

FNAME    DNAME
-------- ---------------
JAMES    HEADQUARTERS
JOHN     RESEARCH
JOYCE    RESEARCH
RAMESH   RESEARCH
FRANKLIN RESEARCH


SELECT    employee.fname
FROM      employee
WHERE     employee.dno IN
          (SELECT dept_locations.dnumber
           FROM dept_locations
           WHERE dept_locations.dlocation = 'STAFFORD');

FNAME
-------
ALICIA
JENNIFER
AHMAD
In the above case, the subquery returns a set of tuples. The IN clause returns true when a tuple matches a member of the set.
- Subqueries using EXISTS . EXISTS will return TRUE if there is at least one row resulting from the subquery.
SELECT   fname, lname, salary
FROM     employee
WHERE    EXISTS
         (SELECT  fname
          FROM    EMPLOYEE e2
          WHERE   e2.salary > employee.salary)
     AND EXISTS
         (SELECT  fname
          FROM    EMPLOYEE e3
          WHERE   e3.salary < employee.salary);

FNAME    LNAME       SALARY
-------- -------- ---------
JOHN     SMITH        30000
FRANKLIN WONG         40000
JENNIFER WALLACE      43000
RAMESH   NARAYAN      38000
The above query shows all employees names and salaries where there is at least one person who makes more money (the first exists) and at least one person who makes less money (second exists).
- Subqueries with NOT EXISTS . NOT EXISTS will return TRUE if there are no rows returned by the subquery.
SELECT   fname, lname, salary
FROM     employee
WHERE    NOT EXISTS
         (SELECT  fname
          FROM    EMPLOYEE e2
          WHERE   e2.salary > employee.salary);

FNAME    LNAME       SALARY
-------- -------- ---------
JAMES    BORG         55000
The above query shows all employees for whom there does not exist an employee who is paid less. In other words, the highest paid employee.
- The HAVING clause is similar to the WHERE clause. The difference is that WHERE is used to filter individual rows while HAVING is used to filter groups according to the GROUP BY clause.
Show the departments with average salary greater than 33000.
SELECT    department.dname, AVG(salary)
FROM      employee, department
WHERE     employee.dno = department.dnumber
GROUP BY  department.dname
HAVING    AVG(salary) > 33000 ;

DNAME           AVG(SALARY)
--------------- -----------
HEADQUARTERS          55000
RESEARCH              33250
Show departments with 3 or more employees:
SELECT   department.dname, COUNT(employee.dno)
  FROM   department, employee
 WHERE   department.dnumber = employee.dno
GROUP BY department.dname
HAVING   COUNT(employee.dno) >= 3;

DNAME           COUNT(EMPLOYEE.DNO)
--------------- -------------------
ADMINISTRATION                    3
RESEARCH                          4
- LIKE operator :
Use the LIKE operator to perform a partial string match. Generally, the % character is used as the wild card although in some DBMS, the * character is used.
Show all employees whose name starts with ‘S’
SELECT   fname, lname, salary
FROM     employee
WHERE    lname LIKE  'S%';


Result:
FNAME    LNAME        SALARY
-------- -------- ----------
JOHN     SMITH         30000
Show all employees whose name contains the letters ‘AR’
SELECT   fname, lname, salary
FROM     employee
WHERE    lname LIKE  '%AR%';

Result:
FNAME    LNAME        SALARY
-------- -------- ----------
RAMESH   NARAYAN       38000
AHMAD    JABBAR        25000
Note that characters within quotes are case sensitive.
Show all employees whose name contains the letter ‘E’ and the letter ‘L’ in that order:
SELECT   fname, lname, salary
FROM     employee
WHERE    lname LIKE  '%E%L%';

Result:
FNAME    LNAME        SALARY
-------- -------- ----------
JOYCE    ENGLISH       25000
Show all employees whose name contains the letter ‘E’ and the letter ‘L’ in any order:
SELECT   fname, lname, salary
FROM     employee
WHERE    lname LIKE  '%E%L%' OR
         lname LIKE  '%L%E%';

Result:
FNAME    LNAME        SALARY
-------- -------- ----------
JENNIFER WALLACE       43000
JOYCE    ENGLISH       25000
4.3.5 Examples of SQL DML Statements – Continued
Click here for the SQL DDL used to create the example tables .
Examples of SQL Functions
- The TO_CHAR function can be used to extract specific parts of a Date or to format a Number.
For example, to extract the Year and the month from the date of birth of each of the employees, use TO_CHAR with a “mask” of ‘YYYY-MM’
SELECT lname, TO_CHAR(bdate, 'YYYY-MM') AS Birth_Year_Month
FROM   employee;

LNAME   BIRTH_YEAR_MONTH
------- -----------
SMITH   1975-01
WONG    1965-12
ZELAYA  1978-07
WALLACE 1951-06
NARAYAN 1972-09
ENGLISH 1982-07
JABBAR  1979-03
BORG    1947-11
- Show the employees who have a dependent born in the same month:
SELECT employee.fname, employee.lname, dependent_name, relationship, TO_CHAR(dependent.bdate, 'MM') AS Birth_Month FROM employee, dependent WHERE employee.employeeid = dependent.employeeid AND TO_CHAR(dependent.bdate, 'MM') = TO_CHAR(employee.bdate, 'MM'); FNAME LNAME DEPENDENT_NAME RELATIONSHIP BIRTH_MONTH JOHN SMITH MICHAEL SON 01 - Text, dates and numbers can be combined using the various conversion functions. In the following example, the TO_CHAR function is used to convert the date BDATE into a character string.
SELECT 'The oldest employee was born on ' || TO_CHAR( MIN(bdate), 'DD/MM/YYYY') AS Sentence FROM employee; SENTENCE ---------------------------------------- The oldest employee was born on 10/11/1947 - Date math results in a numerical answer that must be converted to characters to concatenate with other character strings as in this next example:
SELECT 'The oldest employee was born on ' ||
       TO_CHAR( MIN(bdate), 'DD/MM/YYYY') || ' and is now' ||
       TO_CHAR( (SYSDATE - MIN(bdate)) / 365, '99') ||
       ' years old.'
       AS Sentence
FROM   employee;

SENTENCE
-----------------------------------------------------------------
The oldest employee was born on 10/11/1947 and is now 68 years old.
(Note:This assumes we run the query in year 2013)
- The TO_DATE and TO_CHAR functions are extremely useful when working with dates and times.
Oracle stores bother the date and time in one column using the DATE datatype. For example,
Suppose you have a table MYDATES with two varchar columns:
IMPORTANT_DATE   varchar2    -- example:  12/4/2015
IMPORTANT_TIME   varchar2    -- example:  9:35:00 AM
To get these formatted from a CHAR string to a DATE data type you might do something like:
SELECT TO_DATE(IMPORTANT_DATE || ' ' || IMPORTANT_TIME,
               'MM/DD/YYYY HH24:MI:SS AM')
FROM mydates;
What this does is first is concatenates the value in the IMPORTANT_DATE column with a blank space and then with the IMPORTANT_TIME column using the concatenation || operador. The result will be a varchar string like:'12/4/2015 9:35:00 AM'
Then the TO_DATE function take the format 'MM/DD/YYYY HH24:MI:SS AM' and applies it to the string. This lines up MM with the month 12 , then lines up the DD day with 4 e assim por diante. MI stands for minute. AM matches either AM or PM .
The end result is this is output to an Oracle DATE data type.
The result of this conversion can be stored back in to the table by adding a new column of DATE data type to store this:
ALTER TABLE mydates ADD (important_datetime DATE);
Then a SQL UPDATE statement can be used to populate this new important_datetime columns:
UPDATE mydates
SET important_dateimte =
    TO_DATE(IMPORTANT_DATE || ' ' || IMPORTANT_TIME,
            'MM/DD/YYYY HH24:MI:SS AM')
Once the column is in DATE data type, the opposite function TO_CHAR can be used to pull apart the DATE and get specific parts of it. For example, to see just the hour:
SELECT TO_CHAR(important_datetime, 'HH24')
FROM  mydates;
Or, to get this isolated in its own column:
ALTER TABLE MYDATES ADD (important_hour INTEGER );

UPDATE mydates
SET important_hour = TO_CHAR(important_datetime, 'HH24') ;
If you don’t feel like making new columns, just nest TO_DATE inside of TO_CHAR for example:
SELECT TO_CHAR( TO_DATE(IMPORTANT_DATE || ' ' || IMPORTANT_TIME, 'MM/DD/YYYY HH24:MI:SS AM'), 'HH24' ) FROM mydates; - The DECODE function can be used to provide a variety of lookup values. In the following example, the string concatenation operator || is used to put together a sentence about each employee. The DECODE command takes the COUNT of dependents as the first argument. Then, depending on the COUNT for a given employee, it returns an appropriate ending to the sentence.
SELECT   fname || ' '|| lname || ' has ' ||
         DECODE(COUNT(dependent.employeeid),
                0, 'no dependents.',
                1, 'one dependent.',
                2, 'two dependents.',
                3, 'three dependents.')
        AS Sentence
FROM     employee, dependent
WHERE    employee.employeeid = dependent.employeeid (+)
GROUP BY employee.fname, lname;

SENTENCE
---------------------------------------
AHMAD JABBAR has no dependents.
ALICIA ZELAYA has no dependents.
FRANKLIN WONG has three dependents.
JAMES BORG has no dependents.
JENNIFER WALLACE has one dependent.
JOHN SMITH has three dependents.
JOYCE ENGLISH has no dependents.
RAMESH NARAYAN has no dependents.

8 rows selected.
The DECODE function can also be used to “invert” a table. That is, to transpose columns and rows. For example to show the department names along a single row we might use:
SELECT MAX(DECODE(dnumber, 1, dname)) AS Department,
       MAX(DECODE(dnumber, 4, dname)) AS Department,
       MAX(DECODE(dnumber, 5, dname)) AS Department
FROM department ;


DEPARTMENT      DEPARTMENT      DEPARTMENT
--------------- --------------- ---------------
HEADQUARTERS    ADMINISTRATION  RESEARCH
Deleting Tuples with DELETE
- DELETE is used to remove tuples from a table.
- With no WHERE clause, DELETE will remove all tuples from a table.
- Remove all employees:
DELETE employee;
- Remove only employees making more than $50,000
  DELETE employee
  WHERE  salary  > 50000;
- Remove all employees working in Houston:
  DELETE employee
  WHERE  employee.dno IN
    (SELECT dept_locations.dnumber
     FROM   dept_locations
     WHERE  dlocation = 'HOUSTON');
- DELETE will not be successful if a constraint would be violated.
For example, consider the DNO attribute in the Employee table as a Foreign Key.
Removing a department would then be contingent upon no employees working in that department.
This is what we call enforcing Referential Integrity
- A relative of the DELETE statement is the TRUNCATE statement:
TRUNCATE <table name> ;
The TRUNCATE statement removes all records from a table but leaves the table structure in place. It is similar to:DELETE FROM table-name without a WHERE clause. However, whereas DELETE can be rolled back, TRUNCATE can not.
Change Values using UPDATE
- The UPDATE command is used to change attribute values in the database.
- UPDATE uses the SET clause to overwrite the value.
- Change the last name of an Employee:
UPDATE employee
SET    lname = 'SMITH'
WHERE  lname = 'JONES';
- Give an Employee a raise:
UPDATE employee
SET    salary = salary * 1.05
WHERE  fname = 'JOYCE' AND lname = 'ENGLISH' ;
- Give all employees over the age of 50
a raise:
   UPDATE EMPLOYEE
   SET SALARY = SALARY * 1.02
   WHERE TO_NUMBER( ( SYSDATE - bdate) / 365) >= 50;
Exercise 8:Update and Delete
For this exercise, write the SQL UPDATE and DELETE statements to:
- Add .05 to all of the Marketing major’s GPA’s.
- Change Sam’s tutor from Sue to Jane
- For any student who is currently majoring in CIS and who has a GPA of less than 3.0, change their major to Marketing.
5. Advanced SQL*Plus Commands
This section introduces some of the advanced features of SQL*Plus including editing the SQL command buffer, formatting output from SQL SELECT statements, saving the output from SQL statements and collecting performance statistics on the execution of SQL statements.
5.1 Editing The SQL Buffer
Please note that while SQL*Plus does include the following commands to edit SQL statements directly within SQL*Plus, you are likely to be far better off using a simple text editor such as pico or emacs in UNIX/Linux, or Notepad in MS Windows to perform your editing. If you intend to work in this fashion, then you can safely skip section 5.1. Having said all of that, if you are still interested in learning SQL*Plus’ editing techniques, please read on ahead.
SQL*Plus has several commands to allow the user to edit or modify SQL statements. Once a new SQL statement has been typed in (ending with a ; ) this statement is placed into a buffer and is considered to be the current SQL statement . All of the following commands operate on the current SQL statement in the buffer.
- / – Execute the current SQL statement in the buffer
- APPEND – Add text to the end of the current line of the SQL statement in the buffer
- CHANGE – Replace text on the current line of the SQL statement with new text
- CLEAR – Clear the buffer
- DEL – Delete the current line in the buffer
- INPUT – Add one or more lines to the SQL statement in the buffer
- LIST – List the current SQL statement in the buffer
- RUN – Execute the current SQL statement in the buffer
- SAVE – Save the current SQL statement to a script file
- START – Load a SQL statement located in a script file and then run that SQL statement
SQL statements may be typed with a free format. Spaces and
In the following example, an erroneous SQL statement has been entered. After the ; was typed, an error message was displayed indicating the approximate location of the error and a brief error message description.
   SQL> SELECT tname, tabtype
     2  FRO
     3  tab;
   FRO
   *
   ERROR at line 2:
   ORA-00923: FROM keyword not found where expected
To correct line number 2, the user can type the line number followed by the correct portion of the SQL statement. This corrects the SQL statement in the buffer. The last step is to execute the SQL statement in the buffer by typing the RUN command.
   SQL> 2 FROM
   SQL> RUN

   TNAME                          TABTYPE
   ------------------------------ -------
   MACHINE                        TABLE
   EMPLOYEE                       TABLE
The LIST command can be used to display the current contents of the SQL buffer. An asterisk (*) is used to mark the current line of the SQL statement within the buffer.
   SQL> LIST
     1  SELECT tname, tabtype
     2  FROM
     3* tab
The current line of the SQL statement in the buffer can be appended using the APPEND command. The syntax is:APPEND new text . In the following example the new text “xyz” is appended to line number 3 which is the current line in the buffer.
   SQL> LIST
     1  SELECT tname, tabtype
     2  FROM
     3* tab

   SQL> APPEND xyz
     3* tabxyz

   SQL> LIST
     1  SELECT tname, tabtype
     2  FROM
     3* tabxyz
Text on a line in the SQL statement can also be replaced using the CHANGE command. The syntax for the CHANGE command is:CHANGE / old text / new text /
In the following example, text on the current line number 3 will be replaced with blank text:
   SQL> LIST
     1  SELECT tname, tabtype
     2  FROM
     3* tabxyz

   SQL> CHANGE/xyz//
     3* tab

   SQL> LIST
     1  SELECT tname, tabtype
     2  FROM
     3* tab
To move to a different line of the SQL statement in the buffer,
simply type the line number.
   SQL> LIST
     1  SELECT tname, tabtype
     2  FROM
     3* tab

   SQL> 2
     2* FROM

   SQL> LIST
     1  SELECT tname, tabtype
     2* FROM
     3  tab
The DEL command can be used to delete the current line of the SQL
statement out of the buffer as in the following example.
   SQL> LIST
     1  SELECT tname, tabtype
     2* FROM
     3  tab

   SQL> DEL
     2

   SQL> LIST
     1  SELECT tname, tabtype
     2* tab
A SQL statement in the buffer can be saved to a file for later use.
The SAVE command serves this purpose. The syntax for the SAVE
command is:SAVE filename
In this example, the current contents of the buffer are saved to a
file called query.sql:
   SQL> LIST
     1  SELECT tname, tabtype
     2* FROM
     3  tab

   SQL> SAVE query.sql
A directory and/or drive letter (for those using MS DOS or
MS Windows) can be placed in front of the file name in
order to re-direct the file to another drive or directory.
For example, to save the current statement to a USB thumb drive
on the d:drive:
SQL> SAVE d:\query.sql
A SQL statement saved in a file can then be loaded and executed using the START command. The syntax for the START command is:START filename
Here, the file query.sql created in the previous example is loaded and executed using the START command:
   SQL> START query.sql

   TNAME                          TABTYPE
   ------------------------------ -------
   MACHINE                        TABLE
   EMPLOYEE                       TABLE

   SQL>
Again, a drive letter and/or directory name can be placed in front of the file name.
In many cases, it is easiest to create and edit a set of text files containing the queries and then use the START command to execute them. Instructions for this vary depending on the operating system. For example, under a UNIX system, one can use a text editor such as
VI , Emacs or Pico to create text files with the create statements to create the tables, insert statements to add data and select statements to perform some queries. Under MS Windows, one can use the Windows NotePad editor to create these same types of files. If the files are stored on a USB drive (for example, the
d: drive), then the START command can be used as follows:SQL> START d:\query.sql
Under UNIX or Linux, the START command should reference the path and the
file name using backslahes. Por exemplo:
SQL> START /home/holowczak/oracle/queries/query.sql
When working with SQL statements and SQL*Plus commands in a script file, be sure and make backups of your files.
5.2 Formatting SQL*Plus Output
SQL*Plus contains several commands that can alter the appearance of the output. These commands are only in effect for the current SQL*Plus session. They can also be included in SQL script files and can be executed using the START command.
The formatting commands include:
- BREAK – Set the formatting behavior for records that have the same values for some columns
- BTITLE – Place a title on the bottom of each page in the printout from a SQL statement
- COLUMN – Change the appearance of an output column from a query
- REMARK – Place a comment following the REMARK keyword
- SET – Set a SQL*Plus variable to a new value
- SHOW – Show the current value of a SQL*Plus variable
- TTITLE – Place a title on the top of each page in the printout from a SQL statement
- UNDEFINE – Delete a user defined variable
Note that none of these SQL*Plus formatting commands changes the underlying table structures.
Perhaps the most useful command is
COLUMN which changes the appearance of data for a given column. The syntax for the COLUMN command is as follows:COLUMN column_name option1 option2 ...
Where
option can be one or more of the following:-
FORMAT format– Changes the format for the column. For example, to only display the first 10 characters of an employee’s last name (column LNAME), use the following:COLUMN lname FORMAT A10
This indicates to format the lname column as an Ascii column with only 10 characters. Numbers can be formatted using “9” to indicate digits. Por exemplo:
COLUMN salary FORMAT $9,999,990.99
-
HEADING heading_text
– changes the heading for a column. -
JUSTIFY LEFTorJUSTIFY CENTERorJUSTIFY RIGHT– aligns the output with the left, center or right of the column. -
NULL text– Indicates the text that should be displayed in place of a NULL value. -
WRAPPEDorWORD_WRAPPEDorTRUNCATED– Indicates how text that is longer than the displayed column width should be handled.TRUNCATEDmeans it will be cut off at the maximum width of the field.WRAPPEDwill wrap the value down to the
next line of output.WORD_WRAPPEDdoes the same as Wrapped but breaks the value up on white space.
The
SET and SHOW commands can also be useful. To see a listing of all of the SQL*Plus variables, type SHOW ALL SQL> show all appinfo is ON and set to "SQL*Plus" arraysize 15 autocommit OFF autoprint OFF autotrace OFF shiftinout INVISIBLE blockterminator "." (hex 2e) btitle OFF and is the 1st few characters of the next SELECT cmdsep OFF colsep " " compatibility version NATIVE concat "." (hex 2e) copycommit 0 copytypecheck is ON define "&" (hex 26) echo OFF editfile "afiedt.buf" embedded OFF escape OFF feedback ON for 6 or more rows flagger OFF flush ON heading ON headsep "|" (hex 7c) linesize 100 lno 24 loboffset 1 long 80 longchunksize 80 newpage 1 null "" numformat "" numwidth 9 pagesize 24 pause is OFF pno 0 recsep WRAP recsepchar " " (hex 20) release 800030000 repfooter OFF and is NULL repheader OFF and is NULL serveroutput OFF showmode OFF spool OFF sqlcase MIXED sqlcode 0 sqlcontinue "> " sqlnumber ON sqlprefix "#" (hex 23) sqlprompt "SQL> " sqlterminator ";" (hex 3b) suffix "SQL" tab ON termout ON time OFF timing OFF trimout ON trimspool OFF ttitle OFF and is the 1st few characters of the next SELECT underline "-" (hex 2d) user is "HOLOWCZAK" verify ON wrap : lines will be wrapped
Some of the SQL*Plus variables of interest include
BTITLE and TTITLE described above, Other useful variables include:- SET COLSEP – The separator characters between columns (default is a space)
- SET ECHO – Determines if SQL*Plus commands should be echoed or not. The default is
OFFmeaning SQL*Plus commands will not be echoed. - SET HEADING – Determines if column headings should be displayed or not. Default is
ON. - SET LINESIZE – Determines the maximum number of characters in a line of output. The default is 80.
- SET LONG – Determines how much data in a
LONGcolumn will be displayed. The default is 80 bytes. - SET MARKUP – Converts output of SQL*Plus to HTML markup (Oracle8i and above only). For example:SET MARKUP HTML ON
- SET NULL – Determines what value should be displayed in place of a NULL value.
- SET PAGESIZE – The number of lines for one page (before the headers repeat). The default is 24 lines.
- SET PAUSE – Determines if output should be paused after
PAGESIZElines have been displayed. The default isOFF. - SET TRIMOUT – Determines if each line should be padded with blanks out to a length of
LINESIZE. The default isONmeaning the output will be trimmed (e.g., will not be padded with spaces). - SET WRAP – Determines if the output will be wrapped to the next line or truncated if the line is longer than
LINESIZE. The default isONmeaning long output will be wrapped.
The following example shows an SQL*Plus script file (
myquery.sql ) that utilizes some of the above formatting commands.Assume this text file is saved on a USB disk assigned as the D: drive on this computer. The outputof this script is displayed afterwards.
TTITLE 'Employees, Departments and Department Managers'
SET PAGESIZE 36
COLUMN address      FORMAT A20 WORD_WRAPPED
COLUMN dept_manager FORMAT A13 WORD_WRAPPED HEADING 'Dept. Manager'
COLUMN dno          FORMAT 999
SELECT employee.fname, employee.lname, employee.address,
       employee.dno, department.dname,
       employee2.fname || ' ' || employee2.lname  dept_manager
FROM   employee, department, employee employee2
WHERE  employee.dno = department.dnumber
   AND department.mgrempid = employee2.employeeid ;
When the above script is executed, the following output is displayed:
SQL> START d:\myquery.sql

Mon Jan 05
                        Employees, Departments and Department Managers

FNAME    LNAME    ADDRESS              DNO DNAME          Dept. Manager
-------- -------- -------------------- --- -------------- -------------
JOHN     SMITH    731 FONDREN,           5 RESEARCH       FRANKLIN WONG
                  HOUSTON, TX

FRANKLIN WONG     638 VOSS,HOUSTON TX    5 RESEARCH       FRANKLIN WONG
RAMESH   NARAYAN  975 FIRE OAK,          5 RESEARCH       FRANKLIN WONG
                  HUMBLE, TX

JOYCE    ENGLISH  5631 RICE, HOUSTON,    5 RESEARCH       FRANKLIN WONG
                  TX

JAMES    BORG     450 STONE, HOUSTON,    1 HEADQUARTERS   JAMES BORG
                  TX

ALICIA   ZELAYA   3321 CASTLE, SPRING,   4 ADMINISTRATION JENNIFER
                  TX                                      WALLACE

JENNIFER WALLACE  291 BERRY, BELLAIRE,   4 ADMINISTRATION JENNIFER
                  TX                                      WALLACE

AHMAD    JABBAR   980 DALLAS, HOUSTON,   4 ADMINISTRATION JENNIFER
                  TX                                      WALLACE

8 rows selected.
The BREAK command is useful for formatting the output of queries where the same values in a column will not be repeated in the output. For example, assume the following query is executed:
SELECT salary, lname FROM employee ORDER BY salary;
Since some employees have the same salary, those values would be repeated. The following BREAK command will cause the repeated values to be suppressed.
BREAK ON salary
Additional columns can also participate in the groupings made by BREAK by appending ON columnname to the command. Por exemplo:
BREAK ON salary ON fname
The current setting for BREAK stays in effect until it is either turned off with the CLEAR BREAKS command or the SQL*Plus session is terminated.
Exercise 9:Creating a Report Script
For this exercise, take the following query and create a script file with appropriate titles and column formatting. Use the BREAK ON command so that the DNO and DNAME only appears once for each group of employees in the department.
SELECT employee.dno, department.dname,
       INITCAP(employee.fname) AS FNAME,
       INITCAP(employee.lname) AS LNAME,
       employee.salary
FROM   employee, department
WHERE  employee.dno = department.dnumber
ORDER BY dno;
Below is the desired output:
Thu Aug 29                                   page    1
             Departments and Employees

Dept. Num Dept. Name      First    Last       Salary
--------- --------------- -------- -------- --------
        1 HEADQUARTERS    James    Borg      $25,000
        4 ADMINISTRATION  Alicia   Zelaya    $25,000
                          Jennifer Wallace   $43,000
                          Ahmad    Jabbar    $25,000
        5 RESEARCH        Joyce    English   $25,000
                          Ramesh   Narayan   $38,000
                          Franklin Wong      $40,000
5.3 Saving SQL*Plus Output using the SPOOL Comando
SQL*Plus has a command called
SPOOL that can send the output from any SQL statement to a file. Indeed, anything that is displayed in SQL*Plus can be echoed to this spool file. The
SPOOL command is invoked with the name of a file that will contain the output. Once this has been executed, the output from all subsequent SQL statements will be copied to the file. To end capturing the output, issue the SPOOL OFF comando. The following is an example:SQL> SPOOL d:\myfile.out SQL> SELECT * from EMPLOYEE; etc. Any SQL statements typed here will show up in the output. SQL> SPOOL OFF
The
SPOOL OFF command turns the output off. Everything between SPOOL d:\myfile.out and SPOOL OFF will be in the file myfile.out. This is a simple ASCII text file that can be read by Windows Notepad, MS Word, or just about any word processor, e-mail package, etc. To print, load this file into MS Word, set the font to Courier and print as you would with any other document. Note that some SQL*Plus commands will not show up in the SPOOL file. To have them echo to the SPOOL file, use the
SET ECHO ON opção. Also, when SPOOLing to a file, SQL*Plus makes each line 80 characters long by padding with spaces. This can be shortened to fewer characters using the
SET LINESIZE opção. For example, SET LINESIZE 70 will pad each line of output to 70 characters. The
SET TRIMOUT and SET TABS options offer other ways to change the spooled output. Exercise 10:Creating a Report Script and Saving the output
For this exercise, take the script created for exercise 9 and add the necessary SQL*Plus commands to spool the report to a text file. One in a text file, load this file into a text editor or word processor and print it. Note that if you are loading a text file into a word processor such as MS Word, you should change the font of the text to Courier or Courier New (this is a fixed width font) so that the output lines up correctly.
5.4 Prompting and Accepting user Input
SQL*Plus has several commands that can be used to prompt the user for input, accept input from the user and store it in a variable, and then use that variable in a query.
The following example shows the prompt/accept sequence for a query.
PROMPT Type the department you are looking for
ACCEPT dept NUMBER PROMPT "Department Number: "
SELECT fname, lname, dno
FROM   employee
WHERE  dno = &dept ;
When this script is executed, the following output is shown:
SQL>  START a:\empquery.sql
Type the department you are looking for
Department Number: 5
old   3: WHERE dno = &dept
new   3: WHERE dno =         5

FNAME    LNAME          DNO
-------- -------- ---------
JOHN     SMITH            5
FRANKLIN WONG             5
RAMESH   NARAYAN          5
JOYCE    ENGLISH          5
In the above example, the user typed “5” in response to the Department Number: incitar.
The first PROMPT command simply echoes out a line to the display. The second command, ACCEPT, accepts input from the user. In this case, the variable that will hold the input is called
dept . The input should be of type NUMBER , and the PROMPT Department Number: should be displayed. Once the user types the department number and presses enter, the variable
dept takes on the value. The following two lines (starting with old and new) are verifying the values used for the dept variável. To suppress the display of this verification, use the SET VERIFY OFF command before running the script or as one of the first commands in the script. In the following example, additional commands have been added including the SET VERIFY and REMARK commands to improve the script.
REMARK   This script accepts a department number as
REMARK   input from the user and then displays the
REMARK   last name, first name, address and department number
REMARK   of the employees in that department
REMARK   Turn off VERIFY
SET VERIFY OFF

REMARK   Format some columns
COLUMN dno     FORMAT 99999 HEADING 'Dept.|Number'
COLUMN address FORMAT A25   HEADING 'Address'
COLUMN fname   FORMAT A10   HEADING 'First|Name'
COLUMN lname   FORMAT A12   HEADING 'Last|Name'

REMARK   Prompt the user and get a department number
PROMPT Type the department you are looking for
ACCEPT dept NUMBER PROMPT "Department Number: "

REMARK   Perform the query
SELECT fname, lname, address, dno
FROM   employee
WHERE  dno = &dept ;
When this script is executed, the following output is shown:
SQL>  START d:\empquery.sql
Type the department you are looking for
Department Number: 4

First      Last                                    Dept.
Name       Name         Address                   Number
---------- ------------ ------------------------- ------
ALICIA     ZELAYA       3321 CASTLE, SPRING, TX        4
JENNIFER   WALLACE      291 BERRY, BELLAIRE, TX        4
AHMAD      JABBAR       980 DALLAS, HOUSTON, TX        4
For variables that are not numeric type, the data type is not required in the ACCEPT command. For example, to search for a specific employee by name:
PROMPT Type the last name of the employee you are looking for
ACCEPT name PROMPT "Employee last name: "
SELECT fname, lname, dno
FROM   employee
WHERE  UPPER(lname) like UPPER('%&name%');
In the above example, the UPPER() function is used to change both the column values of lname and the text the user supplied for the &name variable to all upper case letters. In this way, a match will be made even if the user types in lower case letters for the &name . variável.
Exercise 11:Prompting and Accepting User Input
Create a script that accepts a salary from the user and then returns a list of employees who make more the amount provided by the user. The following is the desirable output:
Please provide a Salary
Salary: 30000

First      Last
Name       Name           Salary
---------- ------------ --------
FRANKLIN   WONG          $40,000
JENNIFER   WALLACE       $43,000
RAMESH     NARAYAN       $38,000
5.5 Generating HTML output from SQL*Plus
Starting with Oracle8i and continuing with all newer versions, SQL*Plus has the ability to generate HTML output in place of the normal text based output generated from query results. This facility is especially useful when combined with a web server. Through the use of SQL script files and the SPOOL command, one can easily build a relatively robust query engine that accepts parameters from a web browser, writes a query and additional formatting commands to a script file, invokes SQL*Plus with the script file and then returns the resulting output file (with HTML code) to the user’s web browser. Below are a few techniques to get started using HTML output.
The first step in generating HTML output is to work with the SET MARKUP command in SQL*Plus. At the SQL> prompt, switch the MARKUP to HTML as follows:
SQL> SET MARKUP HTML ON
SQL>
Notice that the SQL prompt even changes to proper HTML by using the HTML code for a greater than sign. At this point, issuing any query will result in the output formatted as an HTML table. Por exemplo:
SQL> SELECT fname, lname, salary FROM employee
        WHERE employeeid = '123456789';
<br>
<p>
<table border="1" width="90%">
<tr>
<th>
FNAME
</th>
<th>
LNAME
</th>
<th>
SALARY
</th>
</tr>
<tr>
<td>
JOHN
</td>
<td>
SMITH
</td>
<td align="right">
     30000
</td>
</tr>
</table>
<p>
Other SQL*Plus commands such as TITLE will also produce appropriate HTML markup.
Exercise 12:Generating HTML output
For this exercise, use the script created in exercise 10 (with the ability to SPOOL to a file named report.htm ) and add the necessary commands to generate HTML output from the query. Load the resulting spool file into a web browser.
5.6 Collecting Statistics On SQL Statements
SQL*Plus has several commands that monitor the execution of SQL statements. The commands can be used to gather statistical information for performance monitoring purposes. Database Administrators (DBAs) call this Profiling and it can be used to find SQL queries that take too long or consume too many database resources.
The first command is called AUTOTRACE and is used to trace the execution plan for an SQL statement. To use AUTOTRACE , a special table must be created in the schema to hold the statistical information. Execute the following CREATE TABLE command in your schema:
create table PLAN_TABLE (
 statement_id    varchar2(30),
 timestamp       date,
 remarks         varchar2(80),
 operation       varchar2(30),
 options         varchar2(30),
 object_node     varchar2(128),
 object_owner    varchar2(30),
 object_name     varchar2(30),
 object_instance numeric,
 object_type     varchar2(30),
 optimizer       varchar2(255),
 search_columns  number,
 id              numeric,
 parent_id       numeric,
 position        numeric,
 cost            numeric,
 cardinality     numeric,
 bytes           numeric,
 other_tag       varchar2(255),
 partition_start varchar2(255),
 partition_stop  varchar2(255),
 partition_id    numeric,
 other           long);
This table need only be created once. No data is permanently stored in PLAN_TABLE so it will not take much if any space.
To check the execution plan for each SQL statement, turn the AUTOTRACE option on with the following SQL*Plus command:
SET AUTOTRACE ON
Then execute an SQL statement:
SQL>  SELECT fname, minit, lname, employeeid, bdate, address
      FROM employee;
FNAME    MI LNAME    EMPLOYEEID BDATE     ADDRESS
-------- -- -------- ---------- --------- ------------------------
JOHN     B  SMITH    123456789  09-JAN-75 731 FONDREN, HOUSTON, TX
FRANKLIN T  WONG     333445555  08-DEC-65 638 VOSS,HOUSTON TX
ALICIA   J  ZELAYA   999887777  19-JUL-78 3321 CASTLE, SPRING, TX
JENNIFER S  WALLACE  987654321  20-JUN-51 291 BERRY, BELLAIRE, TX
RAMESH   K  NARAYAN  666884444  15-SEP-72 975 FIRE OAK, HUMBLE, TX
JOYCE    A  ENGLISH  453453453  31-JUL-82 5631 RICE, HOUSTON, TX
AHMAD    V  JABBAR   987987987  29-MAR-79 980 DALLAS, HOUSTON, TX
JAMES    E  BORG     888665555  10-NOV-47 450 STONE, HOUSTON, TX

Execution Plan
----------------------------------------------------------
   0      SELECT STATEMENT Optimizer=CHOOSE
   1    0   TABLE ACCESS (FULL) OF 'EMPLOYEE'

Statistics
----------------------------------------------------------
          0  recursive calls
          3  db block gets
          2  consistent gets
          0  physical reads
          0  redo size
       1891  bytes sent via SQL*Net to client
        651  bytes received via SQL*Net from client
          4  SQL*Net roundtrips to/from client
          1  sorts (memory)
          0  sorts (disk)
          8  rows processed
Notice the regular output from the SQL command is given followed by the Execution plan and the statistics.
To turn off AUTOTRACE , issue the following command:
SET AUTOTRACE OFF
The next useful command for performance monitoring is called TIMING . This command starts a timer that can be read at any interval, similar to how a stopwatch operates. To set up a timer, issue the following command:
SQL> TIMING START select_emp
SQL> SELECT fname, minit, lname, employeeid, bdate
     FROM   employee ;

FNAME    MI LNAME    EMPLOYEEID BDATE
-------- -- -------- ---------- ---------
JOHN     B  SMITH    123456789  09-JAN-75
FRANKLIN T  WONG     333445555  08-DEC-65
ALICIA   J  ZELAYA   999887777  19-JUL-78
JENNIFER S  WALLACE  987654321  20-JUN-41
RAMESH   K  NARAYAN  666884444  15-SEP-72
JOYCE    A  ENGLISH  453453453  31-JUL-82
AHMAD    V  JABBAR   987987987  29-MAR-79
JAMES    E  BORG     888665555  10-NOV-47

8 rows selected.

SQL> TIMING SHOW select_emp
timing for: select_emp
 real: 1760
Thus the above query took 1.76 seconds to complete.
To stop a timer, issue the TIMING STOP comando. Note that AUTOTRACE and TIMING should probably not be used in conjunction as it would be difficult to separate the execution time for the SQL statement from the time taken to generate the plan and statistics.
Exercise 13:Generating Statistics
Produce the query plan and time the execution of the following SQL statement:
SELECT employee.fname, employee.lname, employee.address,
       employee.dno, department.dname,
       employee2.fname || ' ' || employee2.lname  dept_manager
FROM   employee, department, employee employee2
WHERE  employee.dno = department.dnumber
   AND department.mgrempid = employee2.employeeid;
5.7 Using the ALTER SESSION Statement for Date Formats
In the previous examples of SQL statements, the default format of data of type DATE has been in the form:DD-MON-YY
The TO_CHAR and TO_DATE functions can be used to convert dates to other formats, however, this may become inconvenient, especially when inserting a large number of rows.
The ALTER SESSION statement can be used to alter various characteristics of the current SQL*Plus session including the default date format. This statement is often used to format dates to conform to regional customs. The syntax of ALTER SESSION for use with changing the default date format is as follows:
    ALTER SESSION
    SET NLS_DATE_FORMAT = <date_format>
The date_format can include the following codes:
YY | A 2 digit year such as 98. |
YYYY | A 4 digit year such as 1998. |
NM | A month number. |
MONTH | The full name of the month. |
MON | The abbreviated month (Jan, Feb, Mar). |
DDD | The day of the year. For use is Julian dates. |
DD | The day of the month. |
D | The day of the week. |
DAY | The name of the day. |
HH | The hour of the day (12 hour clock) |
HH24 | The hour of the day (24 hour clock) |
MI | The minutes. |
SS | The seconds. |
For example, to change the default date to include a full four digit year, issue the following ALTER SESSION statement:
ALTER SESSION SET NLS_DATE_FORMAT = 'DD-MON-YYYY'
From this point, all INSERT, UPDATE and DELETE statements must format the date accordingly. Also, any SELECT statements will return the date formatted accordingly.
Note that this change only remains in effect for the current session. Logging out of SQL*Plus and logging back in (or re-connecting to the Oracle database using the connect command) will reset the date format back to its default.
6. Oracle Stored Procedures and Triggers
The Oracle RDBMS has the ability to store procedures within the data dictionary and execute procedures in the RDBMS. Procedures (Program Units) are written in the PL/SQL language (Procedural Language), which is proprietary to Oracle. PL/SQL runs in both the database engine as well as in many of Oracle’s development tools such as Oracle Developer.
Here is an excellent book on Oracle PL/SQL:Oracle PL/SQL Programming:Covers Versions Through Oracle Database 11g Release 2 (Animal Guide)

The basic PL/SQL programming unit is called a block. A block begins with the BEGIN keyword and ends with the END; keyword. All statements and blocks in PL/SQL must end with semicolons. Below is one example of a stored procedure block:
BEGIN
  -- This is a comment line
  -- Now use the PUT_LINE produce to display something
  DBMS_OUTPUT.PUT_LINE('Hello World');
END;
Note:To see the outputs from stored procedures, type the command SET SERVEROUTPUT ON at the SQL> prompt in SQL*Plus. The PUT_LINE procedure is like the printf function in “C” or the System.out.println method in Java
Variables may be declared in a block. Data types for the variables match the underlying datatypes supported by the DBMS. The most commonly used data types are therefore:VARCHAR, NUMBER and DATE. Por exemplo:
DECLARE myname VARCHAR(100); BEGIN -- Assign 'Joe Smith' as the name myname := 'Joe Smith'; -- Now use the PUT_LINE produce to display the name DBMS_OUTPUT.PUT_LINE(myname); END; |
In addition to using these data types, one can also declare variables based upon the data types of columns in database tables. This is done using the %TYPE syntax. Por exemplo:
DECLARE -- Declare the mydept variable using the same data type as the -- dno column in the employee table. mydept employee.dno%TYPE; BEGIN -- Assign 5 as the department mydept := 5; -- Now use the PUT_LINE produce to display the department DBMS_OUTPUT.PUT_LINE(mydept); END; |
Exercise 14:Basic PL/SQL Procedure
For this exercise, write a PL/SQL block that declares three variables:AGE, MIDDLE_INITIAL and SALARY. For the MIDDLE_INITIAL and SALARY, use the data types that correspond to the column data types in the employee table (the MINIT and SALARY columns). Declare the AGE variable as NUMBER. Assign values to each of these variables and then use the PUT_LINE procedure (as was done above) to output each of them.
PL/SQL Statements
The PL/SQL language has all of the conditional (IF …THEN) looping (WHILE), assignment, variable declaration and other language constructs of a complete programming language. SQL statements may be freely mixed in with the other programming
statements. Below is an example of a conditional statement (IF…THEN):
DECLARE
  deptnum department.dnumber%TYPE;
BEGIN
  deptnum := 5;
  IF (deptnum > 3) THEN
     DBMS_OUTPUT.PUT_LINE('Employees should be paid more than 25,000');
  ELSE
     DBMS_OUTPUT.PUT_LINE('Employees should be paid exactly 40,000');
  END IF;
END;
|
Below is an example of a looping construct (FOR):
DECLARE
  i       INTEGER;
  message VARCHAR(180);
BEGIN
  message := 'Hello World  ';
  FOR i IN 1..10 LOOP
      DBMS_OUTPUT.PUT_LINE(message || i);
  END LOOP;
END;
|
The major change to the SQL Data Manipulation Language is to the syntax of the SELECT statement. All SELECT statements in PL/SQL must use the INTO clause to redirect the rows returned by the SELECT into variables. The syntax of the SELECT statement is:
         SELECT <column1, column2, . . .>
         INTO   <var1, var2, . . .>
         FROM   <table1, table2, . . .>
         WHERE  <where clause>
         GROUP BY <column1, column2, . . .>
         HAVING   <having clause>
         ORDER BY <column1, column2, . . .>
|
Variables named in the INTO clause correspond to the order of columns selected in the SELECT clause. Por exemplo:
DECLARE
   empsalary     NUMBER;
   empdepartment NUMBER;
BEGIN
   SELECT   employee.salary, employee.dno
   INTO     empsalary, empdepartment
   FROM     employee
   WHERE    employee.lname = 'SMITH';

   IF (empdepartment = 1) THEN
      UPDATE employee
      SET    salary = empsalary * 1.03
      WHERE  employee.lname = 'SMITH';
   END IF;
END;
|
The above PL/SQL block declares two variables and then executes a SELECT statement returning the salary in PL/SQL variable empsalary and the department number in PL/SQL variable empdepartment for employee SMITH. If the empdepartment is equal to 1 then an SQL UPDATE statement is executed.
It is possible that a SELECT…INTO statement can return more than on row or record, or no records at all. In such situations, the entire SELECT statement will fail resulting in what is called an EXCEPTION. EXCEPTIONs in PL/SQL must be handled (taken care of) by some code. Most all triggers and stored procedures that use SELECT…INTO have EXCEPTION handling code.
The EXCEPTION code the following syntax:
EXCEPTION WHEN <exception_name> THEN BEGIN ... END; WHEN <exception_name> THEN BEGIN ... END; WHEN OTHERS THEN BEGIN ... END; |
To continue the above example, the exception code would appear as follows at the end of the regular stored procedure code:
EXCEPTION
   WHEN NO_DATA_FOUND THEN
   BEGIN
     RAISE_APPLICATION_ERROR(-20610,
           'No employee with last name SMITH found');
   END;
   WHEN TOO_MANY_ROWS THEN
   BEGIN
     RAISE_APPLICATION_ERROR(-20612,
           'More than one employee with last name SMITH found');

   END;
|
The PL/SQL language has many more statements and additional syntax that can be found in the PL/SQL Reference Guide documentation.
Creating Procedures and Triggers
There are two main ways of storing PL/SQL code in the Oracle database:CREATE PROCEDURE and CREATE TRIGGER. Triggers are code that are executed automatically in response to some event. Events include the execution of a DML statement on a table (such as INSERT, UPDATE, DELETE, MODIFY). Procedures are typically used to implement general program logic that can be shared across applications, triggers and utilities. A procedure must be explicitly called by an application, trigger or program.
It is common practice to store general business rule checking in procedures. This allows applications to check data validity before a transaction is submitted to the database. Triggers can also call the procedures to check data at the database level. Since the business rules are coded in a single set of procedures, maintenance of this code is simplified.
In the next section, we will introduce the syntax for creating triggers and demonstrate the use of a trigger to enforce a business rule.
6.1 Oracle Trigger Syntax
Creating a trigger is accomplished with the CREATE TRIGGER statement. There are numerous options for a trigger that specify when the trigger should fire. These options include:
- The SQL statement (INSERT, UPDATE, DELETE, SELECT) that causes the event. An event can include more than one SQL statement per trigger.
- The timing when the trigger code is executed. Options here include
- BEFORE – The trigger code is executed before the effects of the SQL statement are put into place.
- INSTEAD OF – The trigger code is executed instead of the normal SQL statement.
- AFTER – The trigger code is executed after the normal SQL statement is processed.
- Some SQL statements such as UPDATE, DELETE and SELECT may affect more than one row. Triggers may be specified to fire once for the entire SQL statement or once for each row affected by the SQL statement.
6.2 Trigger Example
Here is an example trigger called check_age used to check if an employee is over the age of 16. This trigger will be executed in response to the events of INSERT or DELETE on the employee table. The check_age trigger code will be executed BEFORE the affects of the SQL statement are put into place. Finally, check_age will execute FOR EACH ROW affected by the SQL statement.
Lines starting with the double minus sign -- are comments and are ignored by the trigger.
CREATE OR REPLACE TRIGGER check_age
BEFORE INSERT OR UPDATE ON employee
FOR EACH ROW
DECLARE
   -- Declare two variables.
   years_old NUMBER;
   error_msg VARCHAR(180);
BEGIN
   --  The variable :new.bdate will be holding the new birth date
   --  of the record to be inserted or updated.  Subtract from
   --  the system date and divide by 365 to get years.
   years_old := ( (sysdate - :new.bdate) / 365);
   -- Now check to see if the new employee is under age.
   -- If so, then show an error.
   IF (years_old < 16) THEN
      error_msg :=  'Do not hire '  || :new.fname || ' ' ||
      :new.lname || '. They are only ' ||
      TO_CHAR(years_old, '99.9') || ' years old.';
      -- Signal the user there is a problem with this data.
      -- This also aborts the affects of the SQL statement
      -- for the current row.
      RAISE_APPLICATION_ERROR ( -20601, error_msg);
   END IF;
END;
|
After this code has been entered in SQL*Plus, an additional line will appear as if the SQL statement should continue. To complete entering the trigger code, type a forward slash / and the code will be submitted.
One of three things will happen when a new procedure or trigger is created:
- If there are no syntax errors, the code will be compiled and the trigger will be stored in the user’s schema. In this case, SQL*Plus will respond with a message that the trigger was created.
- If there are some minor syntax errors within the code itself (between DECLARE and the last END statement), the trigger will still be created and stored in the database, however a message will be returned:Trigger created with compilation errors .
To view the compilation errors check the USER_ERRORS view:
SELECT * FROM USER_ERRORS
or use the SHOW ERRORS SQL*Plus command.
- Finally, if there are syntax errors in the CREATE OR REPLACE TRIGGER statement itself (such as if the employee table does not exist or one of the key words was misspelled), then the entire statement will be rejected and the trigger code will not be saved in the schema.
To see if the trigger compiled correctly, look in view USER_ERRORS as follows:
SQL> SELECT * FROM user_errors;

  no rows selected
If the message no rows selected appears, then no errors were found in the trigger.
Alternately, use the SQL*Plus command SHOW ERRORS .
To view the trigger code:
SQL> SET LONG 4096
SQL> SET PAGESIZE 90
SQL> SELECT * FROM user_triggers;
Or, in a more compact form:
SQL> SELECT trigger_name, trigger_body
     FROM   user_triggers
     WHERE  trigger_name = 'CHECK_AGE';
Once the trigger has been entered without syntax errors, it can be tested. See what happens when we attempt to insert a new employee record where the employee’s birthdate is less than 16 years ago:
SQL> INSERT INTO employee VALUES ('12332199', 'Joe', 'K', 'Smith',
  2  '08-JUN-1999', '123 Smith St,', 'M', 32000, 888665555, 1);
INSERT INTO employee VALUES ('12332199', 'Joe', 'K', 'Smith',
            *
ERROR at line 1:
ORA-20601: Do not hire Joe Smith. They are only  15.6 years old.
ORA-06512: at "HOLOWCZAK.CHECK_AGE", line 8
ORA-04088: error during execution of trigger 'HOLOWCZAK.CHECK_AGE'
6.3 Stored Procedure Example
The following example implements a simple inventory system. The Products table holds a list of products with a productid as the key and a description. The inventory location table holds a series of locations in the warehouse including an identifier and the aisle, tier and bin. Finally, the intersection of these two tables is the inventory table which takes a locationid and a productid and gives the quantity of the product present at the location.
SQL Statements to create and populate tables
The SQL code to create and populate the three tables is given below:
First step:Create three tables and add constraints
CREATE TABLE inventory_locations (
  locationid    NUMBER(10) NOT NULL,
  aisle         NUMBER(10),
  tier          NUMBER(10),
  bin           NUMBER(10) );

ALTER TABLE inventory_locations
ADD CONSTRAINT il_pk PRIMARY KEY (locationid);

CREATE TABLE products (
   productid    VARCHAR(10) NOT NULL,
   description  VARCHAR(35) );

ALTER TABLE products ADD CONSTRAINT prod_pk
PRIMARY KEY (productid);

CREATE TABLE inventory (
    locationid  NUMBER(10) NOT NULL,
    productid   VARCHAR(10) NOT NULL,
    quantity    NUMBER(10) );

ALTER TABLE inventory ADD CONSTRAINT inventory_pk
PRIMARY KEY (locationid, productid);
Next step:Add some data to the three tables
INSERT INTO inventory_locations VALUES (101, 1, 1, 1);
INSERT INTO inventory_locations VALUES (102, 1, 1, 2);
INSERT INTO inventory_locations VALUES (103, 1, 1, 3);
INSERT INTO inventory_locations VALUES (104, 1, 2, 1);
INSERT INTO inventory_locations VALUES (105, 1, 2, 2);
INSERT INTO inventory_locations VALUES (106, 1, 2, 3);
INSERT INTO inventory_locations VALUES (107, 2, 1, 1);
INSERT INTO inventory_locations VALUES (108, 2, 1, 2);

INSERT INTO products VALUES ('P500', 'HP LaserJet 6L');
INSERT INTO products VALUES ('P510', 'HP DeskJet 855');
INSERT INTO products VALUES ('P520', 'IBM Aptiva');
INSERT INTO products VALUES ('P530', 'Compaq Presario');

INSERT INTO inventory VALUES (101, 'P500', 5);
INSERT INTO inventory VALUES (102, 'P510', 10);
INSERT INTO inventory VALUES (103, 'P500', 10);
INSERT INTO inventory VALUES (104, 'P520', 1);
INSERT INTO inventory VALUES (105, 'P530', 5);
The following query shows the current state of the inventory:
SELECT i.locationid, aisle, tier, bin, i.productid, description, quantity
FROM   inventory i, inventory_locations il, products p
WHERE  i.locationid = il.locationid
  AND  i.productid = p.productid;
We can create a view to implement this query:
CREATE VIEW vw_inventory AS
SELECT i.locationid, aisle, tier, bin, i.productid, description, quantity
FROM   inventory i, inventory_locations il, products p
WHERE  i.locationid = il.locationid  AND  i.productid = p.productid;
To see the current state of the inventory, simply query the view:
SELECT * FROM vw_inventory;
To see the output from the stored procedures, set the following options (Note:You must do this each time you log into SQL*Plus).
SET SERVEROUTPUT ON
SET ARRAYSIZE 2
6.3 Stored Procedure Example – Continued
Stored Procedures to Add and Remove items From inventory
Adding a new product to an existing location requires the following:
- Check to see if some quantity of that product is already in the location. If so, then UPDATE the quantity already there.
- If that product is not currently in the location, then INSERT a new inventory record with the locationid, productid and new quantity.
The following Oracle PL/SQL implements the add_to_inventory procedure:
CREATE OR REPLACE PROCEDURE add_to_inventory (
    new_locationid IN NUMBER,
    new_productid  IN VARCHAR,
    new_quantity   IN NUMBER) AS
  -- Declare a new variable called 'current_quantity' that is of the same
  -- type as the column quantity in the inventory table
  current_quantity inventory.quantity%TYPE;

BEGIN
  -- Initialize current_quantity to 0
  current_quantity := 0;

  -- See if some quantity exists at the current location
  -- If not, then raise EXCEPTION and insert a new record
  -- If so, then continue on to the UPDATE statement
  SELECT inventory.quantity
  INTO   current_quantity
  FROM   inventory
  WHERE  inventory.locationid = new_locationid
   AND   inventory.productid  = new_productid;

  -- If we get this far, then there must already exist
  -- an inventory record with this locationid and productid
  -- So update the inventory by adding the new quantity.
  IF (current_quantity > 0) THEN
    UPDATE inventory
    SET    quantity = quantity + new_quantity
    WHERE  inventory.locationid = new_locationid
      AND  inventory.productid  = new_productid;
  END IF;

  -- If the first SELECT statement above fails to return any
  -- records at all, then the NO_DATA_FOUND exception will be
  -- signalled. The following code reacts to this exception.
  EXCEPTION
     WHEN NO_DATA_FOUND THEN
     BEGIN
       -- Since an inventory record matching the locationid and
       -- productid can not be found, we must INSERT a new
       -- inventory record.
       INSERT INTO inventory
       (locationid, productid, quantity)
       VALUES (new_locationid, new_productid, new_quantity);
     END;
END;
|
Removing an existing product from inventory requires the following:
- Check to see if the requested quantity of that product is available in the location. If so, then UPDATE the quantity.
- If the resulting quantity falls to 0, then DELETE the inventory record.
CREATE OR REPLACE PROCEDURE remove_from_inventory (
    current_locationid IN NUMBER,
    current_productid  IN VARCHAR,
    quantity_to_remove IN NUMBER) AS
  -- Declare a new variable called 'current_quantity' that is of the same
  -- type as the column quantity in the inventory table
  current_quantity inventory.quantity%TYPE;
  -- Declare an error message string.
  error_msg VARCHAR(180);
BEGIN
  current_quantity := 0;

  -- See if some quantity exists at the current location
  -- If not, then raise EXCEPTION and exit the procedure.
  -- If so, then continue on to the UPDATE statement
  SELECT quantity
  INTO   current_quantity
  FROM   inventory
  WHERE  inventory.locationid = current_locationid
   AND   inventory.productid  = current_productid;

  -- If we get this far, then there must already exist
  -- an inventory record with this locationid and productid
  -- So update the inventory by removing the quantity.
  IF (current_quantity - quantity_to_remove > 0) THEN
    UPDATE inventory
    SET    quantity = quantity - quantity_to_remove
    WHERE  inventory.locationid = current_locationid
      AND  inventory.productid  = current_productid;
  END IF;
  -- If the quantity to remove is the same as the current
  -- quantity in the location, then simply delete the
  -- entire record.
  IF (current_quantity - quantity_to_remove = 0) THEN
    DELETE FROM inventory
    WHERE  inventory.locationid = current_locationid
      AND  inventory.productid  = current_productid;
  END IF;
  IF (current_quantity - quantity_to_remove < 0) THEN
    error_msg := 'ERROR: Insufficient quantity in that location';
    RAISE_APPLICATION_ERROR (-20602, error_msg);
  END IF;

  -- If the first SELECT statement above fails to return any
  -- records at all, then the NO_DATA_FOUND exception will be
  -- signalled. The following code reacts to this exception.
  EXCEPTION
     WHEN NO_DATA_FOUND THEN
     BEGIN
       error_msg := 'ERROR: Product ' || current_productid ||
                            ' not found at this location';
       RAISE_APPLICATION_ERROR (-20603, error_msg);
     END;
END;
|
Note:When creating stored procedures in SQL*Plus, you must type a slash character ( / ) on the line after the last END; of the procedure. This lets SQL*Plus know to submit the CREATE PROCEDURE statement to the database.
To see any errors from the compilation of the procedure use the show errors comando. To run the stored procedures, use the EXECUTE command followed by the name of the procedure and any parameters. For example, to add 10 units of product P500 to location 106, execute the following:
EXECUTE add_to_inventory(106, 'P500', 10)
To remove 10 units of procedure P500 from location 106, execute the following:
EXECUTE remove_from_inventory(106, 'P500', 10)
As an exercise, try creating a new stored procedure that will transfer a given product from one location to another location.
In this section, we have shown some basic forms of triggers and stored procedures. For additional information and examples on the PL/SQL language, please refer to the Oracle PL/SQL User’s Guide and Reference. In addition you might consider this excellent book on Oracle PL/SQL:Oracle PL/SQL Programming:Covers Versions Through Oracle Database 11g Release 2 (Animal Guide)
You may also be interested in my Blog:So You Want to be a DBA?.
8. Acknowledgements
Please feel free to use these tutorials for your own personal use, education, advancement, training, etc. However, I kindly ask that you respect the time and effort I have put into this work by not distributing copies, either in whole or in part, for your personal gain. You may not under any circumstances download, cache or host copies of these tutorials on your own servers. Use of these tutorials for commercial training requires a special arrangement with the author or authors.